

Embed an Astrato dashboard in your web app
This page shows how to put an Astrato dashboard inside a page of your own website or product, so that people see live, interactive content without leaving your app. The word dashboard covers two different things in Astrato, so first pick the route that matches what you have.
Choose a route
Section titled “Choose a route”| You have | Use | Where the embed is configured |
|---|---|---|
| A Data App that you or your team built and published | Data App embedding | The Data App’s Public access tab, the CLI or MCP |
| A published workbook with a sheet, group or chart you want to show | Workbook embed link | Administration → Embed Links and the original Astrato app |
Both routes end the same way: you paste an address into an <iframe> on your page. They use
different allow lists. A host added for workbook embed links does not let a Data App be
embedded, and the reverse is also true.
If you want governed charts that your own code draws, rather than a framed dashboard, use the externally hosted app quickstart instead.
Before you start
Section titled “Before you start”Use this checklist. Items marked with a route apply only to that route.
- A site you control that serves HTTPS, and a page where you can add an
<iframe>. Not every web-based text editor accepts<iframe>, so check the platform you embed into. - An administrator or owner to switch on External embed links on the General tab of System settings. Creators cannot change it. Ask them for that setting and give them the exact host name of your site. A Data App’s Public access tab needs the same switch for public access and embedding.
- Data that the viewer may read. For a link that anyone can open, the semantic layer and its data connection must both be Visible to everyone. See Manage resource access.
- Workbook route: a Creator role or higher, and a workbook that is already published.
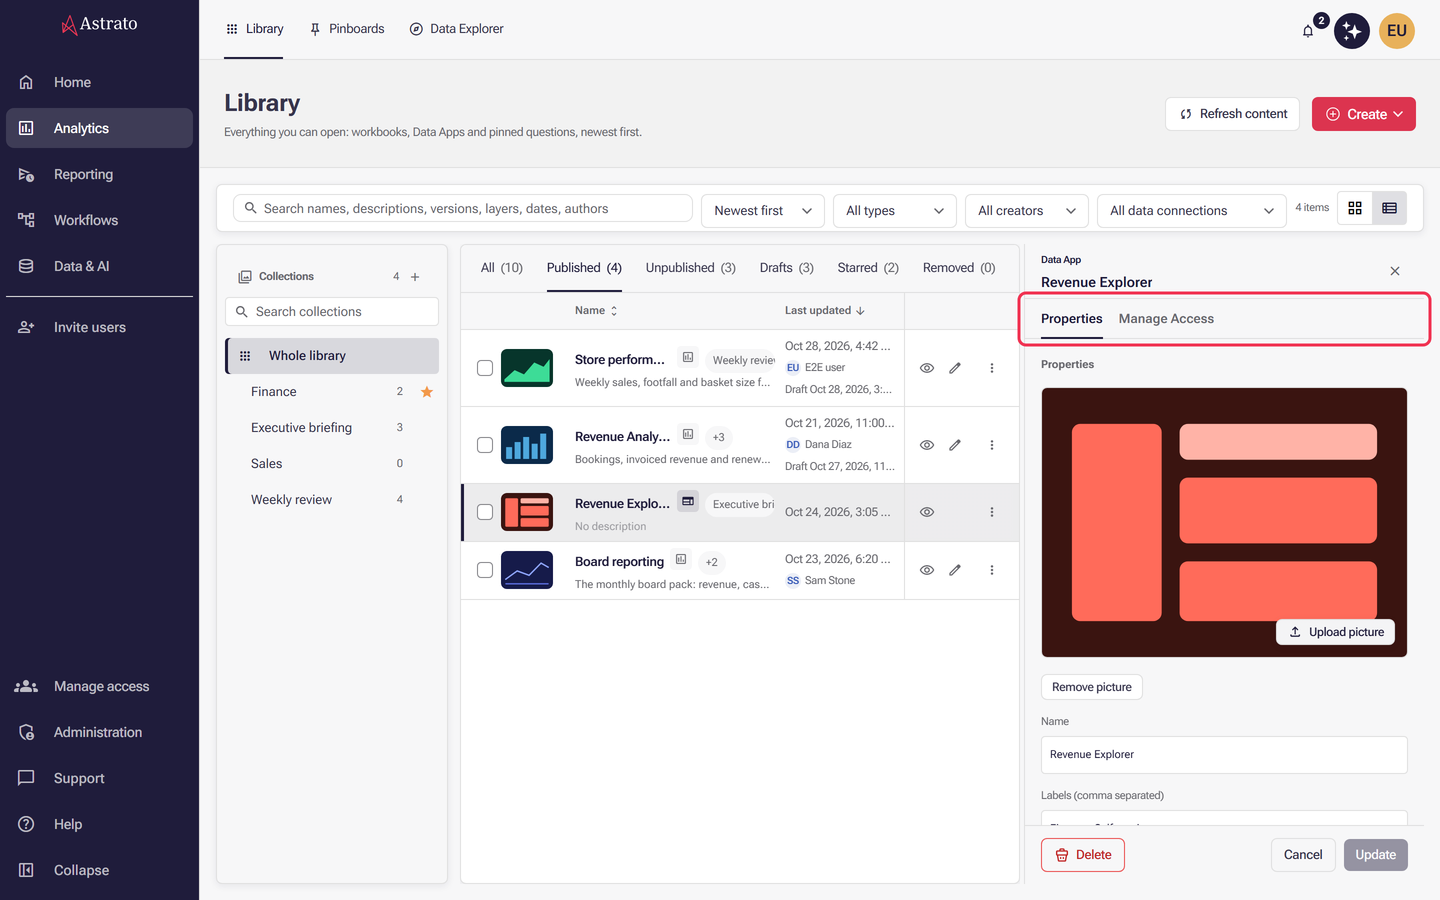
- Data App route: a published Data App, Manage access permission on it, and an Astrato environment where publication access settings are switched on. Where they are off, the Public access tab, CLI settings and MCP settings are not offered. To check, open the property panel of a Data App you can manage, as in Route 2. If the panel has a Manage Access tab but no Public access tab, the settings are off in your environment, and MCP refuses access changes with “Publication access settings are disabled by feature flag.” Astrato switches them on; see Check which preview features you have for how to ask, and for a picture of the panel without the tab.
- Data App route, public viewers only: the data connection must use one shared credential (a password, key pair or service account). A connection that signs each viewer in with their own identity cannot serve a public viewer.
Route 1: embed a workbook with an embed link
Section titled “Route 1: embed a workbook with an embed link”This route is for existing workbook content. For new work, see Route 2.
-
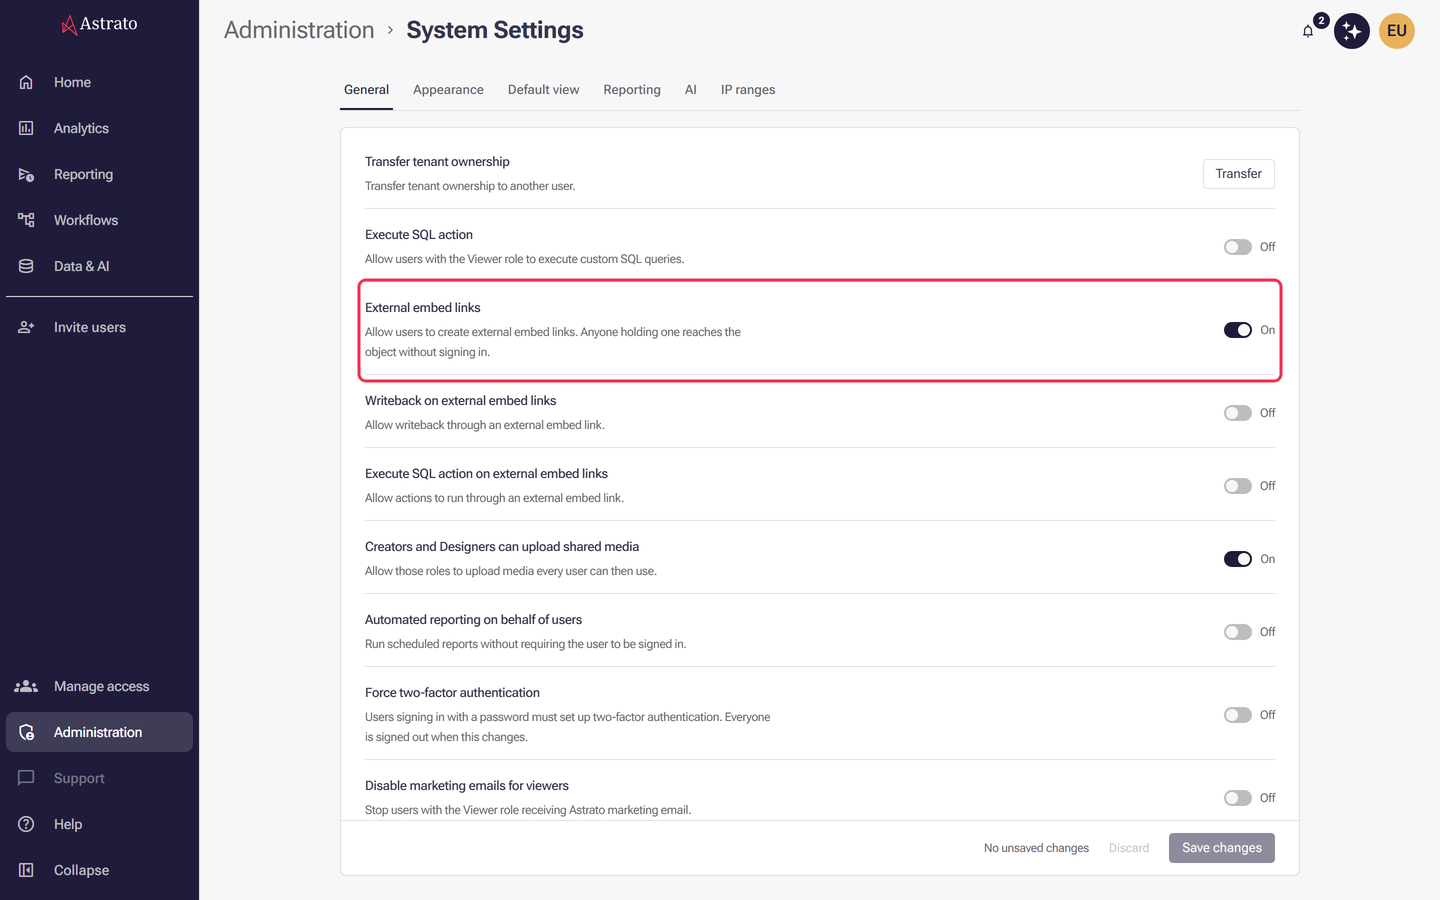
Ask an administrator to switch on External embed links in System settings if you want people without an Astrato sign-in to see the content. Restricted links, for signed-in colleagues, do not need it.
-
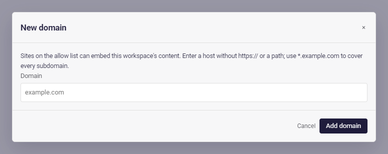
As an administrator, open Administration → Embed Links, select the Allow list tab and choose New domain. Enter the host of the page that will hold the iframe, for example
portal.example.com,*.example.comfor every subdomain, orexample.com:8443with a port. Do not typehttps://or a path. Select Add domain. See Manage embed links.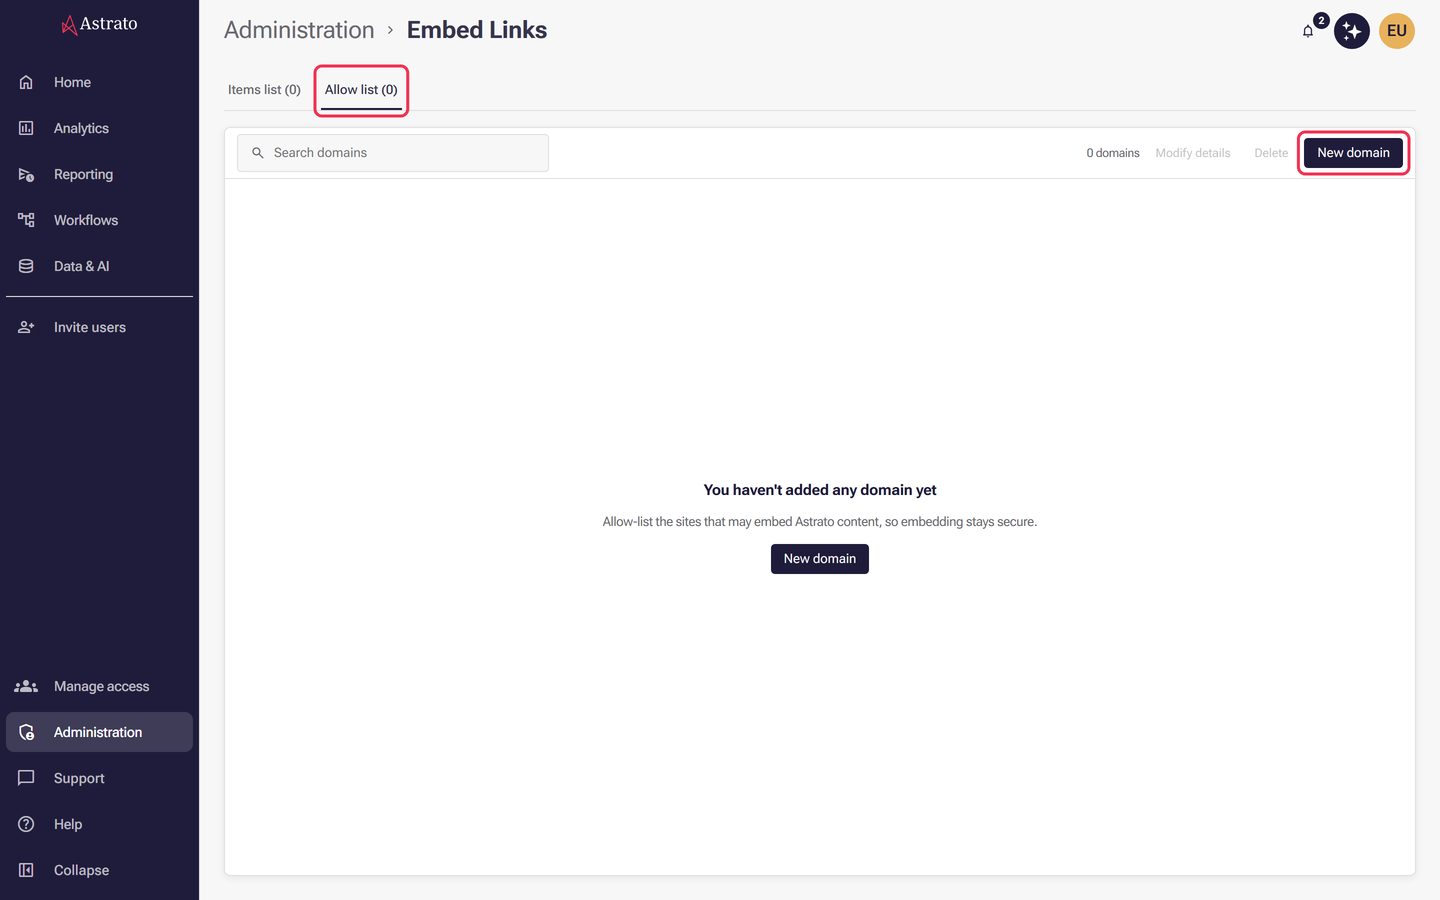
-
Open the published workbook, right-click the object (a chart, table or other item) or the sheet you want to show, and select Embed link. Choose what the link shows: Object, Group for the group the object belongs to, Sheet or Workbook. Object can be chosen only when you right-click an object, and Group only when that object is in a group.
-
In the Create … embed link dialog, under Who can view this?, select Restrict (only people invited to this organization can view) for signed-in colleagues, or External (anyone can view) for everyone. External is unavailable until External embed links is on.
-
Set the remaining options, then select Create:
- Expiration date is 14 days from today unless you change it. Tick Does not expire to keep the link without an end date.
- Enable data export lets viewers of the link export, download or send data.
- Description is optional. You can change it later on Administration → Embed Links.
- Include applied filter, under Customize, appears only while filters are applied, and builds them into the link. See Pass filters and variables in the address.
-
The dialog changes to Embed link successfully created. Select Copy Link for the address or Copy Embed Code for a ready-made
<iframe>. If the dialog warns “No domain added yet”, the allow list from step 2 is still empty. -
Paste the address into a browser tab first. If the content appears, the link works.
-
Add the iframe to your page, as shown below.
Where links are created
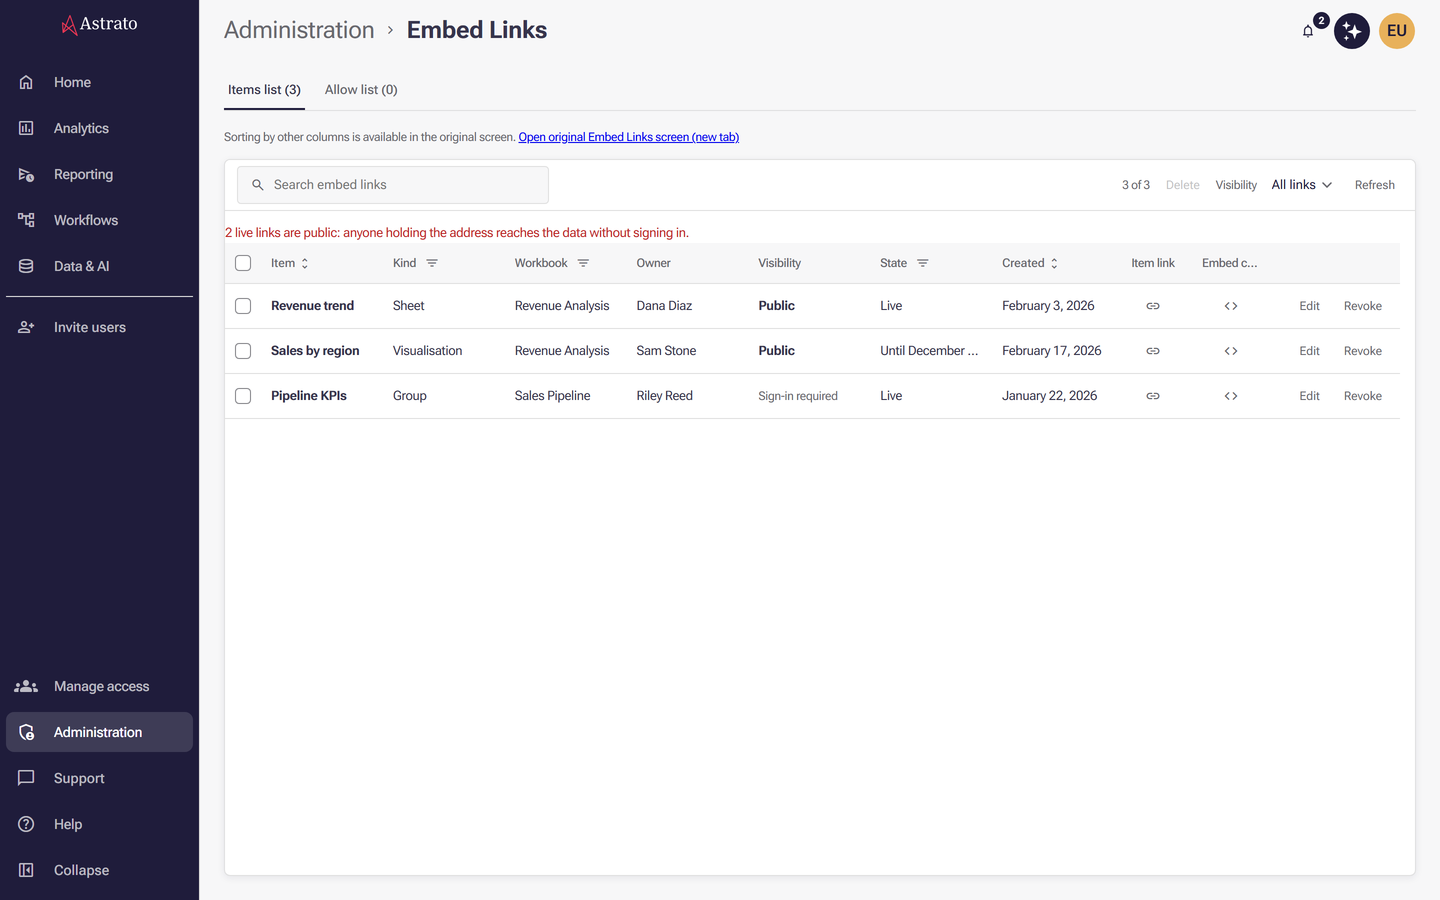
Section titled “Where links are created”The lobby page Administration → Embed Links is for reviewing, editing and revoking links that
already exist, and for the allow list. Each row on its Items list tab has two icon buttons,
Copy link in the Item link column for the address and Copy code in the Embed code
column for a ready-made <iframe>. The page does not create links: creating a new workbook link
happens in the published workbook, as in steps 3 to 6 above.
Route 2: embed a published Data App
Section titled “Route 2: embed a published Data App”-
Publish the Data App with the CLI or App Builder. See Manage Data Apps.
-
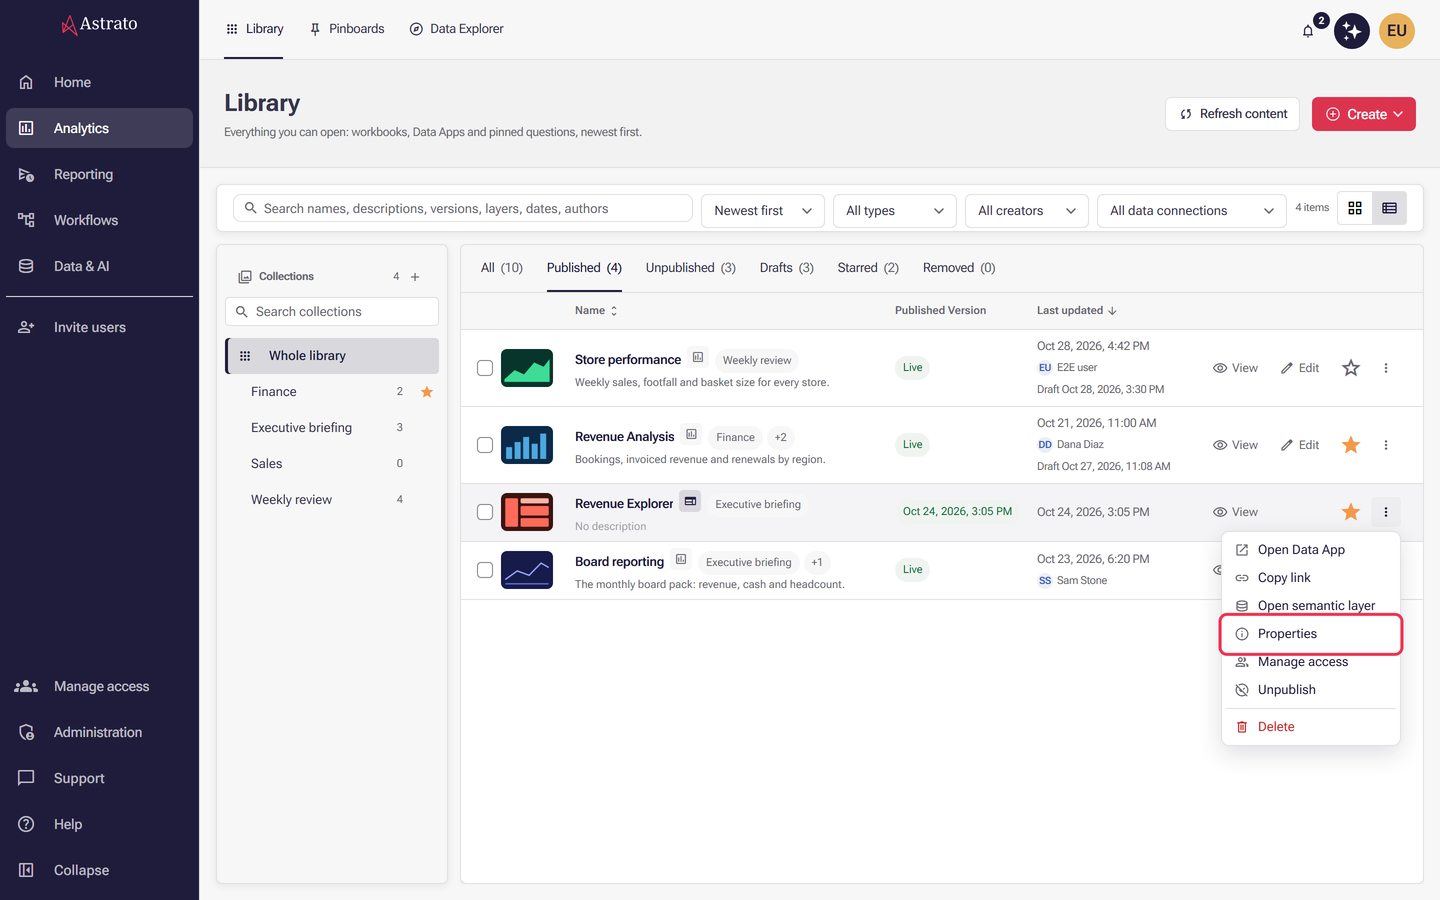
In the lobby, open Analytics, select the Published tab of the Library, open the app’s action menu (the three dots at the end of its row) and select Properties. For a published app you can also select its Published Version tag. Selecting the row itself opens the app instead. In the property panel, go to the Public access tab. If the panel shows Manage Access but no Public access tab, publication access settings are off in your environment.
-
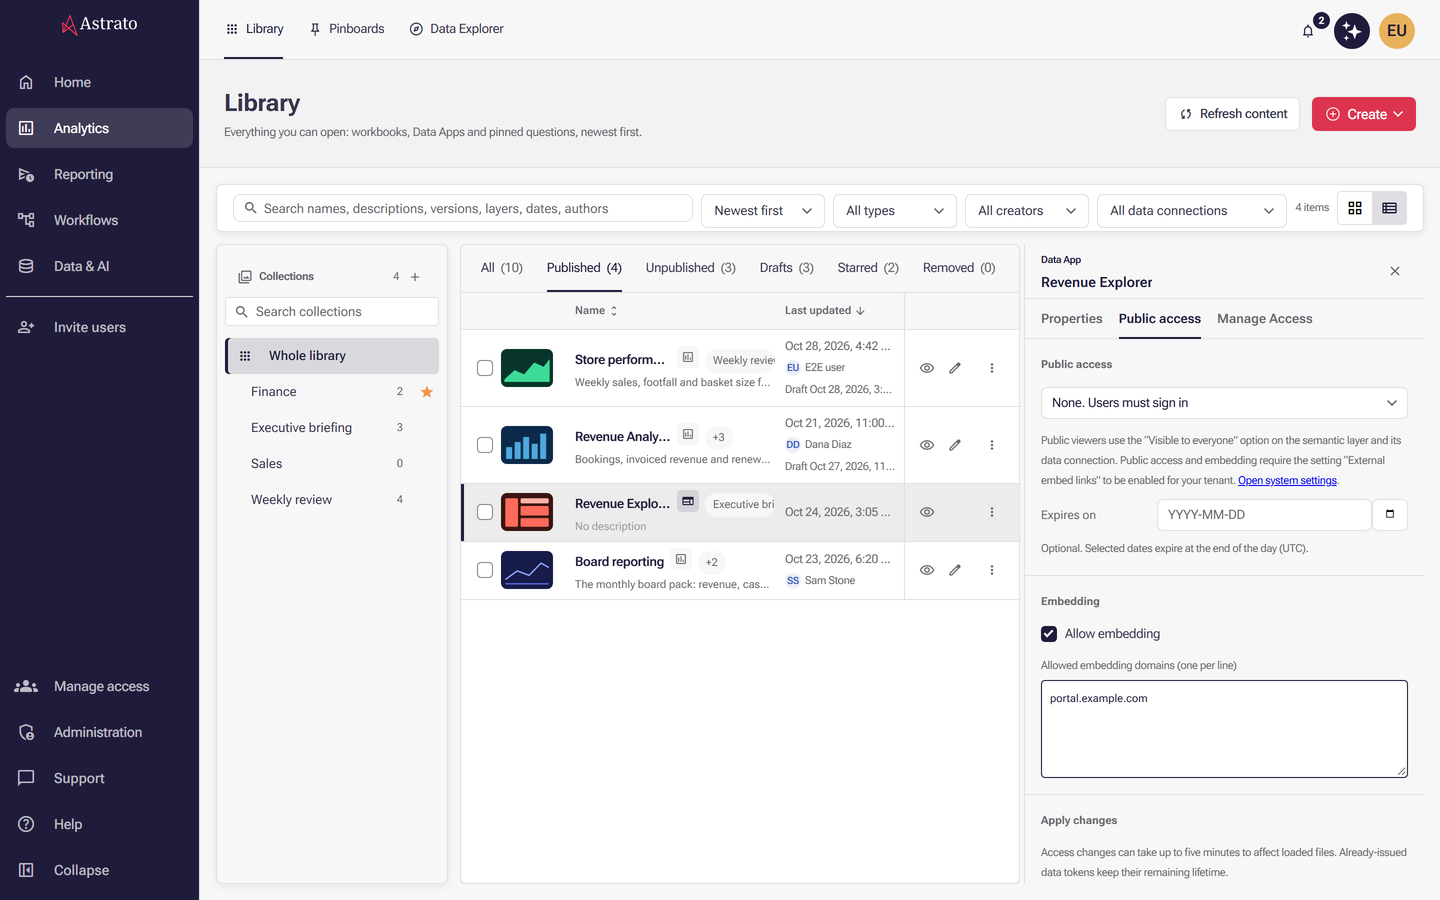
To let people without an Astrato sign-in see it, set the Public access list to Public. Anyone with the link can access. and apply the change. Leave it on None. Users must sign in if viewers will sign in; the embed then shows a sign-in button that opens a separate window.
-
Tick Allow embedding, and in Allowed embedding domains (one per line) enter the host of your page, for example
portal.example.comor*.example.com. If your page is itself inside another iframe, every ancestor frame host must be listed. -
Select Apply access settings.
-
Copy the app’s hosted address. It has the form
https://<publication-id>.<hosting-host>/: the app’s publication ID, then the host name of the location the app is published to, for examplehttps://0b111111-1111-4111-8111-111111111111.apps.example.com/. You can get it in three ways:- In the Library, point at View on the app’s row: the tooltip shows the address, and View opens it. Copy link in the row’s action menu copies it.
- With the CLI,
astrato publications get <publication-id>prints it on the line afterVersion:. - Over MCP,
astrato_dashboard_freeform_getreturns it asurl.
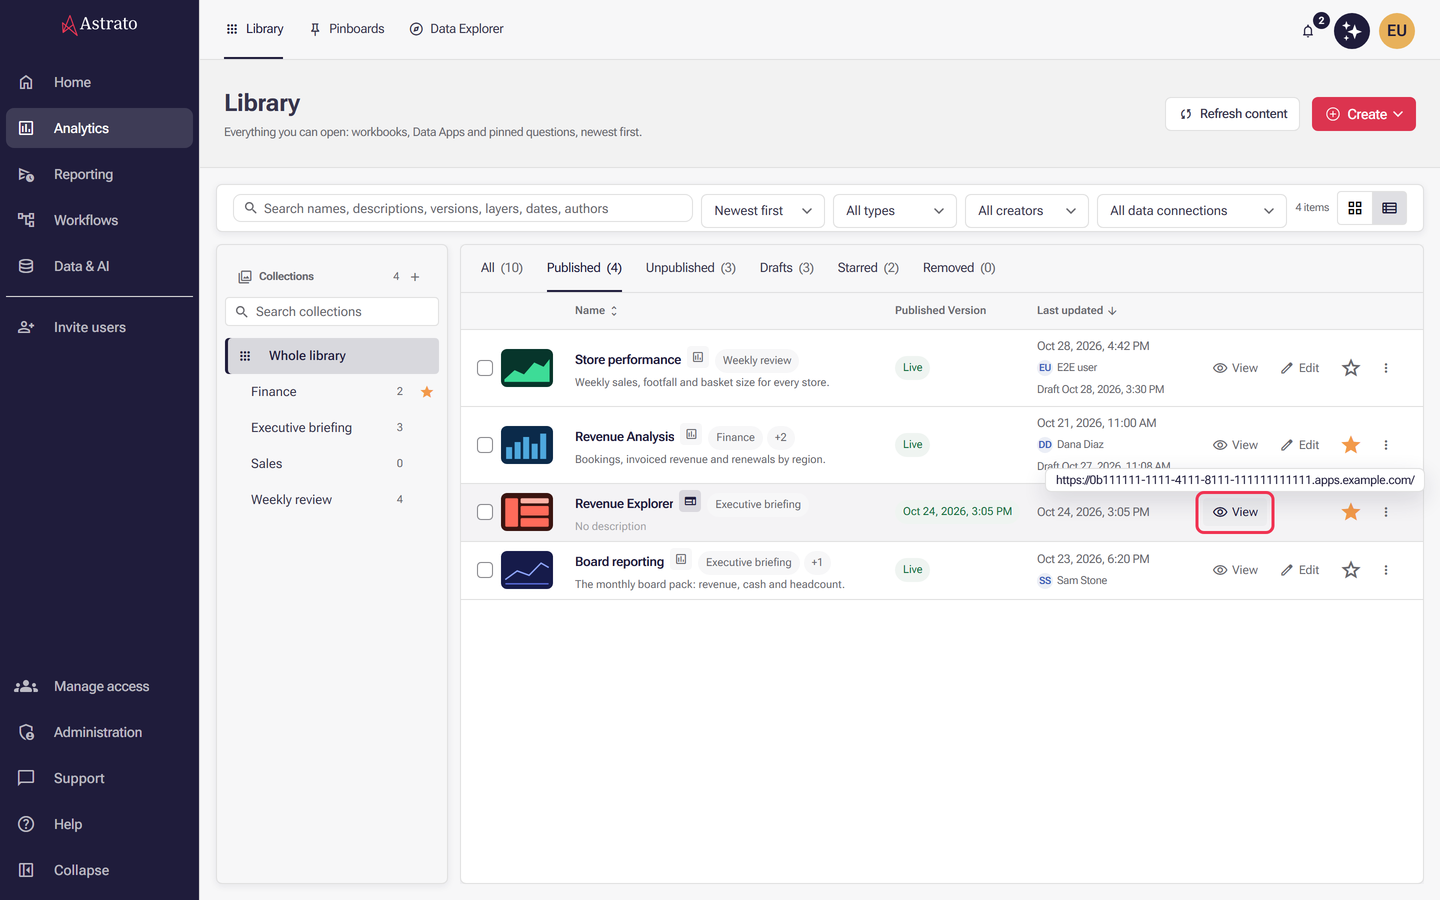
An app with no address shows no View or Copy link. MCP, and the CLI with
--json, give the reason asurlUnavailableReasoninstead of aurl. “This publication has no resolved hosting location. Publish its content through the Astrato CLI first.” means the app has not been published yet: publish it, then look again. “No canonical hostname is configured for this publication location. Ask your administrator to configure it.” means the location has no host name set up in your Astrato environment. Do not build the address by hand: send that message to Astrato support.
From the CLI, the same settings are:
astrato publications update <publication-id> --expected-version <version> \ --audience public --embedding true --embed-domain portal.example.com--embedding true without --embed-domain is refused with “Add at least one allowed embedding
domain.” Full flag details are in
Manage Data Apps.
The iframe snippet
Section titled “The iframe snippet”Both routes use the same markup. Replace the address with the one you copied.
<iframe src="https://YOUR-ASTRATO-ADDRESS" title="Sales dashboard" width="100%" height="700" style="border: 0"></iframe>Keep a meaningful title, because screen readers read it out.
A full host page
Section titled “A full host page”Save this as index.html, put your address in src, and serve it from a host that you have
added to the relevant allow list.
<!doctype html><html lang="en"> <head> <meta charset="utf-8" /> <meta name="viewport" content="width=device-width, initial-scale=1" /> <title>Our sales dashboard</title> <style> body { margin: 0; font-family: system-ui, sans-serif; } header { padding: 16px 24px; border-bottom: 1px solid #ddd; } iframe { display: block; width: 100%; height: calc(100vh - 62px); border: 0; } </style> </head> <body> <header><strong>Sales overview</strong></header> <iframe src="https://YOUR-ASTRATO-ADDRESS" title="Sales dashboard"></iframe> </body></html>What success looks like: the page shows your header, and below it the dashboard fills the rest of the window. You can click and filter in it as you would in Astrato. A public embed opens without a sign-in prompt. An authenticated Data App embed first tries to sign the viewer in without asking. If it cannot, the frame reads “Sign in to continue.” and shows a Sign in to open publication button, which opens the sign-in in a separate window.
Sign your own users in
Section titled “Sign your own users in”A public embed needs no sign-in, but it also shows every viewer the same data. When the people using your product must see only their own data, embed a restricted link or an authenticated Data App, and decide how those people get an Astrato session.
| Your users | Use |
|---|---|
| Already sign in to Astrato with your company IdP | Single sign-on. Once signed in to Astrato, they can open restricted links. |
| Sign in to your product, not to Astrato | The OEM management API (web tickets), so your backend signs them in for them. |
With web tickets, your product’s backend vouches for the user and Astrato creates the session, so the viewer never sees an Astrato sign-in page:
-
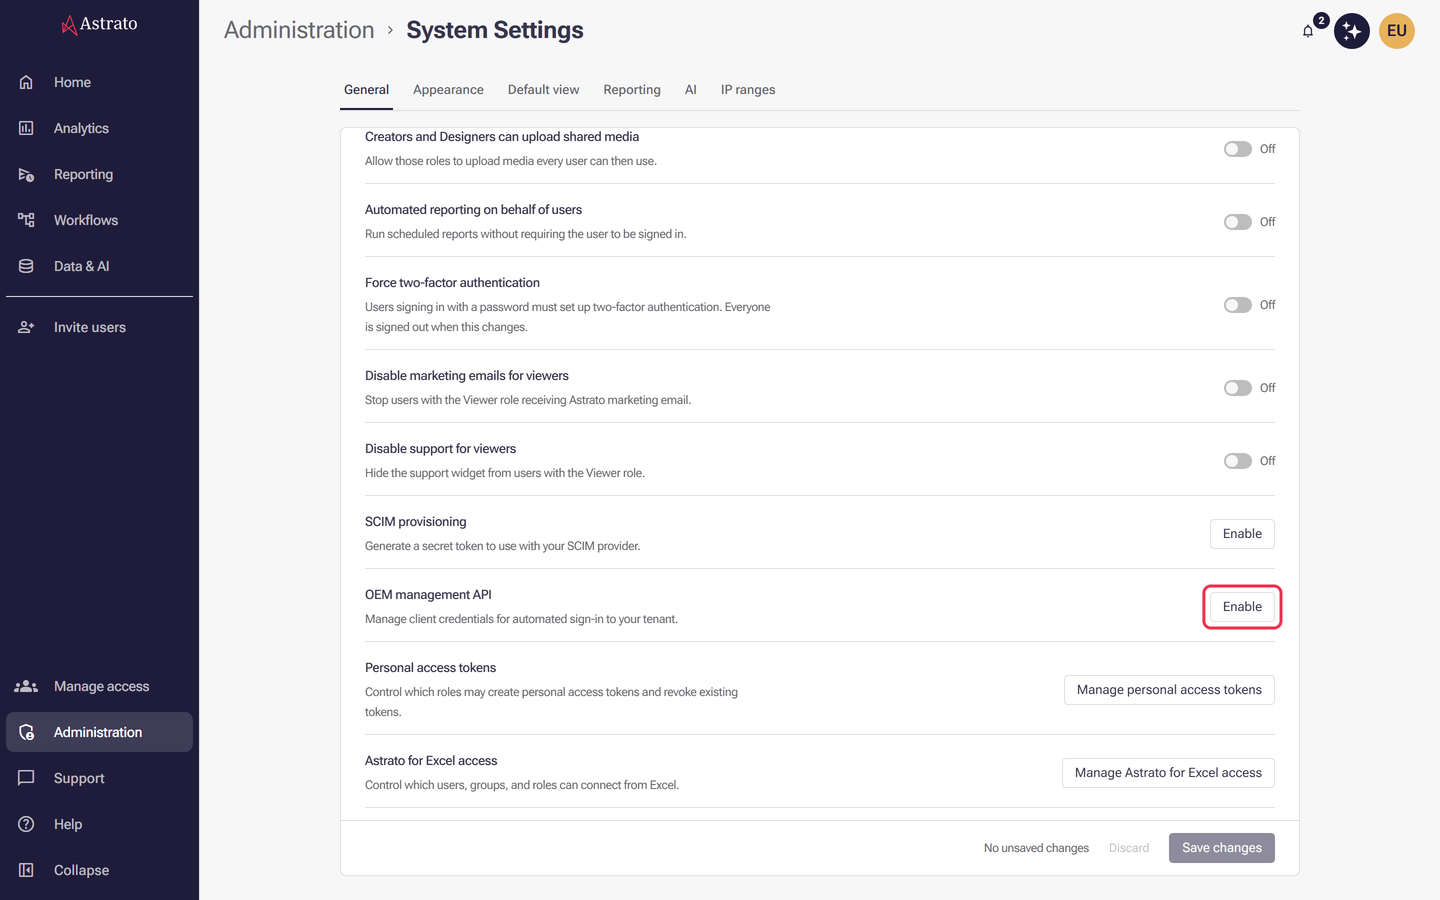
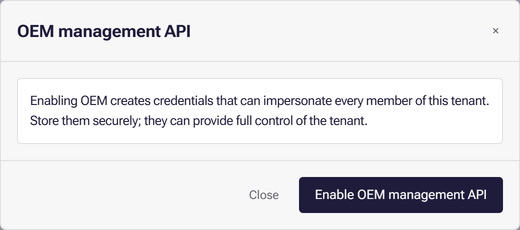
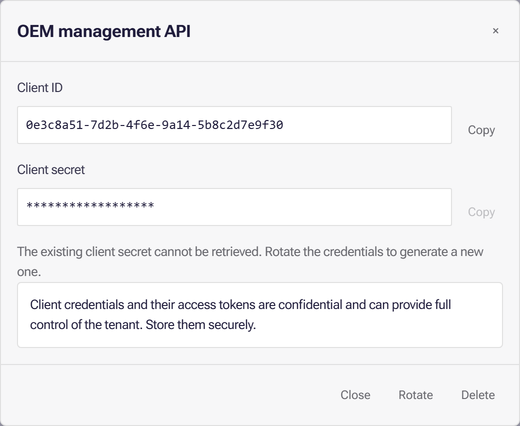
An administrator enables the API. On the General tab of System settings, find OEM management API and select Enable, then Enable OEM management API. Copy the Client ID and Client secret before closing the dialog: the secret cannot be shown again, and Rotate is the only way to get a new one.
-
Your backend gets a token. It exchanges the client ID and secret for a short-lived access token. Keep this on the server: the credentials can impersonate every member of the tenant.
-
Your backend asks for a ticket for the signed-in user, by email address, with the groups whose permissions they should have. A user who does not exist yet is created. The ticket is valid for 60 seconds.
-
The browser redeems the ticket, with the
embedparameter, before your page inserts the iframe. Astrato sets the session, and the embed then opens signed in.
The request bodies, the ticket address and a working example repository are in Auth: OEM API (Web Ticket Authentication). That article also shows how to pass filters into the embed through a browser event. For how each Astrato client authenticates, see Authentication.
Pass filters and variables in the address
Section titled “Pass filters and variables in the address”Your host page can tell the embed what to show by adding parameters to the address in src.
Workbook embed links read these parameters, either after ? or after #:
| Parameter | Effect | Example |
|---|---|---|
queryFilter=<field> in (<values>) |
Applies a filter. Join several with and. |
queryFilter=Sales/Territory/Country in ('United States') |
variable=<name>:<value> |
Sets a workbook variable. Repeat it for several variables. | variable=vTop:10&variable=vRegion:EMEA |
refreshData=<seconds> |
Reloads the data every that many seconds. | refreshData=300 |
A field is written as Schema/View/Field, as View/Field, or as the name of a dimension alone.
Put a name with spaces in single quotes, for example Default/Territory/'Sales Country'. A value
of the wrong type for its variable is skipped. Parameters after # can be changed while the
page is open: when your host page sets a new #queryFilter=… or #variable=… on the iframe
address, the embed applies it without reloading. Include applied filter in the
Create … embed link dialog writes the filters you have applied into the link for you.
Data Apps have no built-in address parameters. The address you embed opens the app, and the
query string after ? is kept through sign-in, so the app’s own code can read it from
window.location.search and apply it however the app is written.
For more examples, see Customising Embed links with URL parameters.
Does localhost work?
Section titled “Does localhost work?”It depends on the route, because the two allow lists check different things.
- Data App route: yes. The per-app list accepts the literal
localhost, optionally with a port such aslocalhost:5173. Add it to Allowed embedding domains. - Workbook route: only a few forms. The allow list accepts
localhost,http://localhost,https://localhostandhttp://localhost:4848. Any other local port, such aslocalhost:3000, is refused with “Invalid domain URL. URL can not contain protocol or paths.” For a real host name a port is allowed, for exampleexample.com:8443. If you cannot use one of the accepted local forms, test from a real host name that you control.
If the frame is blank
Section titled “If the frame is blank”A blank frame usually means the browser refused to show Astrato inside your page. Astrato shows no error in the frame for this. Work down the list.
- Open the browser developer console on your page. A blocked embed is reported there as a
frame-ancestorsviolation, and nowhere else. - Check the host against the right allow list. The page’s host must be in the workbook Allow list for a workbook link, or in the app’s Allowed embedding domains for a Data App. A host in the wrong list has no effect.
- Match the exact host.
example.comdoes not coverwww.example.com; use*.example.comfor subdomains. If your page uses a port, include it. - List every ancestor if your page sits inside another iframe.
- Workbook route: if you see “Domain not added. Please contact your administrator”, the domain is missing from the allow list.
- Check the switches. A public workbook link also needs External embed links enabled
and a link that is active and not expired. A Data App with Allow embedding off fails with
403 embedding_disabled. - Check cookies. Embedded Data App sessions need browser support for partitioned cookies; if browser policy blocks them, open the app directly. Restricted workbook links do not display in a private (Incognito) window.
- Allow up to five minutes for a Data App access change to reach files already authorized for a viewer.
If it still fails, collect the console message and the address you used and send them to your administrator or Astrato support.
What next
Section titled “What next”- Manage embed links — review, edit and revoke workbook links, and manage the allow list.
- Manage Data Apps — public access, expiry and the per-app embedding list.
- Auth: OEM API (Web Ticket Authentication) — the web ticket requests for signing your own users in.
- Set up single sign-on — connect your identity provider so colleagues sign in once.
- Authentication — which sign-in mechanism each Astrato client uses.
- Embedding and sharing interactive analytics — restricted versus external links, filters and variables in the link.
- Externally hosted app quickstart — draw governed charts from your own code.