

Creator or above
How access works
Astrato answers “who can open this?” with four separate ideas. They are easy to mix up, mostly because the word “team” is used for one of them and means something different from what you might expect. This page names each one, says what it controls, and walks through one complete example.
Before you start: you need the Owner or Admin role to create groups and to open Administration → Access Overview. Creators can browse groups, and can manage access on a resource only when they have permission to manage access for that resource.
The four ideas
Section titled “The four ideas”| Idea | What it controls | Where you set it |
|---|---|---|
| Role | What a person can do in the workspace as a whole | Administration → Users, or when you invite |
| Group | A named set of people that you grant access to once | Administration → Groups |
| License team | Which share of your license a person’s usage counts against | Administration → License Teams, or on the person |
| Collection | Which workbooks sit together, and who can open them | Share on the collection’s properties panel |
A role is one of Owner, Admin, Creator, Designer or Viewer, and every person has exactly one. The role decides what a person may do at all, such as inviting users or creating semantic layers. It also limits what you can grant: Everyone, and any person or role that is not Owner, Administrator or Creator, can only be given View on a semantic layer or data connection. See Users to change a role.
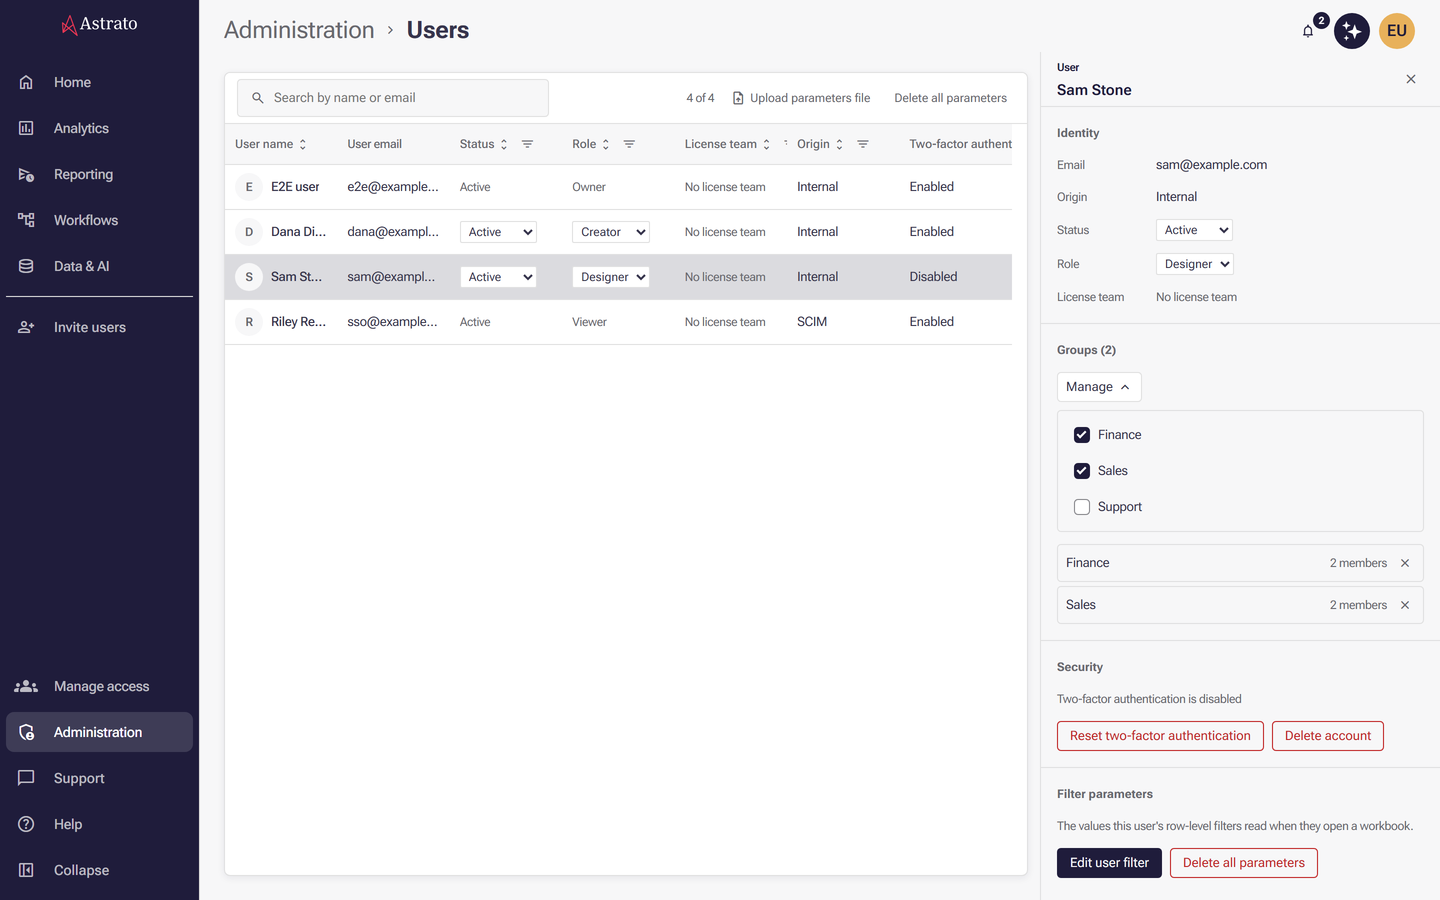
Groups
Section titled “Groups”A group is a named set of people. Instead of granting a layer to ten people one at a time, you grant it to a group once, and everyone in the group gets it. Add someone to the group and they gain the access; remove them and they lose it. Groups can be filled by hand, by assignment rules, or by your identity provider through OIDC group sync or SCIM (see Keep groups in step with your identity provider).
License teams
Section titled “License teams”When the Administration area says team, it means a license team: a share of your license that people are allocated to, so that seats and credits can be counted separately. A license team does not grant access to anything. Putting someone in a license team changes how their usage is counted, not what they can open. To give people access, use a group. See License teams.
Collections
Section titled “Collections”A collection holds workbooks. Access granted on a collection reaches every workbook inside it, which is why Access Overview shows a collection’s grants on each of its workbooks. Semantic layers and data connections are not held in collections; each has its own access panel. A collection’s access opens from Share on its properties panel rather than from a tab; see Share a collection with the group.
How they combine
Section titled “How they combine”A person’s access to a resource is everything that reaches them, added together: a direct grant to them, a grant to any group they belong to, a grant to their workspace role, a grant to Everyone, and ownership. Owners and administrators can always open everything. Because access adds up, removing one grant does not remove access that arrives another way. See Manage resource access.
A data connection carries its own access, separate from the semantic layers built on it. A group that can open a layer but not its connection may not be able to query it, so check both.
Plan your groups
Section titled “Plan your groups”Decide the groups before you grant anything. Grants made to people one at a time are the ones nobody can account for later.
- One group per business function. Name groups after the work people do, such as
Sales,FinanceorSales Operations, not after a person or a project that will end. A new hire then needs one change, their membership, and someone who leaves loses everything the group gave them when they are removed from it. - Grant to groups, not to people. A direct grant on a person does not show on the group and survives a change of job. Keep direct grants for exceptions, and review them in Access Overview, which labels each one Direct grant.
- Let the role set the ceiling. A role is not a way to share content; it decides how much a person may be given at all. A Viewer or Designer granted directly can only get View, on any resource. A grant to a group is never capped this way, so people who should only read belong in groups that are only given View.
- Use Everyone sparingly. Add access lists it as Visible to everyone. A grant to it reaches every account in the workspace, including the ones invited later, and it can only be View. Keep it for content that really is for everybody.
- Grant to a workspace role (Roles in Add access) only when access genuinely follows the role, such as every Creator building on one sandbox connection.
- Fill groups automatically where you can. Assignment rules and your identity provider keep membership right without anyone having to remember it.
Then write the plan down as a matrix: one row per group, one column per resource, and the profile in each cell. For two groups it might look like this:
| Group | Sales layer |
Finance layer |
Lakehouse connection |
Sales collection |
Pipeline Data App |
|---|---|---|---|---|---|
Sales |
View | none | View | View | View |
Finance |
View | Edit | Create | none | none |
Each cell is one grant to make. A layer in a row without the connection it reads is a mistake: the
group can open the layer and gets no data. License teams are not a column, because they change how
usage is counted, not what anyone can open. The Sales row is the worked example below.
To start your own, copy this template into a spreadsheet or a document, replace the placeholders in angle brackets with your groups and resource names, and add a column per resource:
Group,<layer name> (semantic layer),<connection name> (data connection),<collection name> (collection),<app name> (Data App)<group name>,View,View,View,View<group name>,none,none,none,noneUse only the profiles each kind of resource offers, or none:
| Resource | Profiles |
|---|---|
| Semantic layer | View, Edit, Full access |
| Data connection | View, Create, Edit, Full access |
| Collection | View, Edit |
| Data App | View, Edit, Full access |
Workspaces on legacy resource access offer View and Edit on a semantic layer, and View, Create and Edit on a data connection; see Manage resource access. Once the grants are made, compare them with the plan in the Matrix view of Access Overview: add a column per group and read across. Matrix covers semantic layers, data connections, collections and workbooks, so check the Data App column on each app’s Manage Access tab.
To show different rows of one layer to different groups, add a security rule that compares a column
with $userGroupNames rather than building a layer per group; see
Restrict rows with a security rule.
Worked example: give a Sales group access to a layer and a connection
Section titled “Worked example: give a Sales group access to a layer and a connection”In this example a group called Sales should be able to use one semantic layer and the data
connection behind it. Replace the names with your own. The sections after it give the same
group a collection and a Data App, and put a member in a license team.
Before you start: you need the Owner or Admin role to create the group, and permission to manage access on the semantic layer and the data connection.
-
Open Administration → Groups, select New group, enter
Salesas the Group name, add an optional description, and select Create group. The group appears in the list. -
Select the
Salesgroup, then select Add user to group. Search by name or email, tick each person to add, and select Add to group (it reads Add 2 people and so on when you tick several). Pending invitees can be added too. Members appear in the group’s member list straight away; there is no further save step.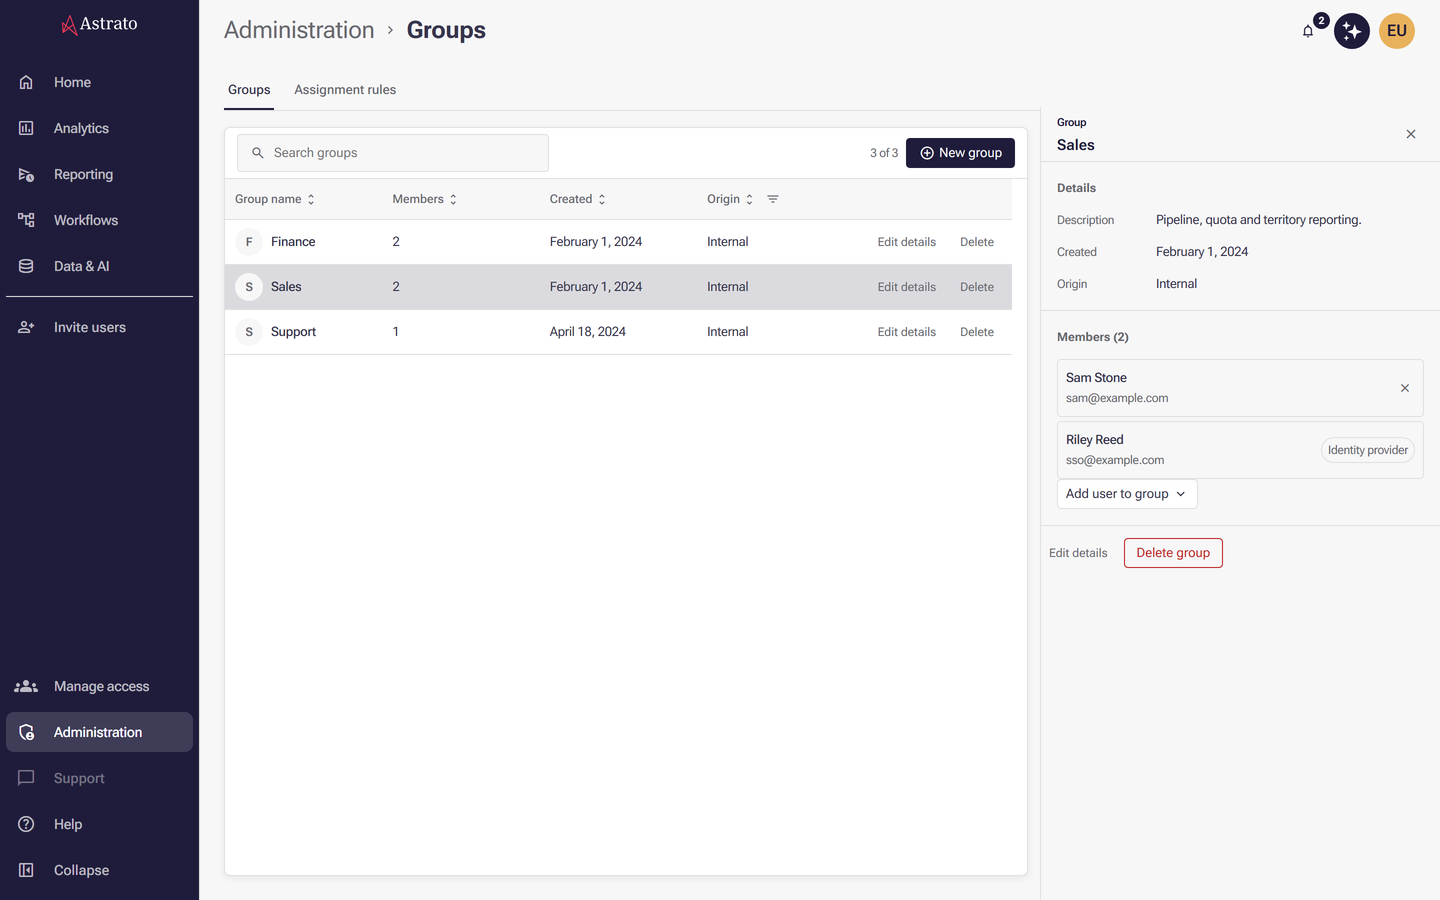
-
Open Data & AI on its Semantic Layers tab. Open the actions menu at the end of the layer’s row and choose Properties, or Manage access if you can manage the layer’s access but not edit it, then select the Manage Access tab. Under Add access, choose Groups, type
Salesin Search groups and add it. Its row then offers the profiles; leave View if the group should only use the layer. Select Update.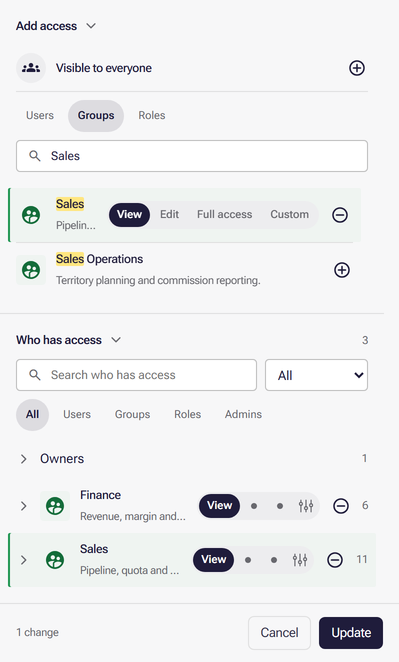
-
On the Data Connections tab of Data & AI, open the connection’s actions menu, choose Properties or Manage access, and select the Manage Access tab. Add
Salesthe same way and choose View, or Create if the group should also build semantic layers on the connection. Select Update.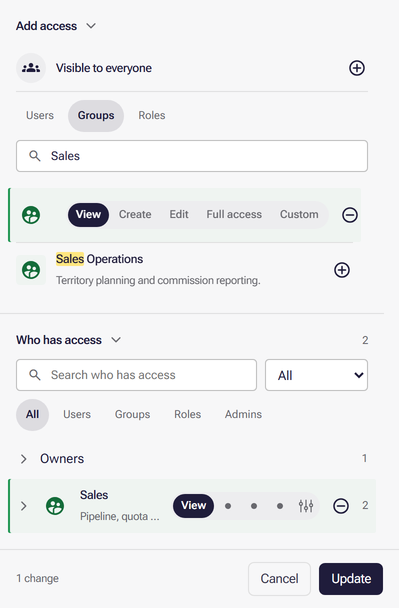
-
Open Administration → Access Overview and stay in its People view. In the list of people and groups, choose
Sales. Its Access tab lists everything the group reaches, each row marked Through Sales. Choose one of its members in the same list to see that person’s own grants plus every grant that reaches them through the group.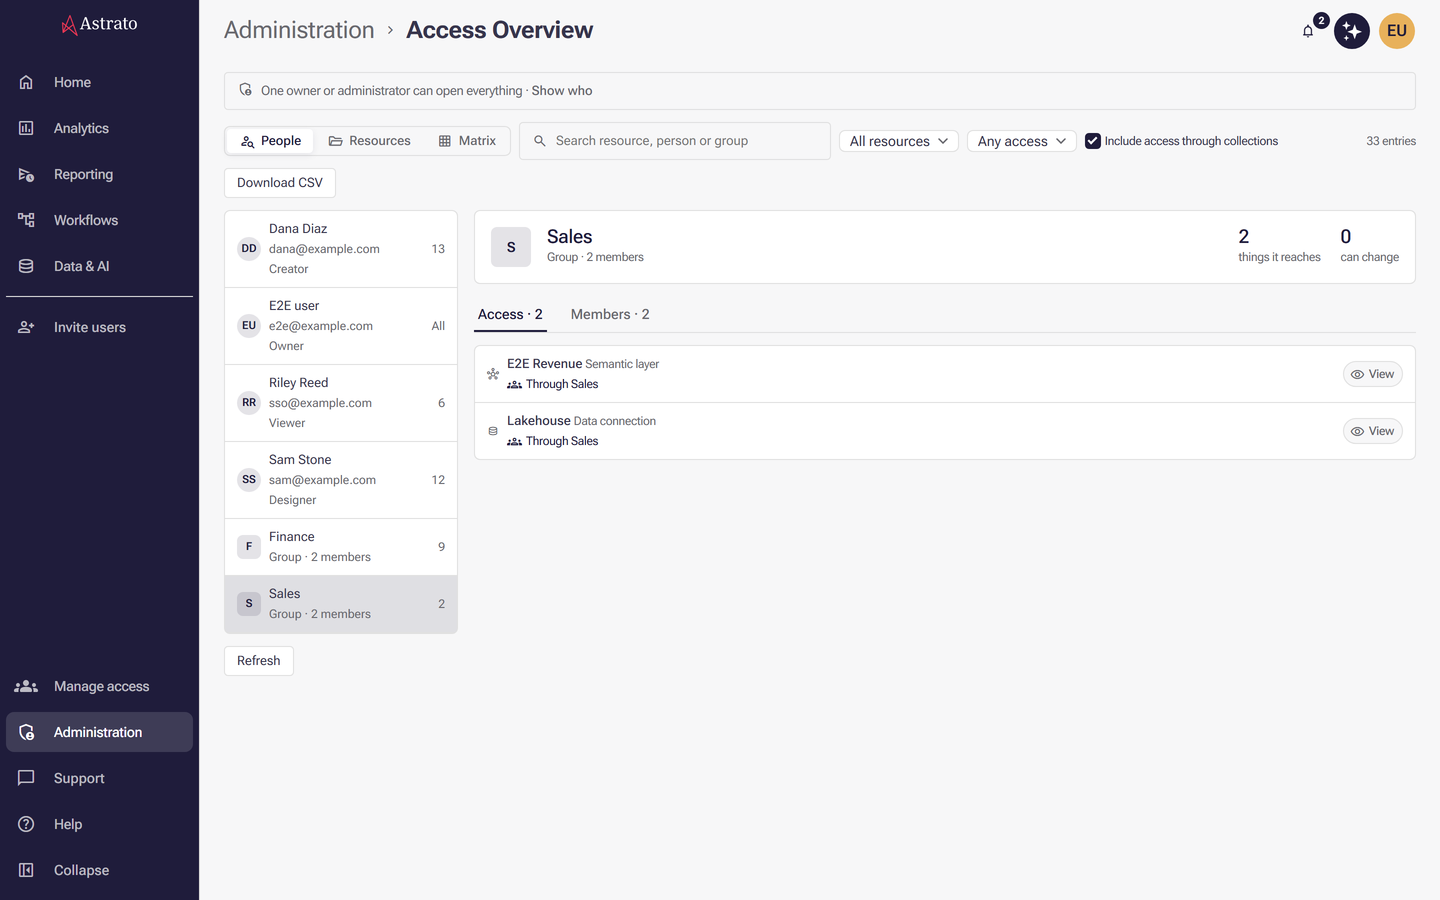
Choosing a member shows the same two rows under Through Sales, alongside anything that reaches that person another way, such as their role or Everyone:
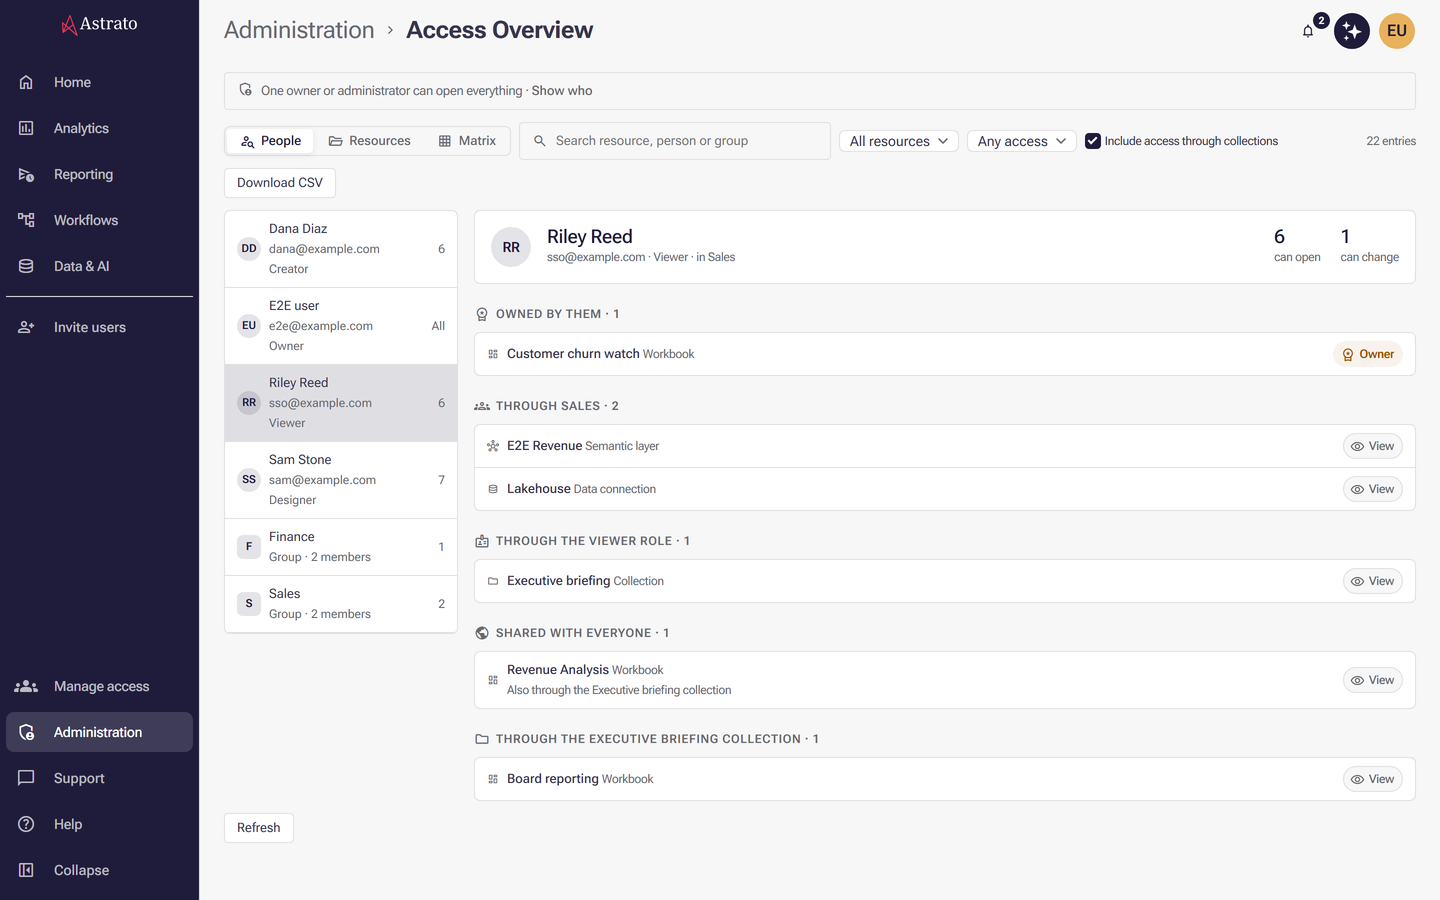
You are done when the Sales group has a row for the layer and a row for the connection in
Access Overview, at the access level you chose, and each member lists both resources. A member who
also owns one, has it shared with them directly, or reaches it at a stronger level another way sees
it under that reason instead, with Sales named after Also on its row.
If a row is missing, the grant did not save. Reopen the resource’s access panel: changes only take effect after you select Update, and a failed update leaves your draft in place so you can retry. If a member still cannot open the resource, check that they can also reach the connection behind the layer, and that they are in the group: Access Overview shows their grants Through Sales only once they are. If you granted the person directly rather than through the group, their role may have capped the grant: a Viewer or Designer can only be given View, and the closed profile buttons say “Only owners, administrators and creators can be given more.”
A member who opens a semantic layer they cannot read is told it is unavailable and offered Request access, which notifies the layer’s owners and the administrators. See Review permission requests.
Share a collection with the group
Section titled “Share a collection with the group”Before you start: you need to own the collection, or have the Owner or Admin role.
- Open Analytics. In the Collections list beside the Library, select the collection. The list narrows to it and its properties panel opens.
- Select Share on the bar at the top of the panel. The access controls open inside it.
- Under Add access, choose Groups, search for
Salesand add it. A collection offers View and Edit. - Select the Update directly below the access controls. The Update at the foot of the panel saves the collection’s name and description, not its access.
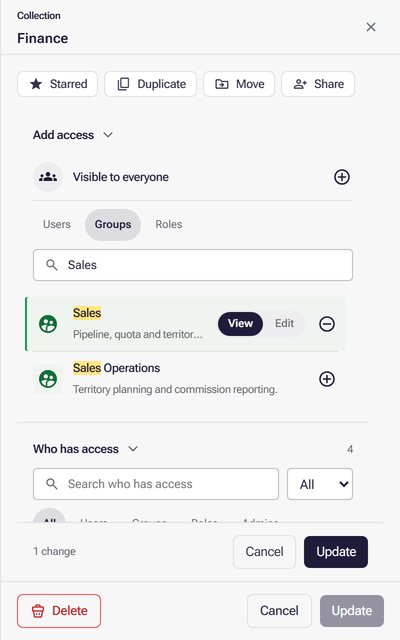
Every workbook in the collection now reaches the group, and so does any workbook added to it later. Owners and Admins can make the same grant in Administration → Access Overview: open the collection in Resources and choose Give access.
Give the group a Data App
Section titled “Give the group a Data App”Before you start: you need Manage access permission on the app.
A Data App has its own access, separate from the layer and connection it reads.
- Open Analytics. In the Library, open the three-dot menu at the end of the app’s row and select Manage access. The property panel opens on its Manage Access tab.
- Under Add access, choose Groups, search for
Salesand add it with View. - Select Update.
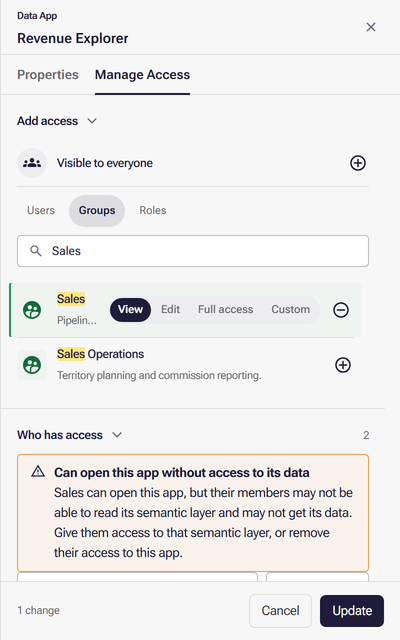
Edit also lets the group change the app’s details, and Full access adds Publish, Delete and Manage access. Access Overview does not list Data App grants, so check them on the app’s own Manage Access tab. Until the group can also read the app’s semantic layer, the panel warns that it can open the app without access to its data; step 3 above clears that, and step 4 lets the layer’s data load. See Manage Data Apps.
Put a member in a license team
Section titled “Put a member in a license team”Before you start: you need the Owner or Admin role, and at least one license team.
A license team grants nothing, but it decides whose share of the license a person’s usage counts against.
- Open Administration → Users and select the person’s row.
- In the properties panel, under Identity, choose a team in License team. The change saves as you pick it; there is no save step.
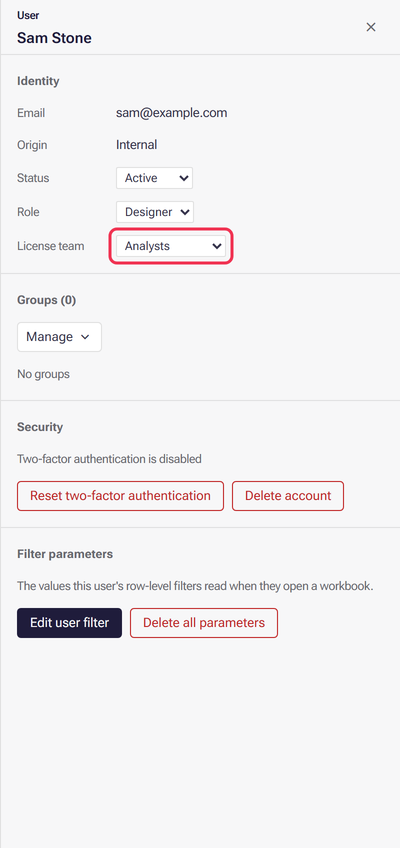
The same picker is in the row’s License team column. See License teams.
Keep groups in step with your identity provider
Section titled “Keep groups in step with your identity provider”If your workspace uses single sign-on, groups can be filled from your identity provider instead of by hand. Members provisioned by SCIM are labelled Identity provider in the member list and cannot be removed in Astrato: change them in your identity provider.
- Sync groups and roles reads each person’s role and groups from the sign-in token every time they sign in. It replaces memberships you added by hand, except those from assignment rules.
- SCIM provisioning lets the provider create, update and deactivate users and groups, and is turned on under System settings.
Older wording in imported help articles
Section titled “Older wording in imported help articles”Some imported help articles use older labels. The current ones are the ones on this page. In Data & AI, a semantic layer and a data connection both have a Manage Access tab on their properties panel. Inside the semantic layer editor, the Manage access button in the left rail opens the same controls on a panel whose tabs read Properties and Access. A collection is shared with Share on its properties panel. The Members button is gone, a group needs no save step after you create it or add a member, and team means a license team.
What next
Section titled “What next”- Manage groups and assignment rules - create groups and fill them automatically.
- Manage resource access - the profiles and rules for layers and connections.
- Review access across the workspace - check who can open what.
- License teams - seats and credits, which are separate from access.
- Restrict rows with a security rule - show each group only its own rows of a shared semantic layer.