

Inviting & Managing Users, Roles, Teams & Groups
Introduction to User Management
Section titled “Introduction to User Management”The options for managing Users and Teams are visible in the Administration area of Astrato.
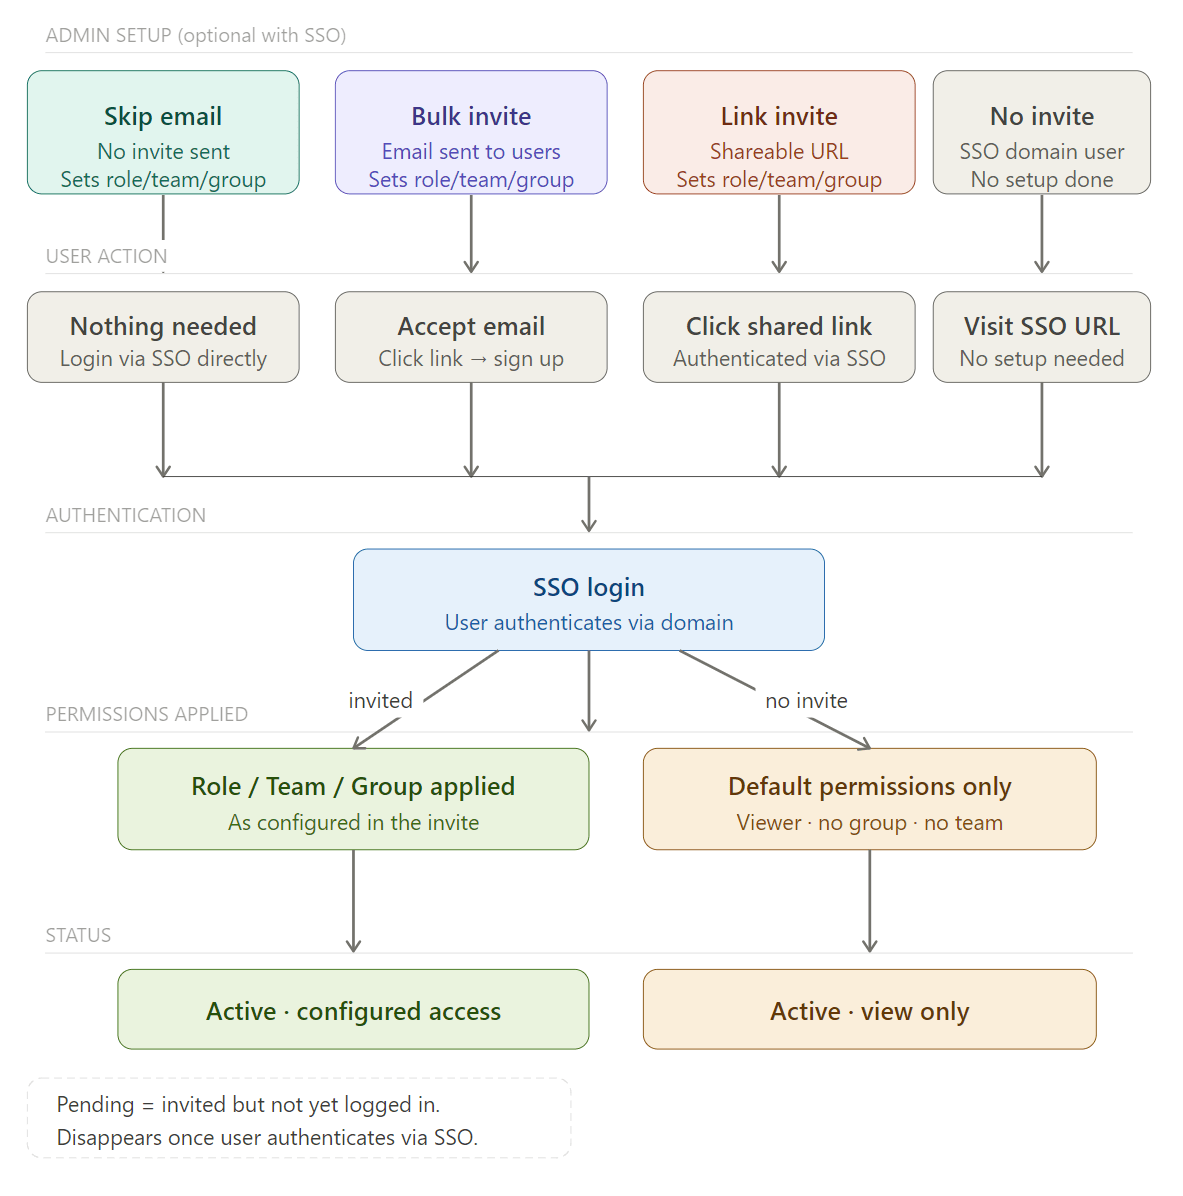
There’s no need to import users into Astrato. From the sidebar, click Invite Users to add Users or Teams. When your users accept their invitation and log in to Astrato, their account status changes from Pending to Active.
Please note: the User section and the list of users are visible to all user roles; however, the Teams option and the bulk of Administration functions are not.
Contents
Section titled “Contents”-
Creating Teams
User Roles
Section titled “User Roles”Astrato offers user roles with different permission levels - Owner, Administrator, Creator, Designer, and Viewer.
Other user management functions include:
-
Invite users: click Invite, or use the menu item Invite users to your Astrato tenant.
-
Filter: click the filter icon beside Status, Role, Team, or Origin to narrow the user list.
-
Search: type a user’s name or email in the Search field to find them quickly.
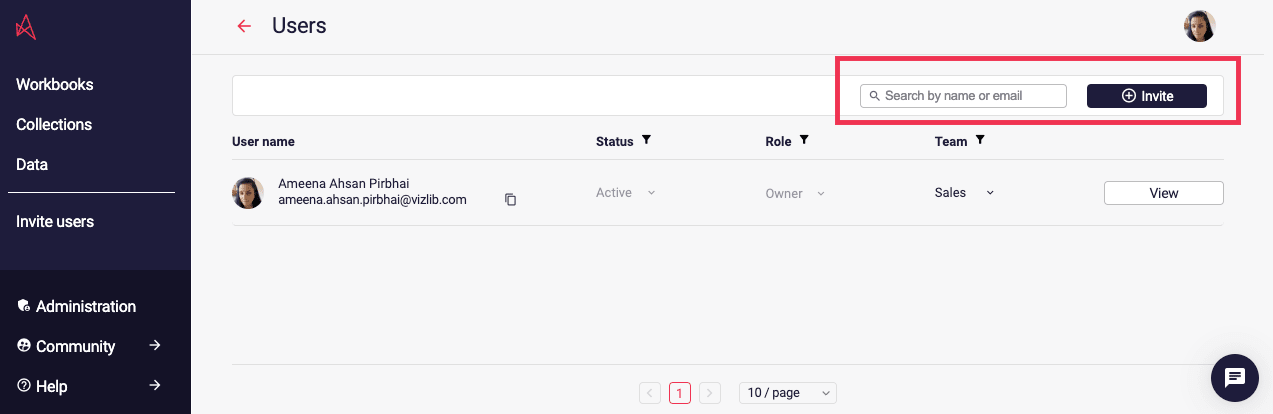
Figure 1: Viewing users in your Astrato tenant.
Find people in the refreshed lobby
Section titled “Find people in the refreshed lobby”Owners and administrators can open Administration → People to search, sort and filter the workspace directory, including pending invitations.
- Click User name, Status, Role, License team, Origin, or Two-factor authentication to sort. Click again for descending order, and a third time to return to the default order.
- Open the filter beside Status, Role, License team, or Origin and select one or more values. Users can match any selected value within a column and must match every filtered column. The role filter includes the owner; origin offers Internal and SCIM.
- Search by name or email. Search, sorting and filters apply to the entire directory. Load more adds the next matching users; the count shows how many matching users are loaded out of the total.
- Choose Clear sorting and filters to reset the table, or Clear filter in a column menu to reset only that column. Filters remain available when no users match.
When you edit a user with sorting or filters active, loaded rows and the user’s panel stay visible while the results refresh. If the refreshed results exclude that user, their panel closes. A failed refresh keeps the rows and panel visible and shows an error.
Find groups in the refreshed lobby
Section titled “Find groups in the refreshed lobby”Owners and administrators can open Administration → Groups to search, sort and filter groups. Each row’s Edit details and Delete buttons are on the right.
- Click Group name, Members, Created, or Origin to sort ascending. Click again for descending order, and a third time to restore the original order.
- Open the filter beside Origin and select Internal, SCIM, or both. Name search combines with the selected origins.
- These controls apply to all groups before pagination. Changing a control returns to the first displayed page; Load more groups shows additional matches.
- Use Clear filter in the Origin menu or Clear sorting and filters above the table to reset your choices. These controls remain available when no groups match.
-
Create, add, and delete permissions for Workbooks, Collections, and all functions in Administration settings.
-
Assigned to the Astrato user for whom the tenant was created.
Administrator
Section titled “Administrator”- Create, add, and delete permissions for Workbooks, Collections, and all functions in Administration settings.
Creator
Section titled “Creator”- Create, add, and delete permissions for Workbooks, Collections, and all functions in Administration settings.
Designer
Section titled “Designer”- Create add and delete permissions for workbooks and collections
Viewer
Section titled “Viewer”- View permissions for workbooks and collections where they are listed as a user.
Roles Matrix Capabilities
Section titled “Roles Matrix Capabilities”-
Workbooks\Collections
Section titled “Workbooks\Collections”
Action\Role | Administrator\ Owner | Creator | Designer | Viewer |
Use workbook | ✅ | ✅ | ✅ | ✅ |
Create\ Edit Workbook. | ✅ | ✅ | ✅ * | |
Create\ Edit Custom Measures. | ✅ | ✅ | ||
Create\ Edit collection. | ✅ ** | ✅ * | ✅ * |
*- only collection created by the user.
**- All collections in the tenant
Semantic Layers\ Data Connections
Section titled “Semantic Layers\ Data Connections”Action\Role | Administrator\ Owner | Creator | Designer | Viewer |
Create\ Edit Data connection | ✅ | ✅ * | ||
Create\Edit Data view | ✅ | ✅ |
*- Only data connections created by the user.
Administration
Section titled “Administration”Action\Role | Administrator\ Owner | Creator | Designer | Viewer |
Invite users to the tenant | ✅ | |||
Manage users Roles and Groups | ✅ | Can only view | ||
Tenant general settings | ✅ | |||
Emabed Links | ✅ | ✅ | ||
Enterprise Authentication | ✅ | |||
Media Assets | ✅ | |||
Lincense managment | ✅ |
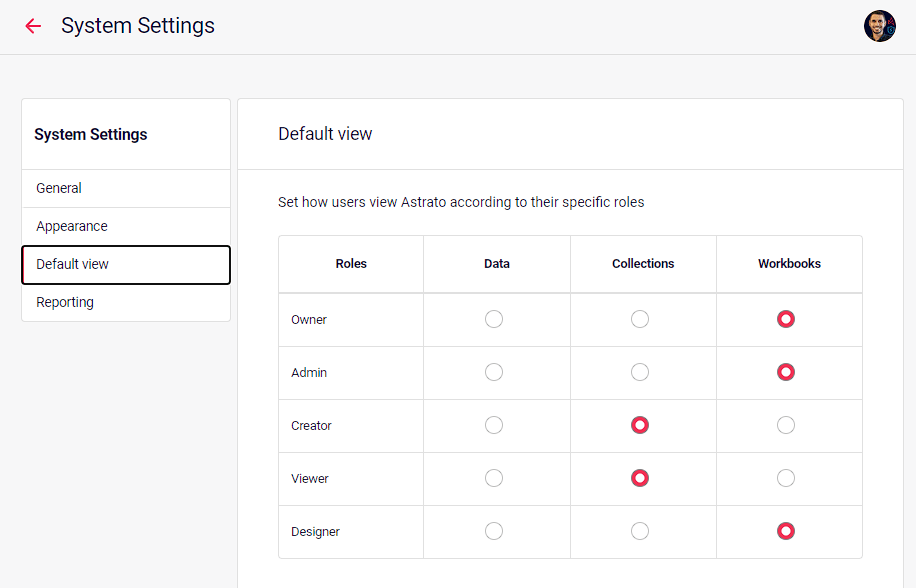
The default view (when opening Astrato), can be changed for each role used in Astrato.
Back to Top
Inviting and Managing Users
Section titled “Inviting and Managing Users”In Astrato there are a number of ways to add users to the platform:
-
SSO Login (Direct login via an approved domain)
ℹ️ Please note: A user’s email address can only be used in one Astrato tenant. If you’re inviting an existing Astrato user, a dialog displays to ask them if they want to move to your tenant.
Email Invite
Section titled “Email Invite”Click Users, to display the full list of users (Figure 1), with details including their User name, Status, Role, and Team.
-
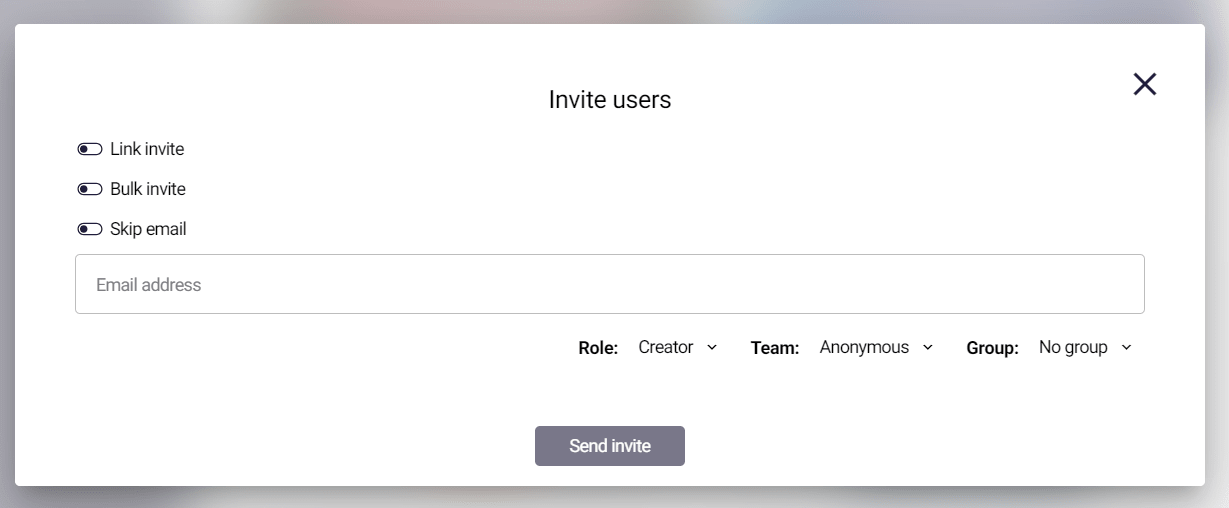
Type in the user’s email address
-
Select the options for the user
-
Role. Determines what role the user has (i.e. admin, creator, designer)
-
Team. Used for licensing/consumption tracking, if this applies to you.
-
Group. Used for setting permissions/access to workbooks/collections etc.
-
-
Click Add. The user’s details are added to the list. To add multiple users, repeat the first three steps to add all users.
-
Click Send Invite to send the registration email.
If a user has been sent an email but has not completed their registration, their status displays as Pending. This changes to Active when they register to use Astrato. You can amend a user’s status to Disabled if you don’t want to delete their account.
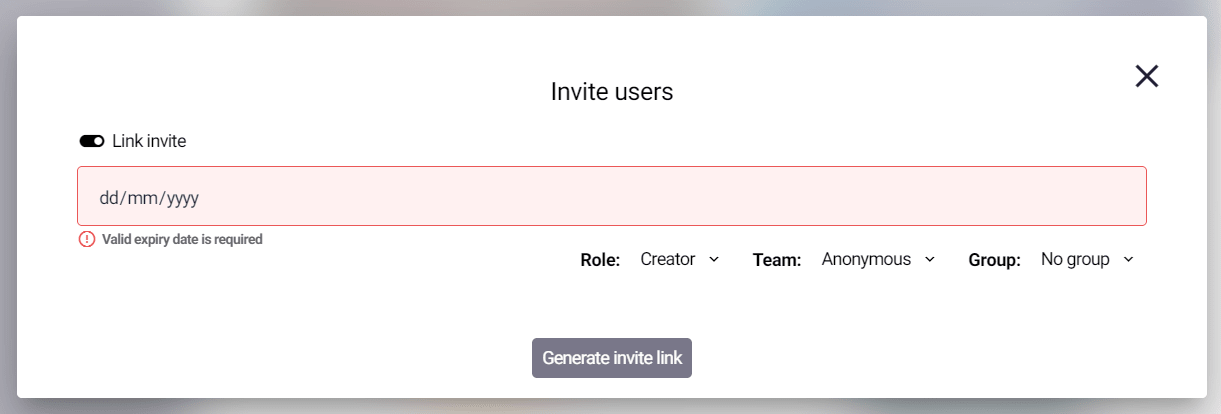
Link Invite
Section titled “Link Invite”Invite links let anyone join without needing a pre-defined user list. This is useful when sharing access with external users or third parties.
Each link includes an expiry date to limit how long it can be used.
A common use case is onboarding end customers. Instead of collecting individual email addresses, you can send a single invite link to a group with access restricted to a specific dashboard.
Back to Top
Creating and managing Teams
Section titled “Creating and managing Teams”In the refreshed lobby, owners and administrators can open Administration → Teams and click License team name, Users, or Created to sort ascending. Click again for descending order and a third time for the default order. Sorting combines with name search and applies to all matching teams before pagination. Load more license teams continues with the same search and sort; changing either returns to the first page. Clear sorting restores the default order. Each row’s Rename and Delete buttons are on the right.
From the Administration section, click Teams to view, add and manage users in your teams.
Click the button New team to create and assign users to a new team in your Astrato tenant.
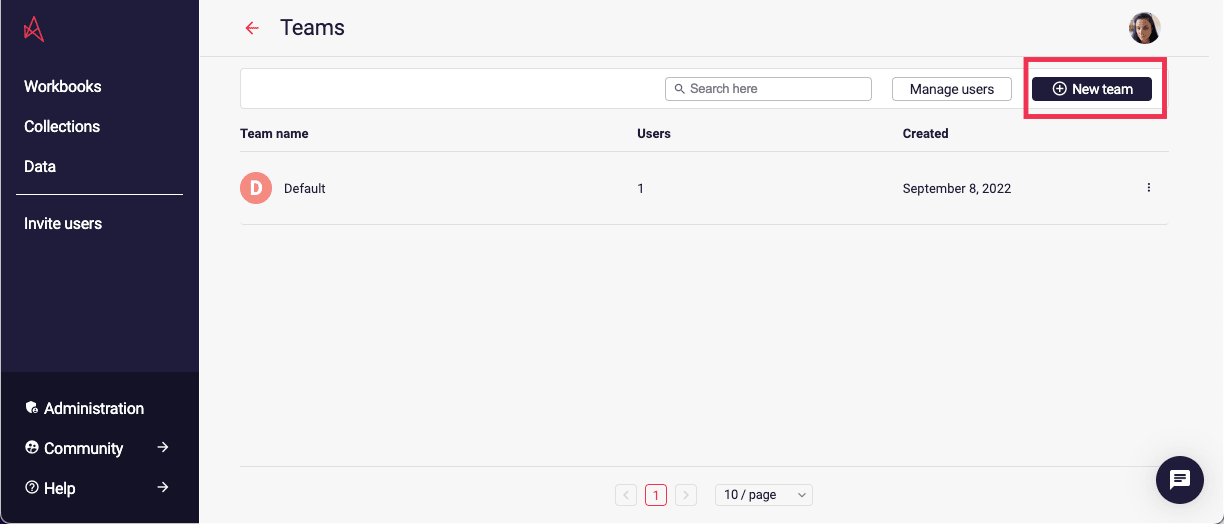
Figure 3: View users assigned to Teams in your Astrato tenant.
Adding a new Team
Section titled “Adding a new Team”-
Enter the Team Name, drag an image, or browse files to select an image to use for the Team.
-
Click Save Changes.
-
Click the ellipsis on the right to view and edit the Team details.
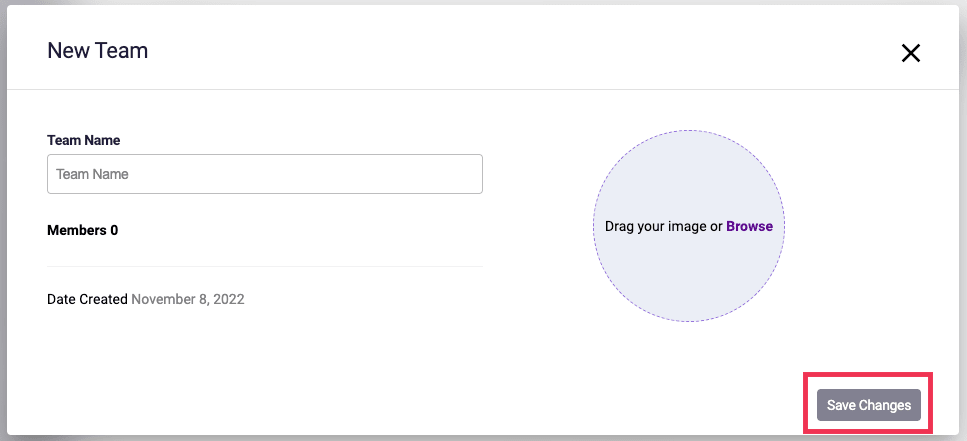
Figure 4: Add a new Team
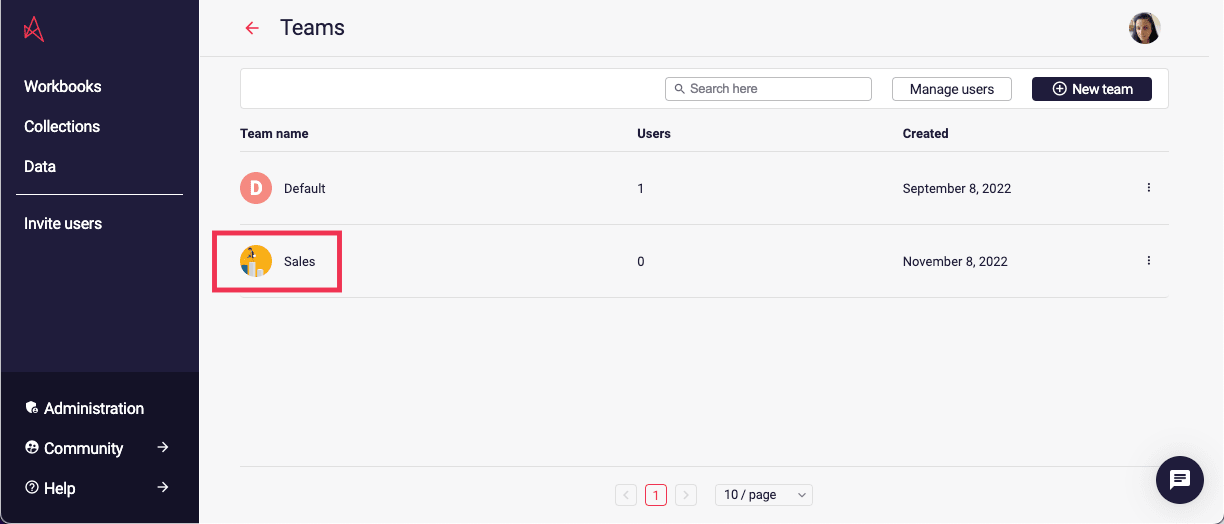
Figure 5: New Team saved to the list
Editing the Team image
Section titled “Editing the Team image”-
Drag an image or browse files to select an image for the Team.
-
Crop the image as required. Click Crop to save the image.
-
View the preview, use the option to Upload or Reset to change it if required
-
Click the ellipsis to modify the Team details.
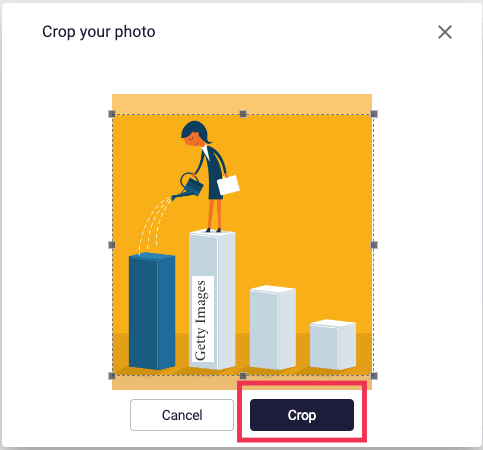
Figure 6: Cropping your image
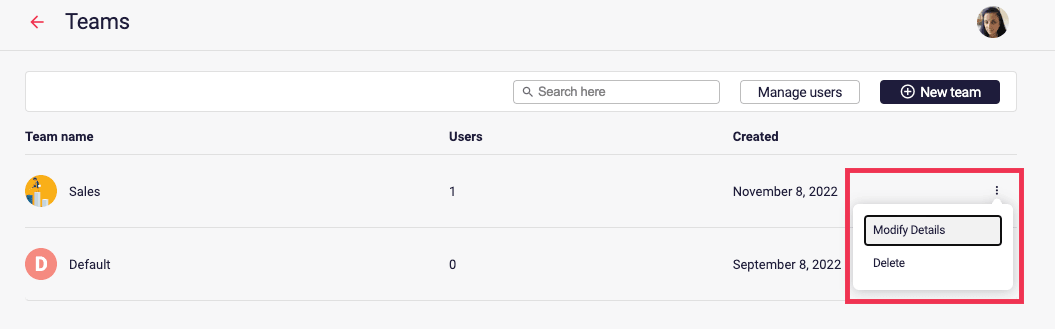
Figure 7: Click the ellipsis to modify the Team details or to delete the Team.
Managing users in a Team
Section titled “Managing users in a Team”-
Click the button Manage users to view the list of users.
-
From the list of users, click on the ellipsis to view the user details
-
Use the drop-down list to amend the user’s Team.
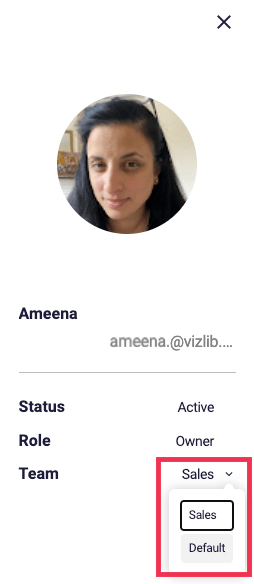
Figure 8: Change a user’s team
Back to Top