

Connect an AI Assistant to Astrato via MCP
You can let an AI assistant work with your semantic layer — ask it what’s in your model, have it search for a measure, or ask it to build one for you. It works on your behalf, with your permissions, on your organisation’s data.
Before you start: this isn’t switched on everywhere yet. Check with your Astrato contact that it’s enabled for your environment before you set anything up. It’s also still in preview, so expect it to keep improving.
Find your assistant below
Section titled “Find your assistant below”These assistants are supported with Astrato. Whichever you use, the address is the same — your Astrato address followed by /mcp, which for most organisations is https://app.astrato.io/mcp. If your company uses its own Astrato address, use that instead.
For developer settings, personal access tokens and the full tool list, see the MCP overview.
Claude
Section titled “Claude”Works on claude.ai and in the desktop app. Both are set up the same way.
Step 1: Add the Astrato connector from the marketplace:
- Organisation admins: open Organisation settings and go to Connectors.
- Everyone else: open Settings and go to Connectors.
In either place, choose Discover, search for Astrato, and click Add.
Step 2: Astrato asks you to approve. It names the assistant, shows which Astrato account you’re connecting, and lists exactly what it will be allowed to do: Read semantic layers, Edit semantic layer drafts and Create semantic layer versions.
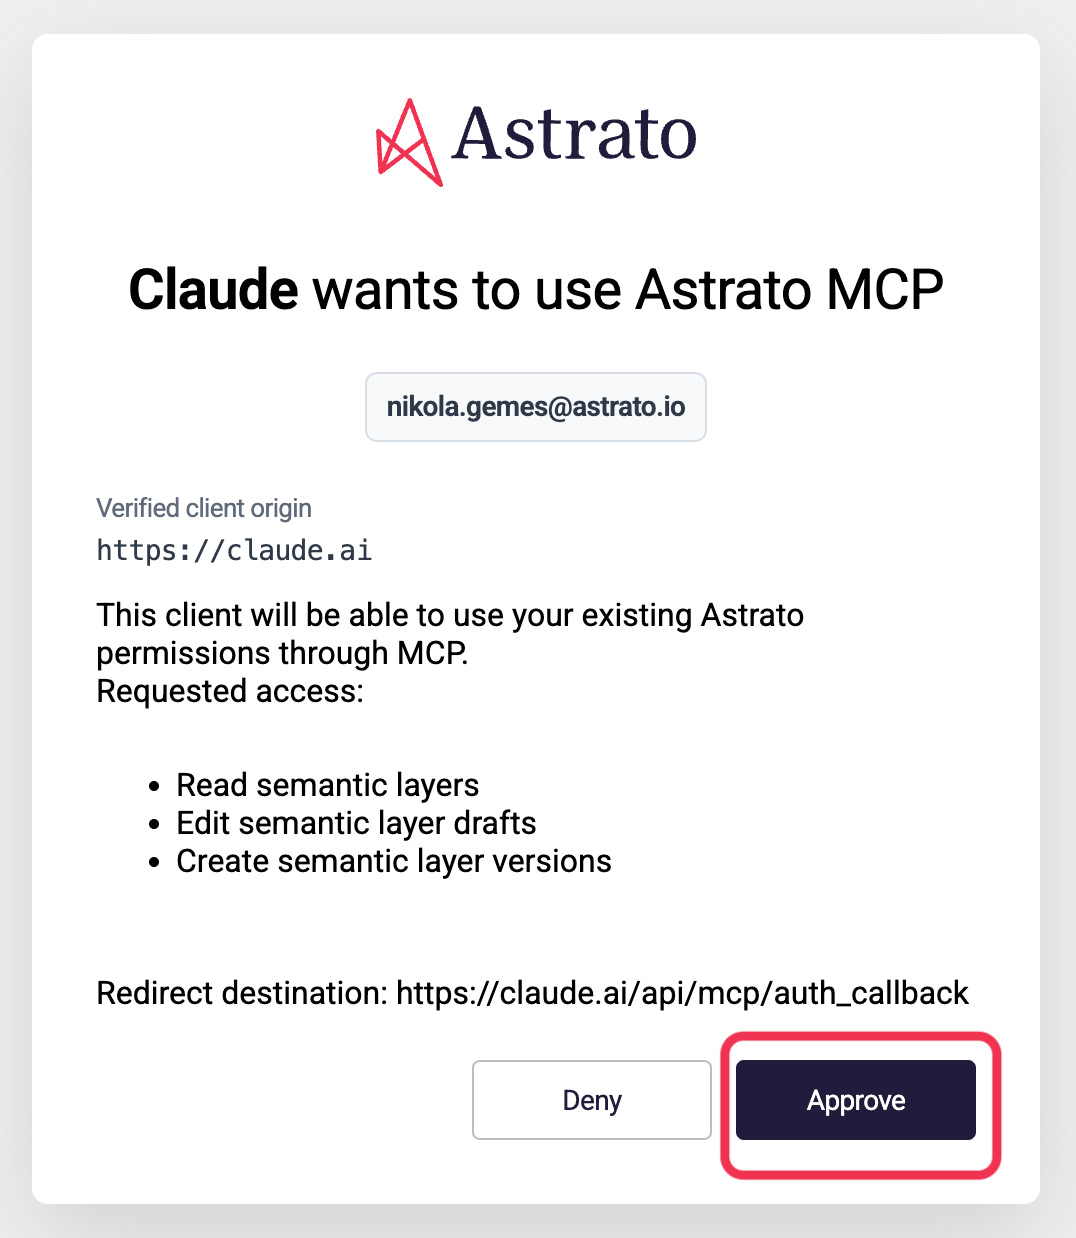
Step 3: Click Approve.
Result: Claude can now reach your semantic layers. Ask it to list them as a first test.
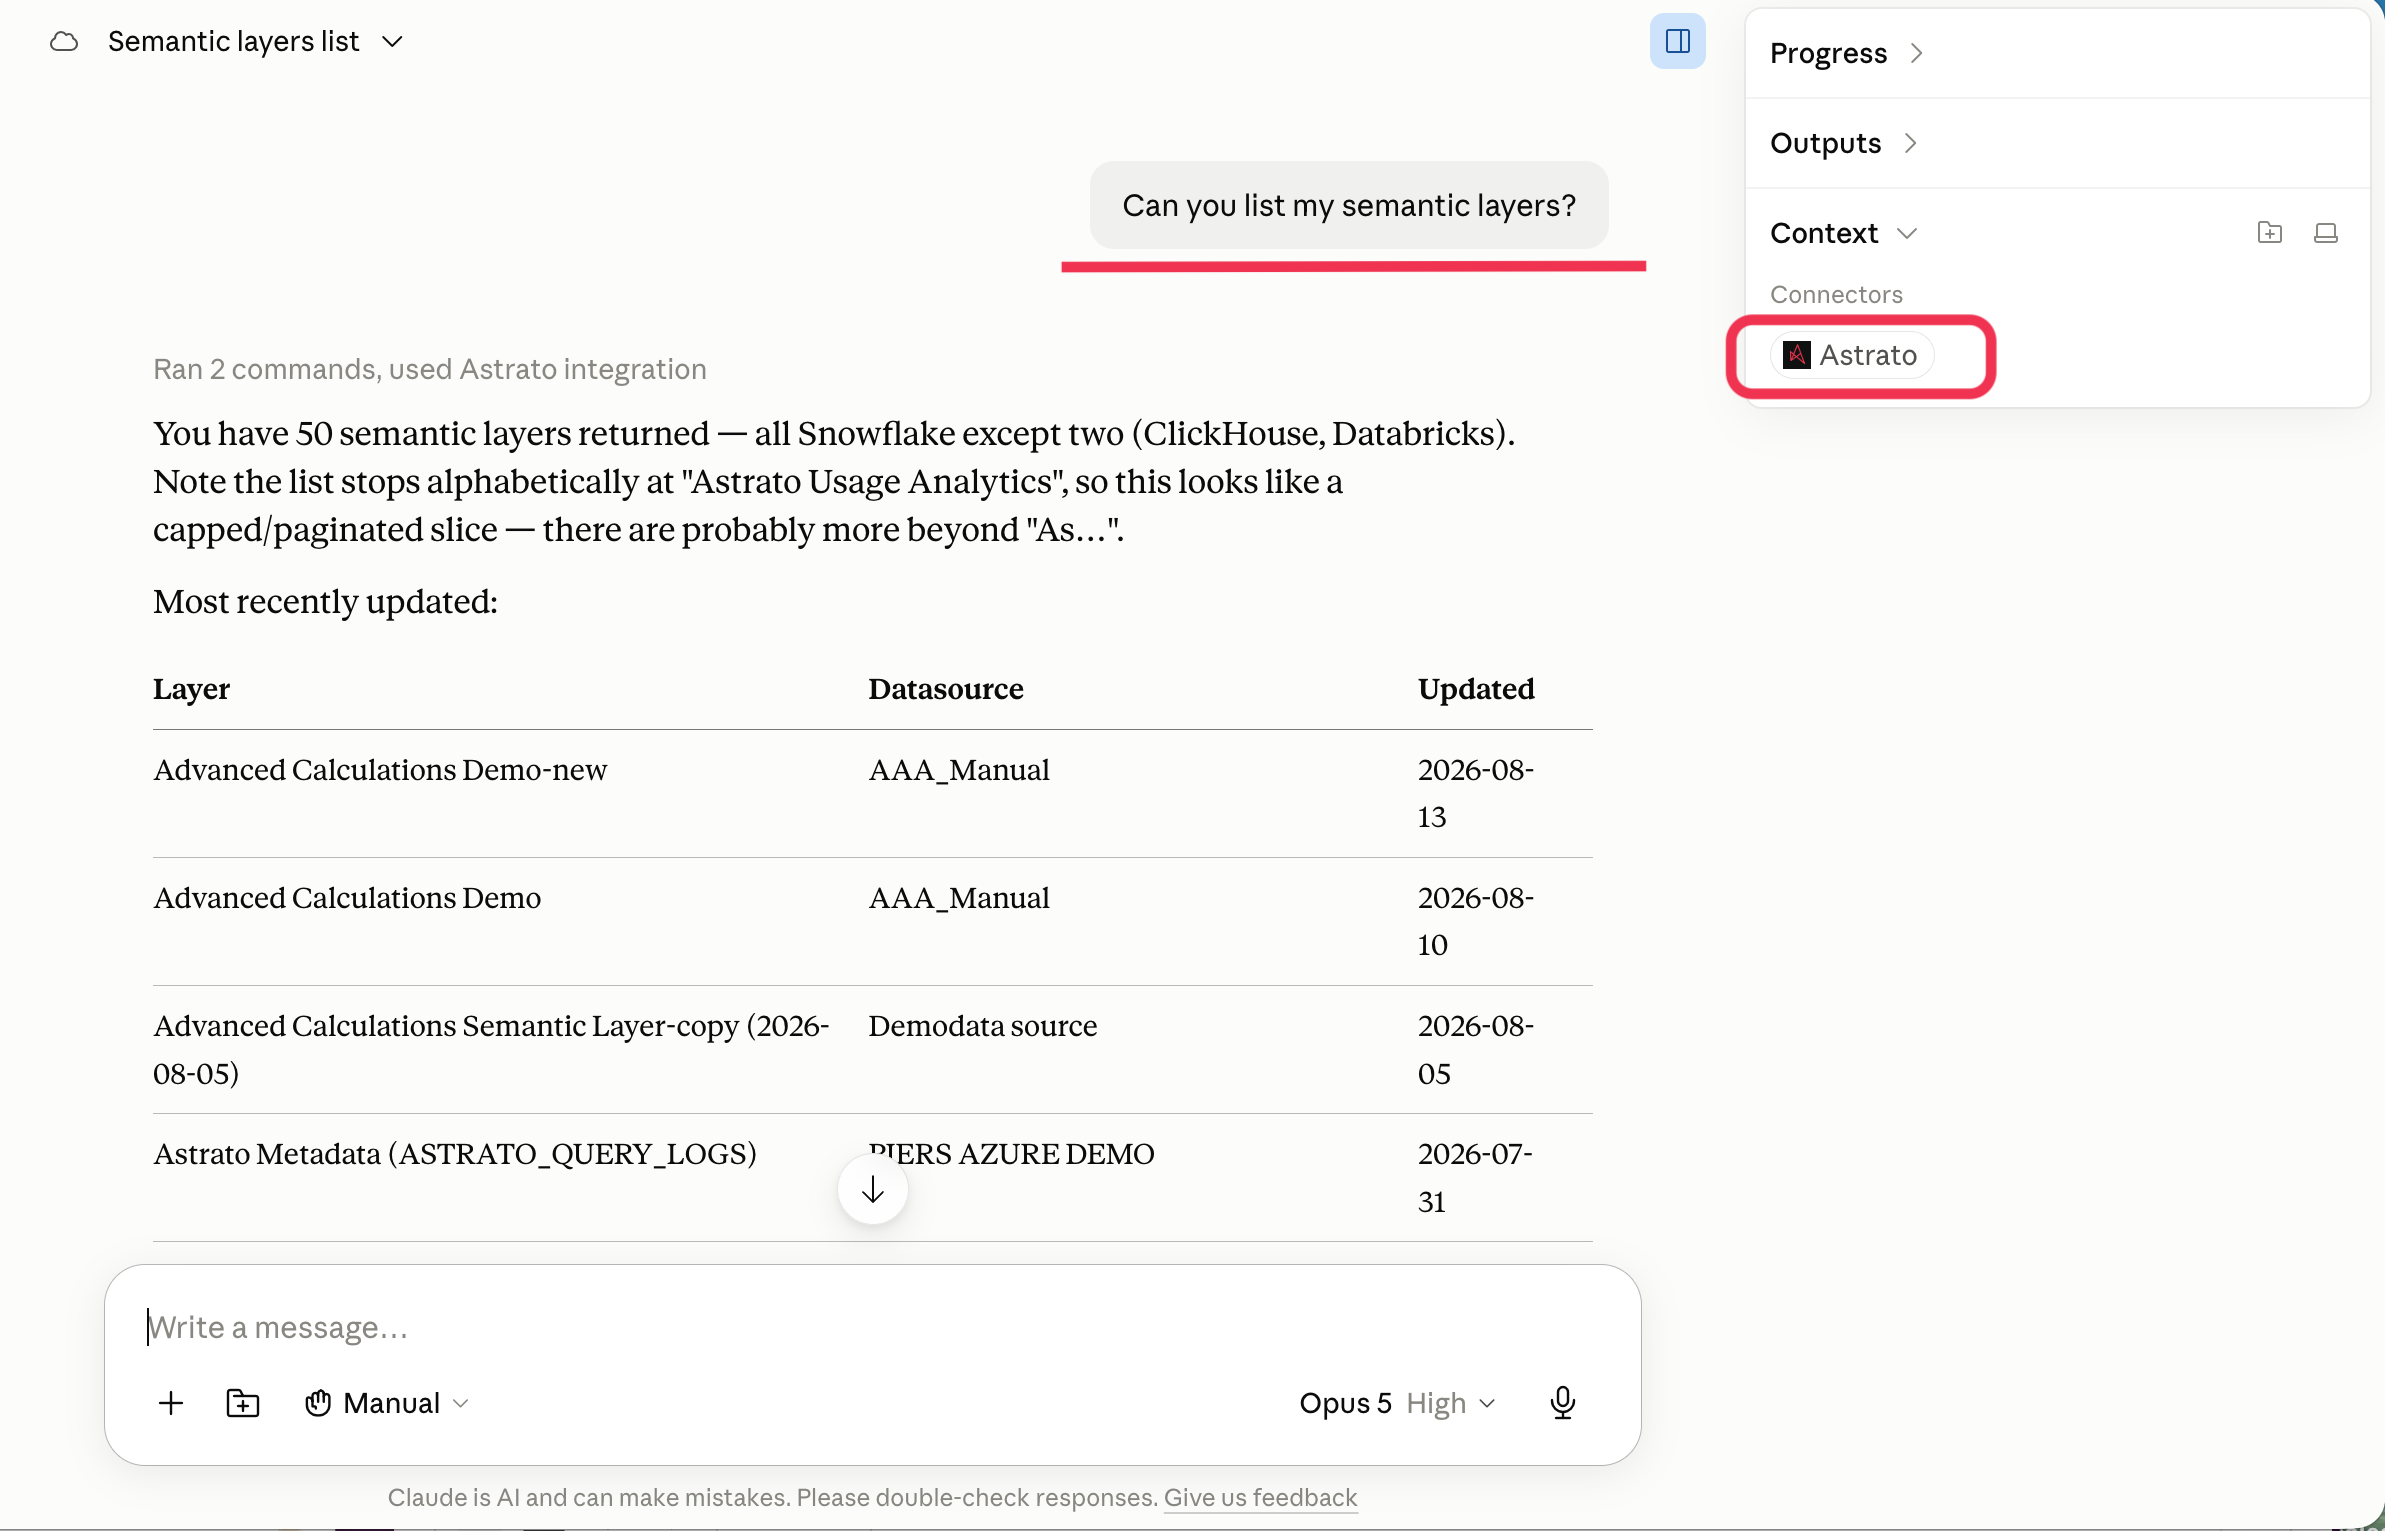
You’re not handing over a password. You sign in to Astrato itself, and the assistant only ever receives a limited pass tied to your own account and organisation. You can withdraw it later without changing your password.
ChatGPT
Section titled “ChatGPT”ChatGPT calls these plugins, and Astrato isn’t one OpenAI has reviewed — so you add it yourself, and ChatGPT shows warnings along the way. Those warnings are about custom plugins in general, not about Astrato in particular, but read them before you agree.
Before you start: you need a ChatGPT plan that includes plugins. If your organisation has a policy on connecting AI tools to company data, check it first — this gives ChatGPT the ability to edit and publish your semantic layer.
Step 1: Click your profile picture and open Settings.
Step 2: Go to Plugins, then Developer mode.
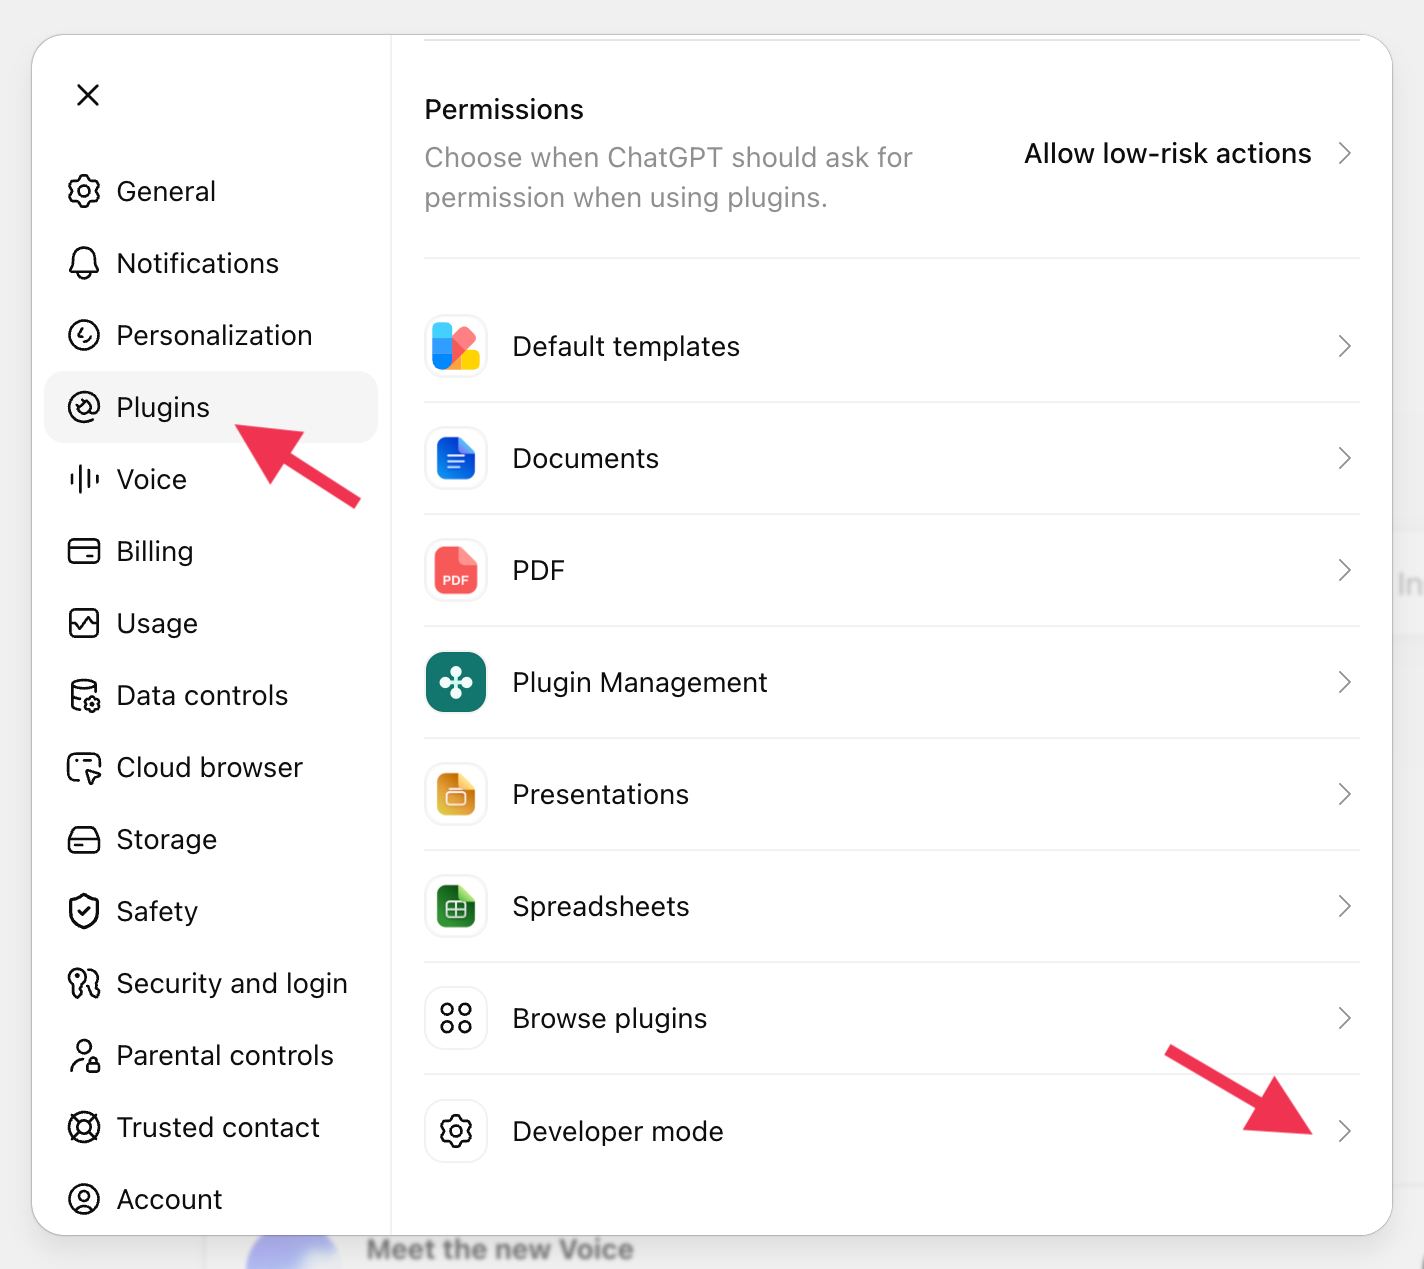
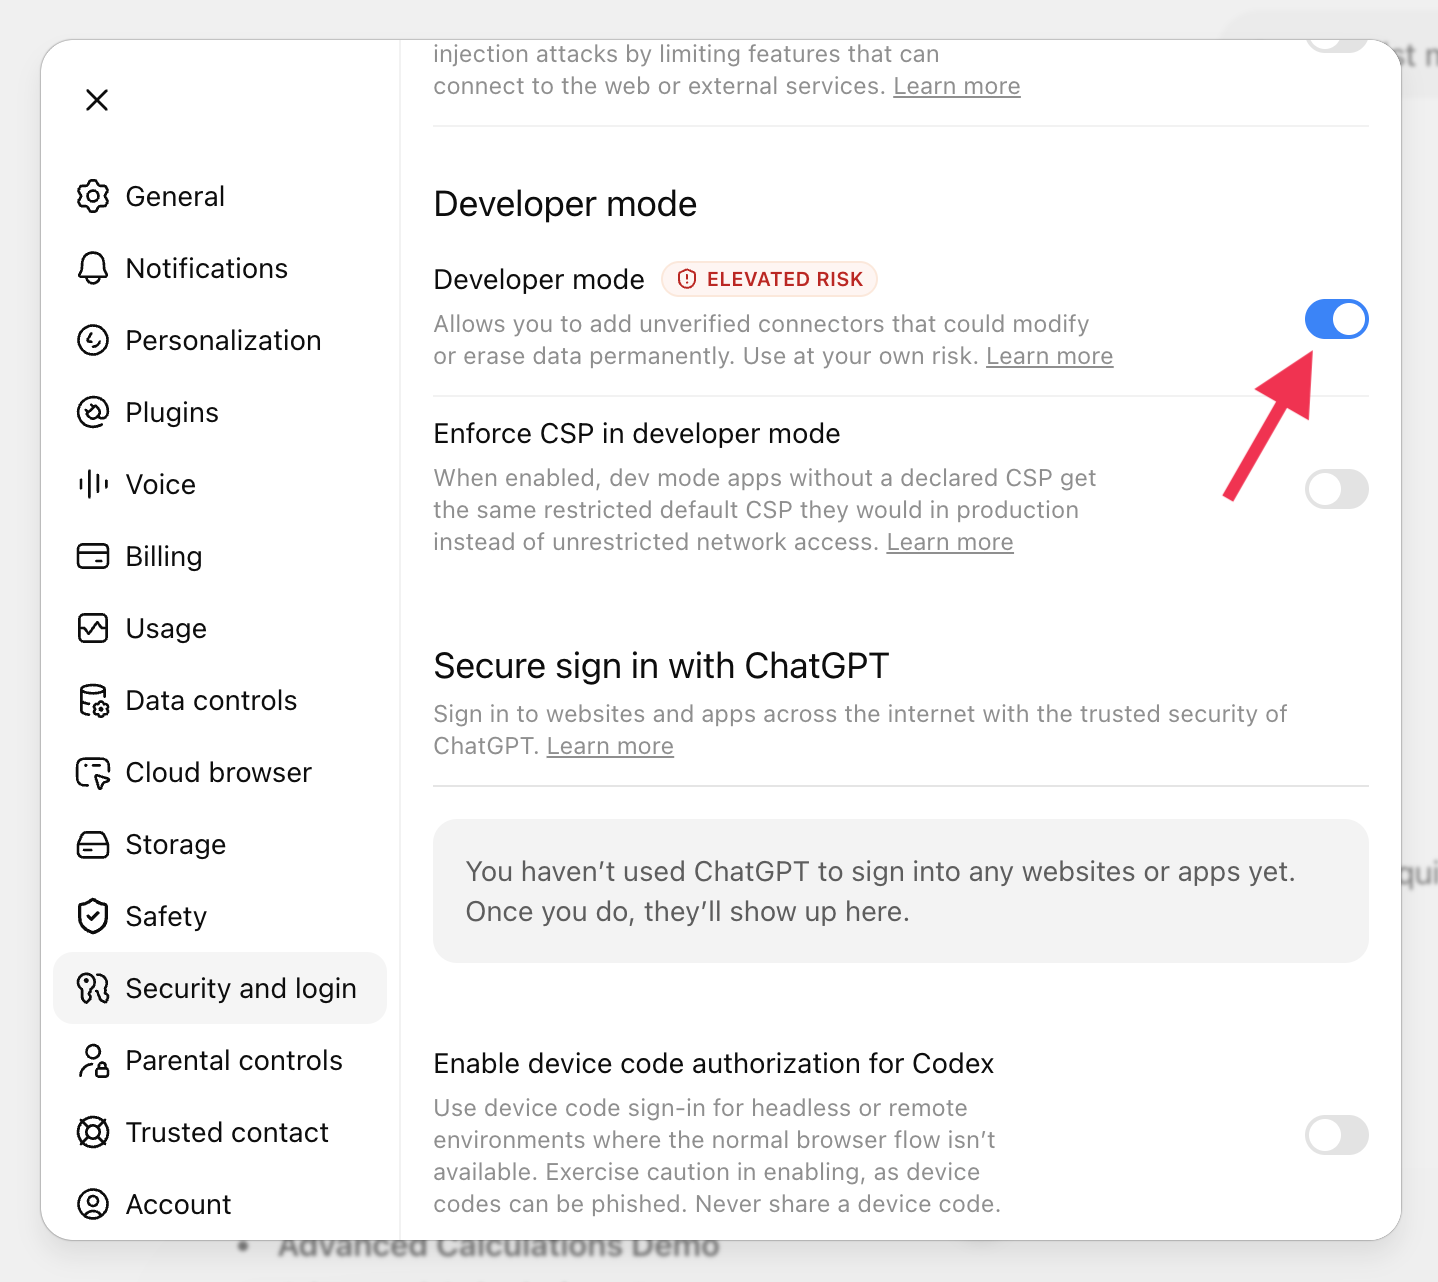
Step 3: Turn Developer mode on. ChatGPT marks this elevated risk, because it lets you add plugins OpenAI hasn’t checked.
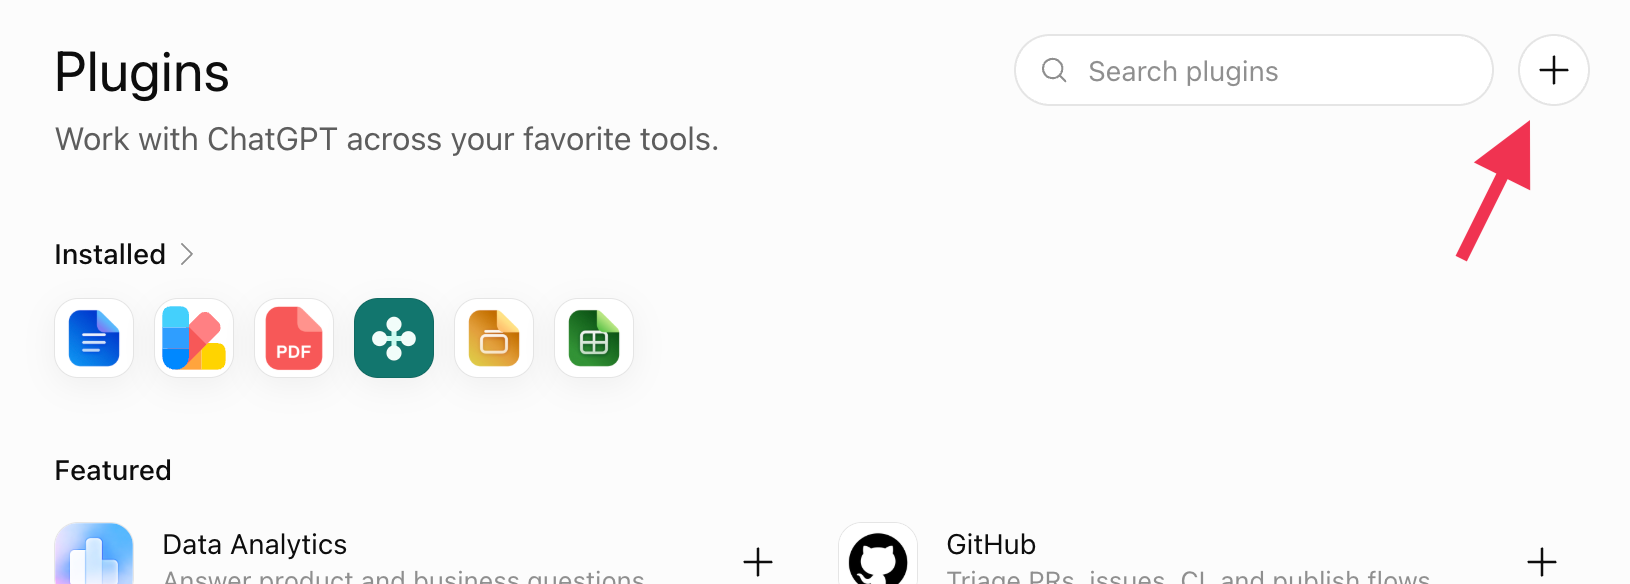
Step 4: Go back to Browse plugins and click + to add one.
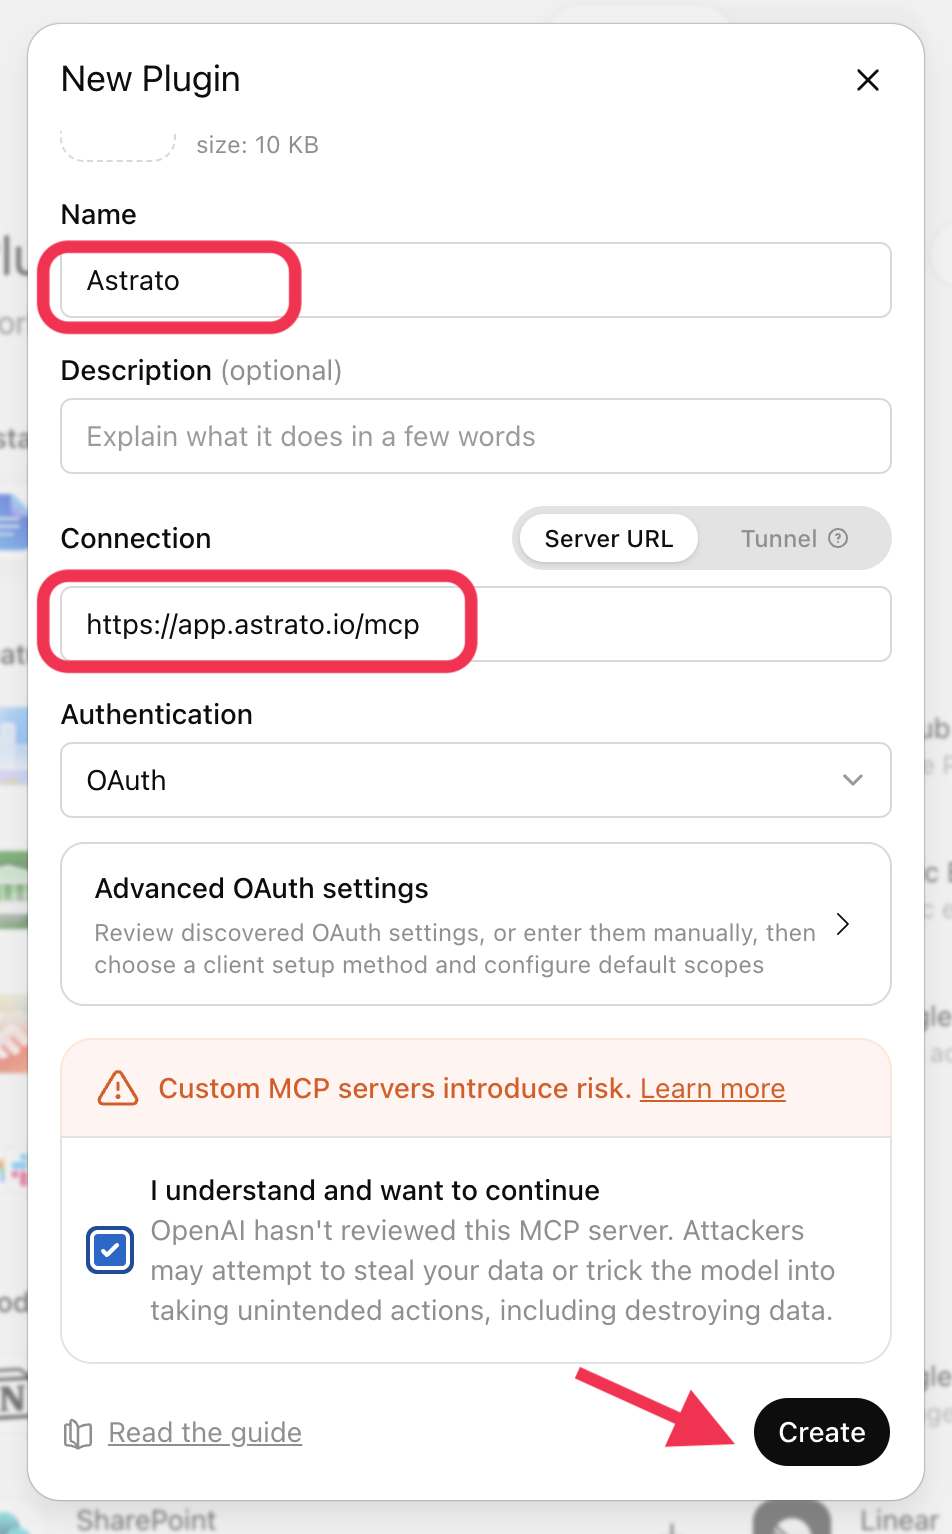
Step 5: Fill in the New Plugin panel:
- Name — Astrato
- Connection — leave it on Server URL and enter
https://app.astrato.io/mcp - Authentication — OAuth
Then tick I understand and want to continue and click Create.
Step 6: Add Astrato to ChatGPT, and sign in to Astrato when it asks.
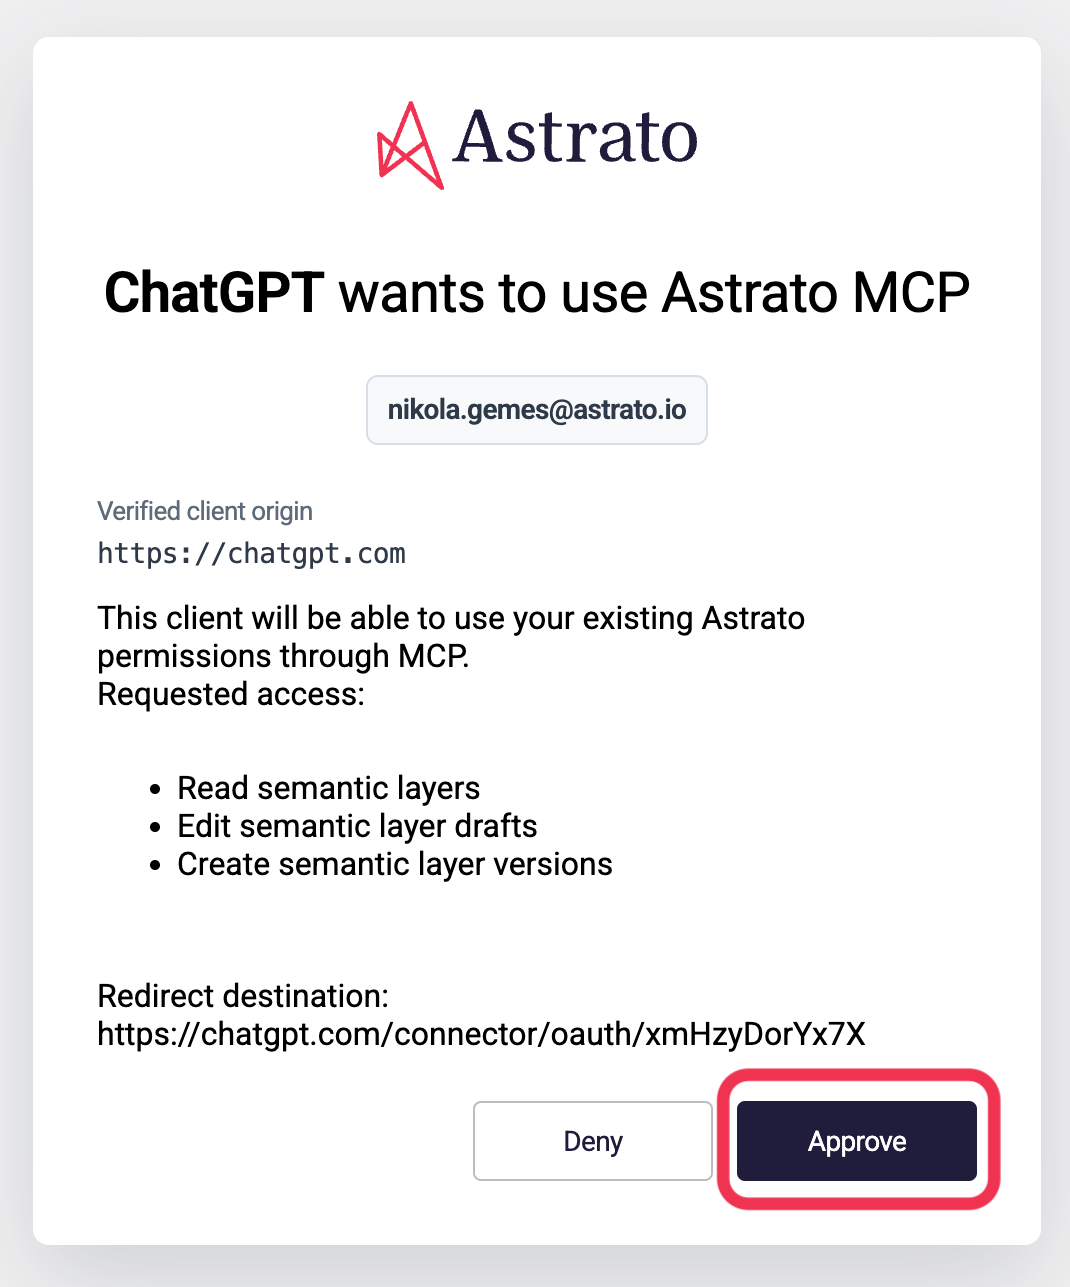
Step 7: Astrato asks you to approve. It names ChatGPT, shows which Astrato account you’re connecting, and lists what it will be allowed to do: Read semantic layers, Edit semantic layer drafts and Create semantic layer versions. Click Approve.
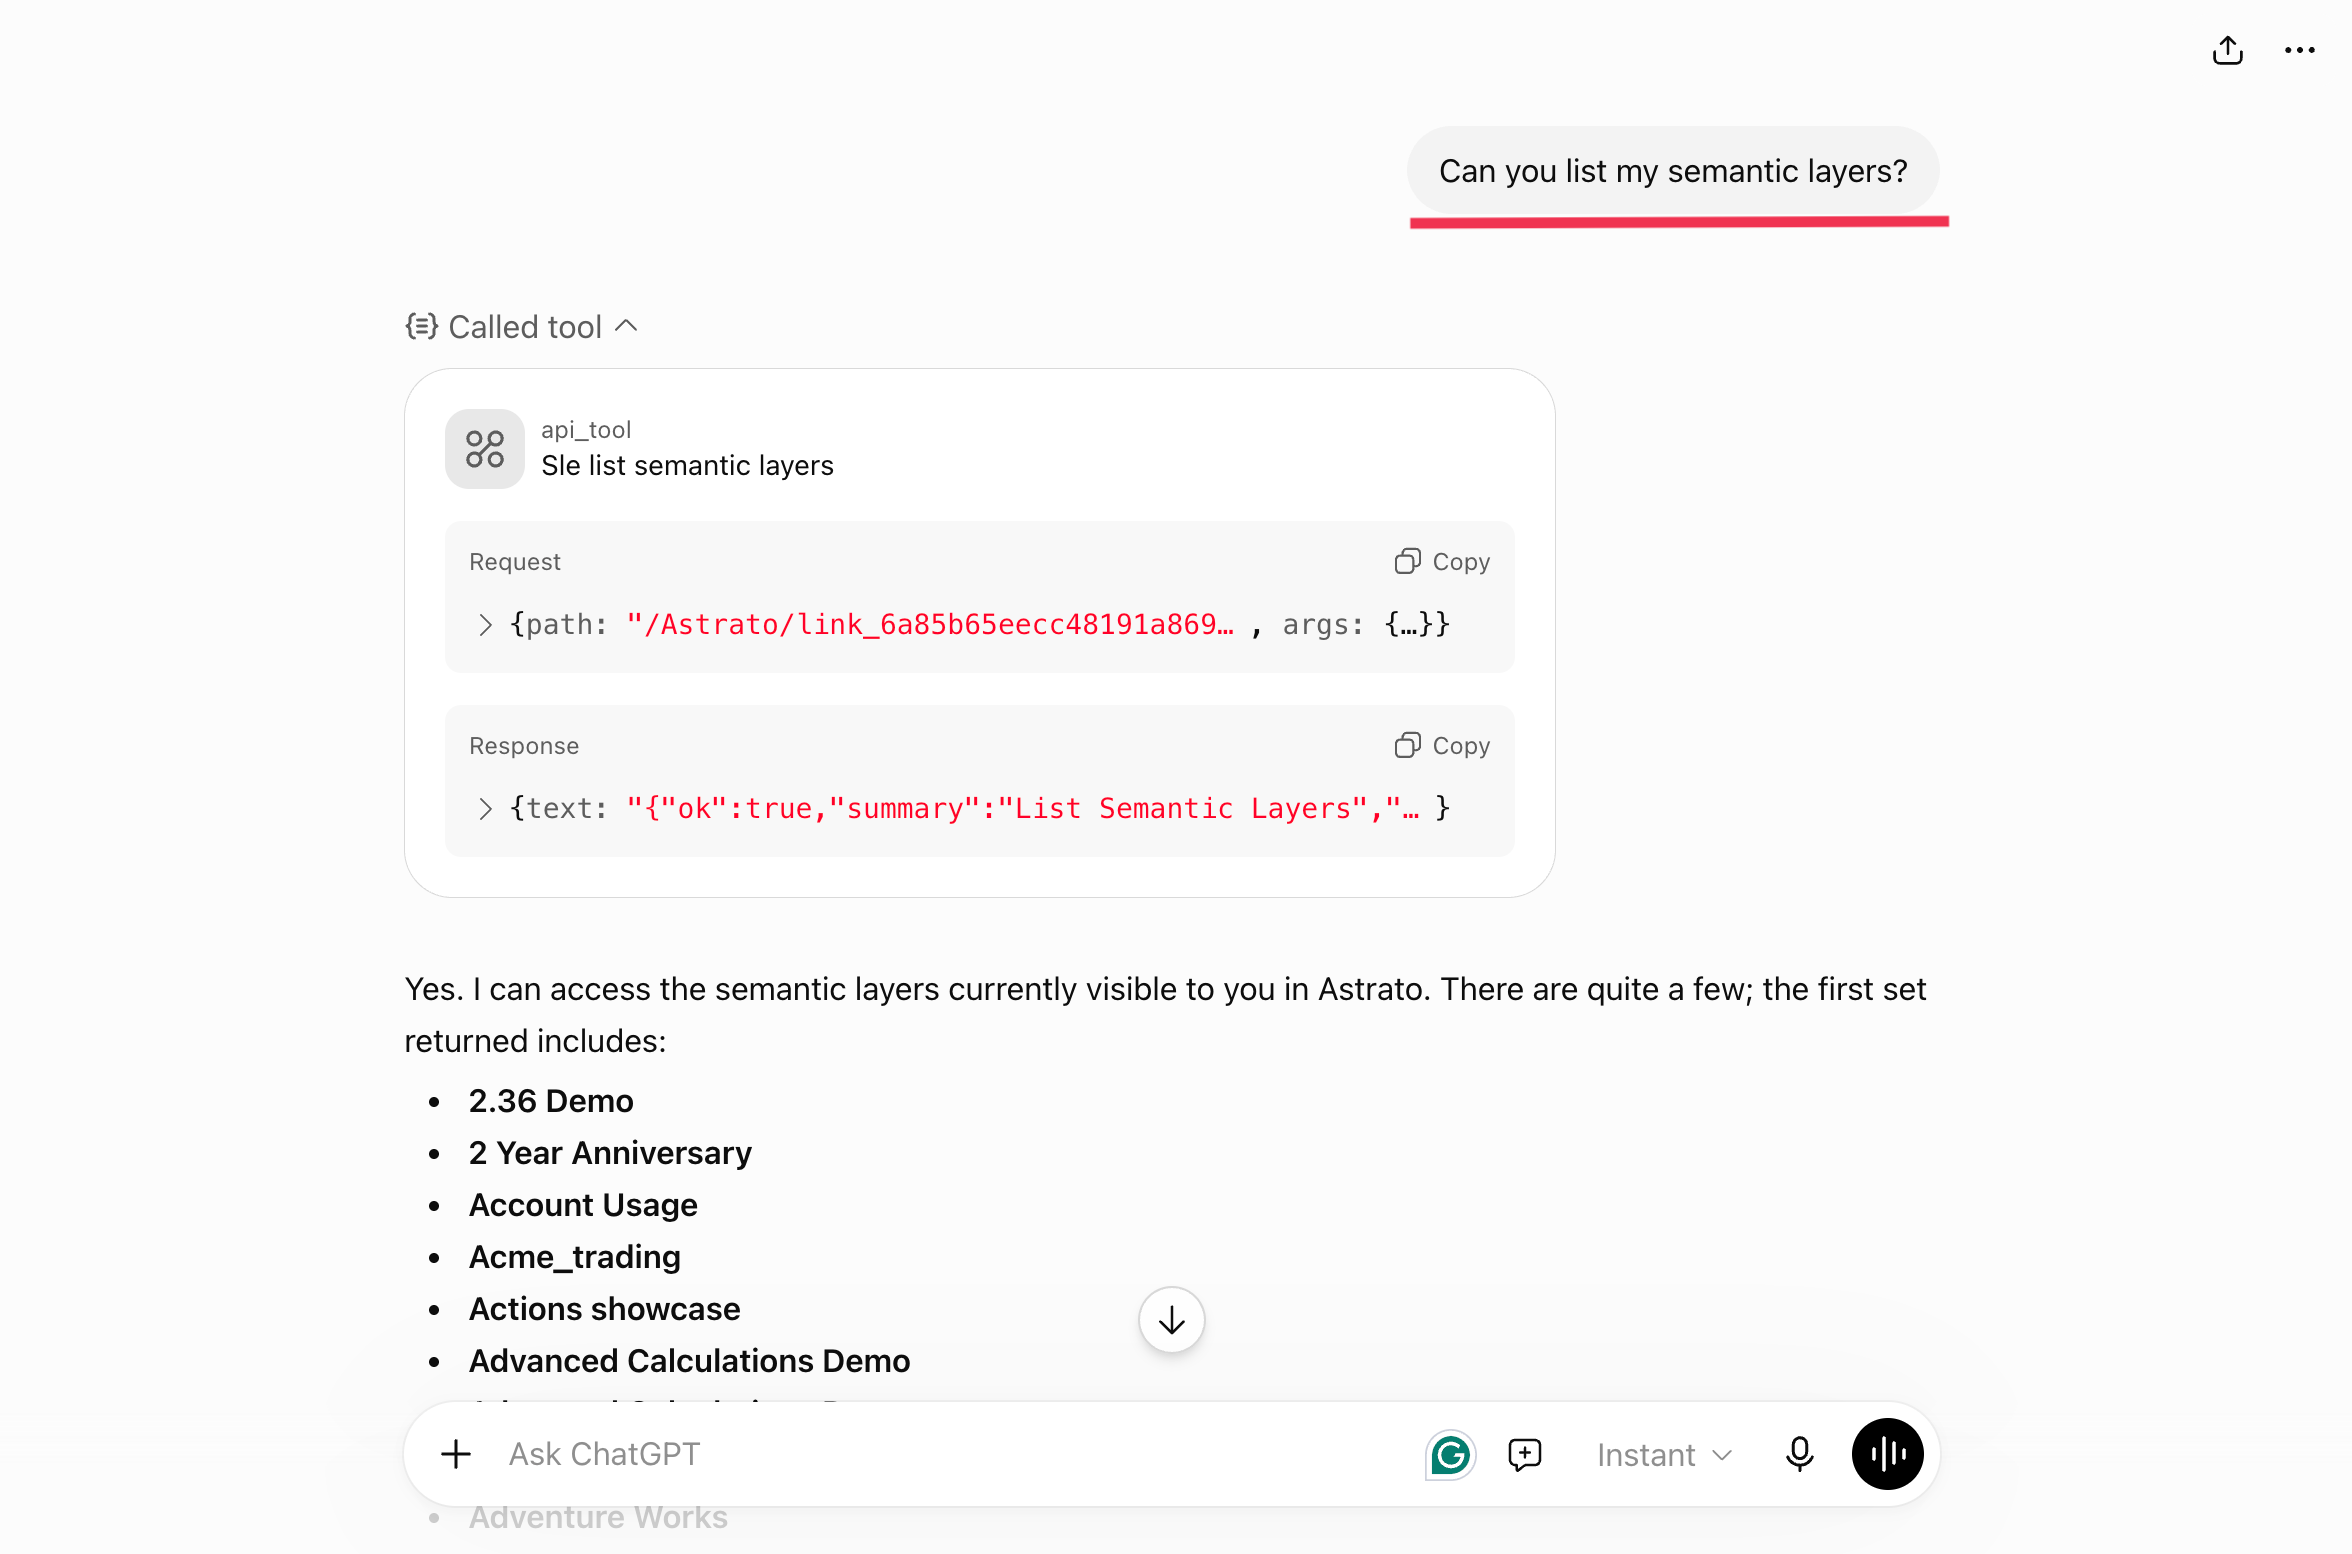
Result: Astrato appears under your installed plugins. Ask ChatGPT to list your semantic layers as a first test — you’ll see it call the Astrato tool and come back with your layers by name.
About those warnings. OpenAI shows them for any plugin it hasn’t reviewed, and they’re worth taking seriously in general — a plugin you don’t recognise really can act on your data. What you’re agreeing to here is the access shown on Astrato’s own approval screen, and nothing more. You can remove the plugin at any time.
Visual Studio Code
Section titled “Visual Studio Code”Visual Studio Code is Microsoft’s free code editor, with an AI assistant built in. Connecting Astrato lets that assistant work with your semantic layer while you’re in the editor. You add it through the command palette — there’s no configuration file to edit.
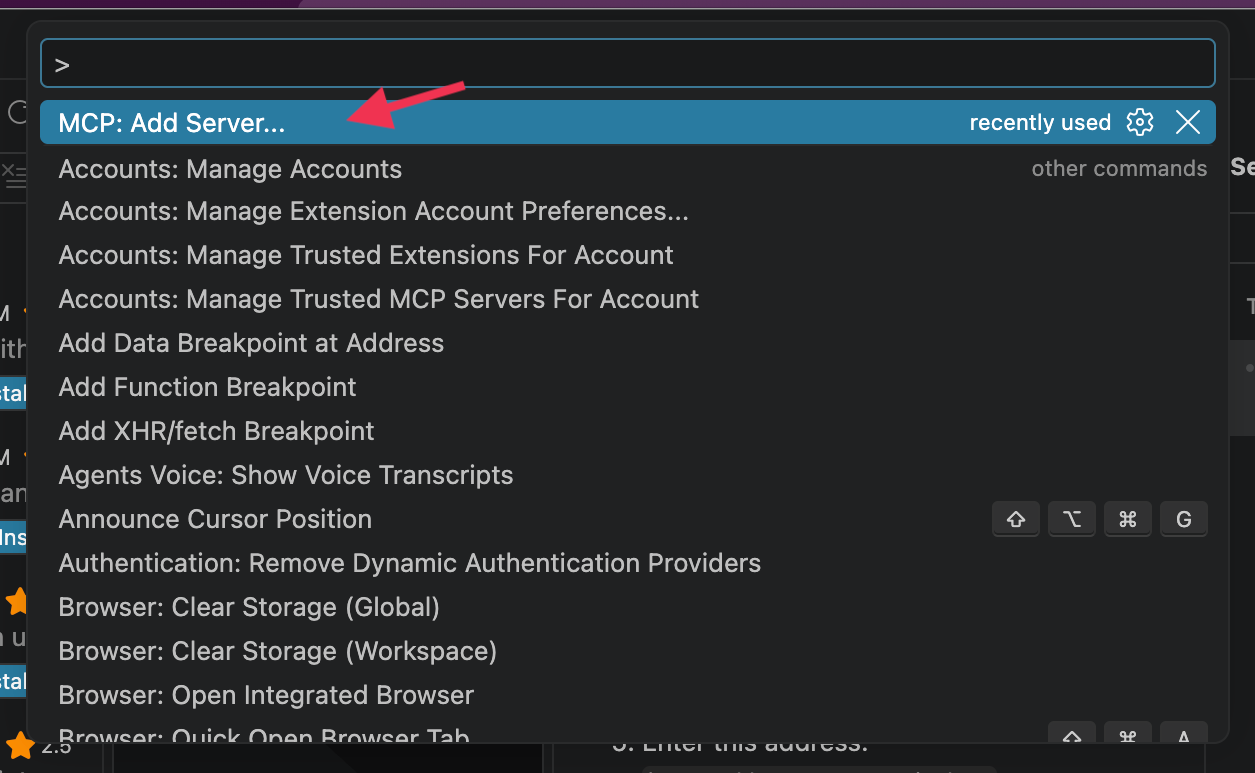
Step 1: Open Visual Studio Code and press Cmd+Shift+P (Ctrl+Shift+P on Windows) to bring up the command palette. Start typing and choose MCP: Add Server…
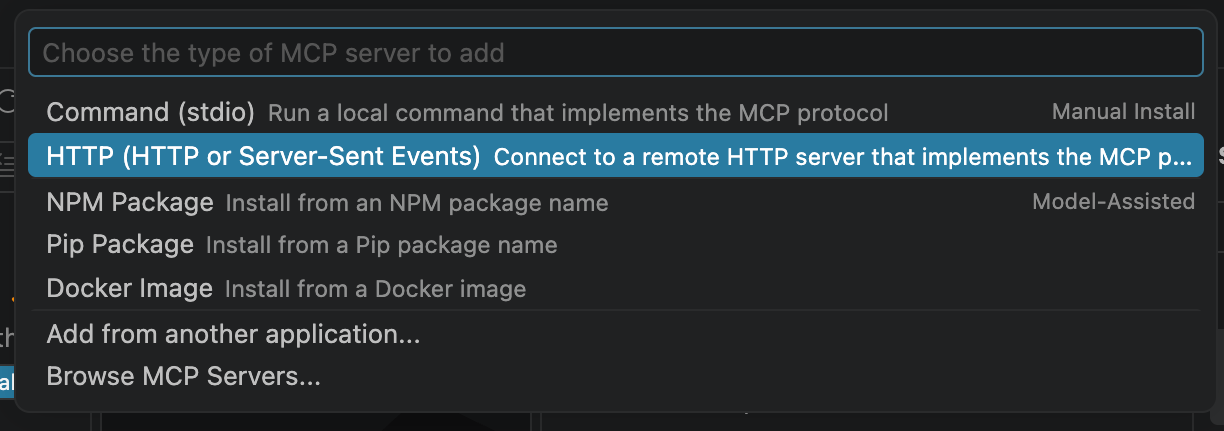
Step 2: Choose HTTP.
Step 3: Enter your Astrato address followed by /mcp — for most organisations https://app.astrato.io/mcp — and press Enter.

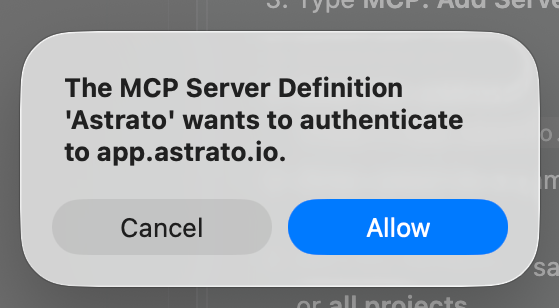
Step 4: Visual Studio Code asks whether the Astrato server may sign you in. Click Allow.
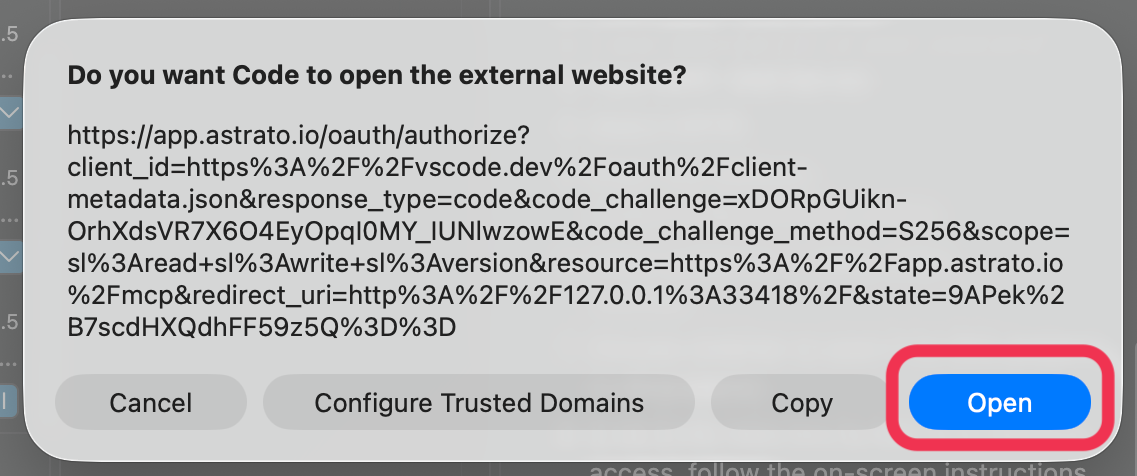
Step 5: It then asks to open Astrato in your browser. Click Open.
Step 6: Astrato asks you to approve. It names Visual Studio Code, shows which Astrato account you’re connecting, and lists what it will be allowed to do: Read semantic layers, Edit semantic layer drafts and Create semantic layer versions. Click Approve.
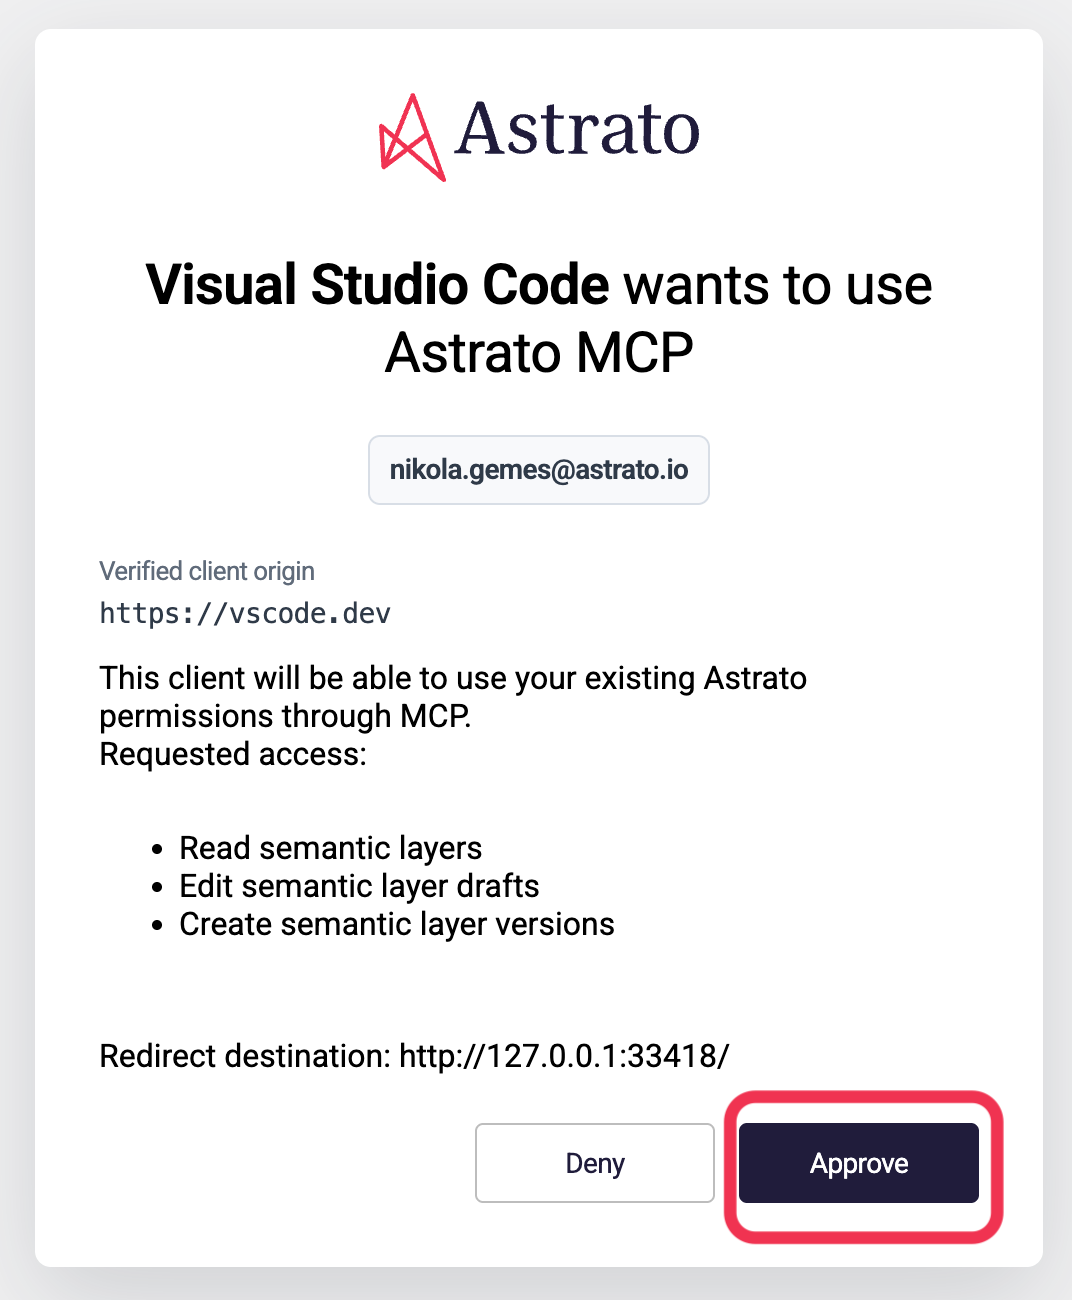
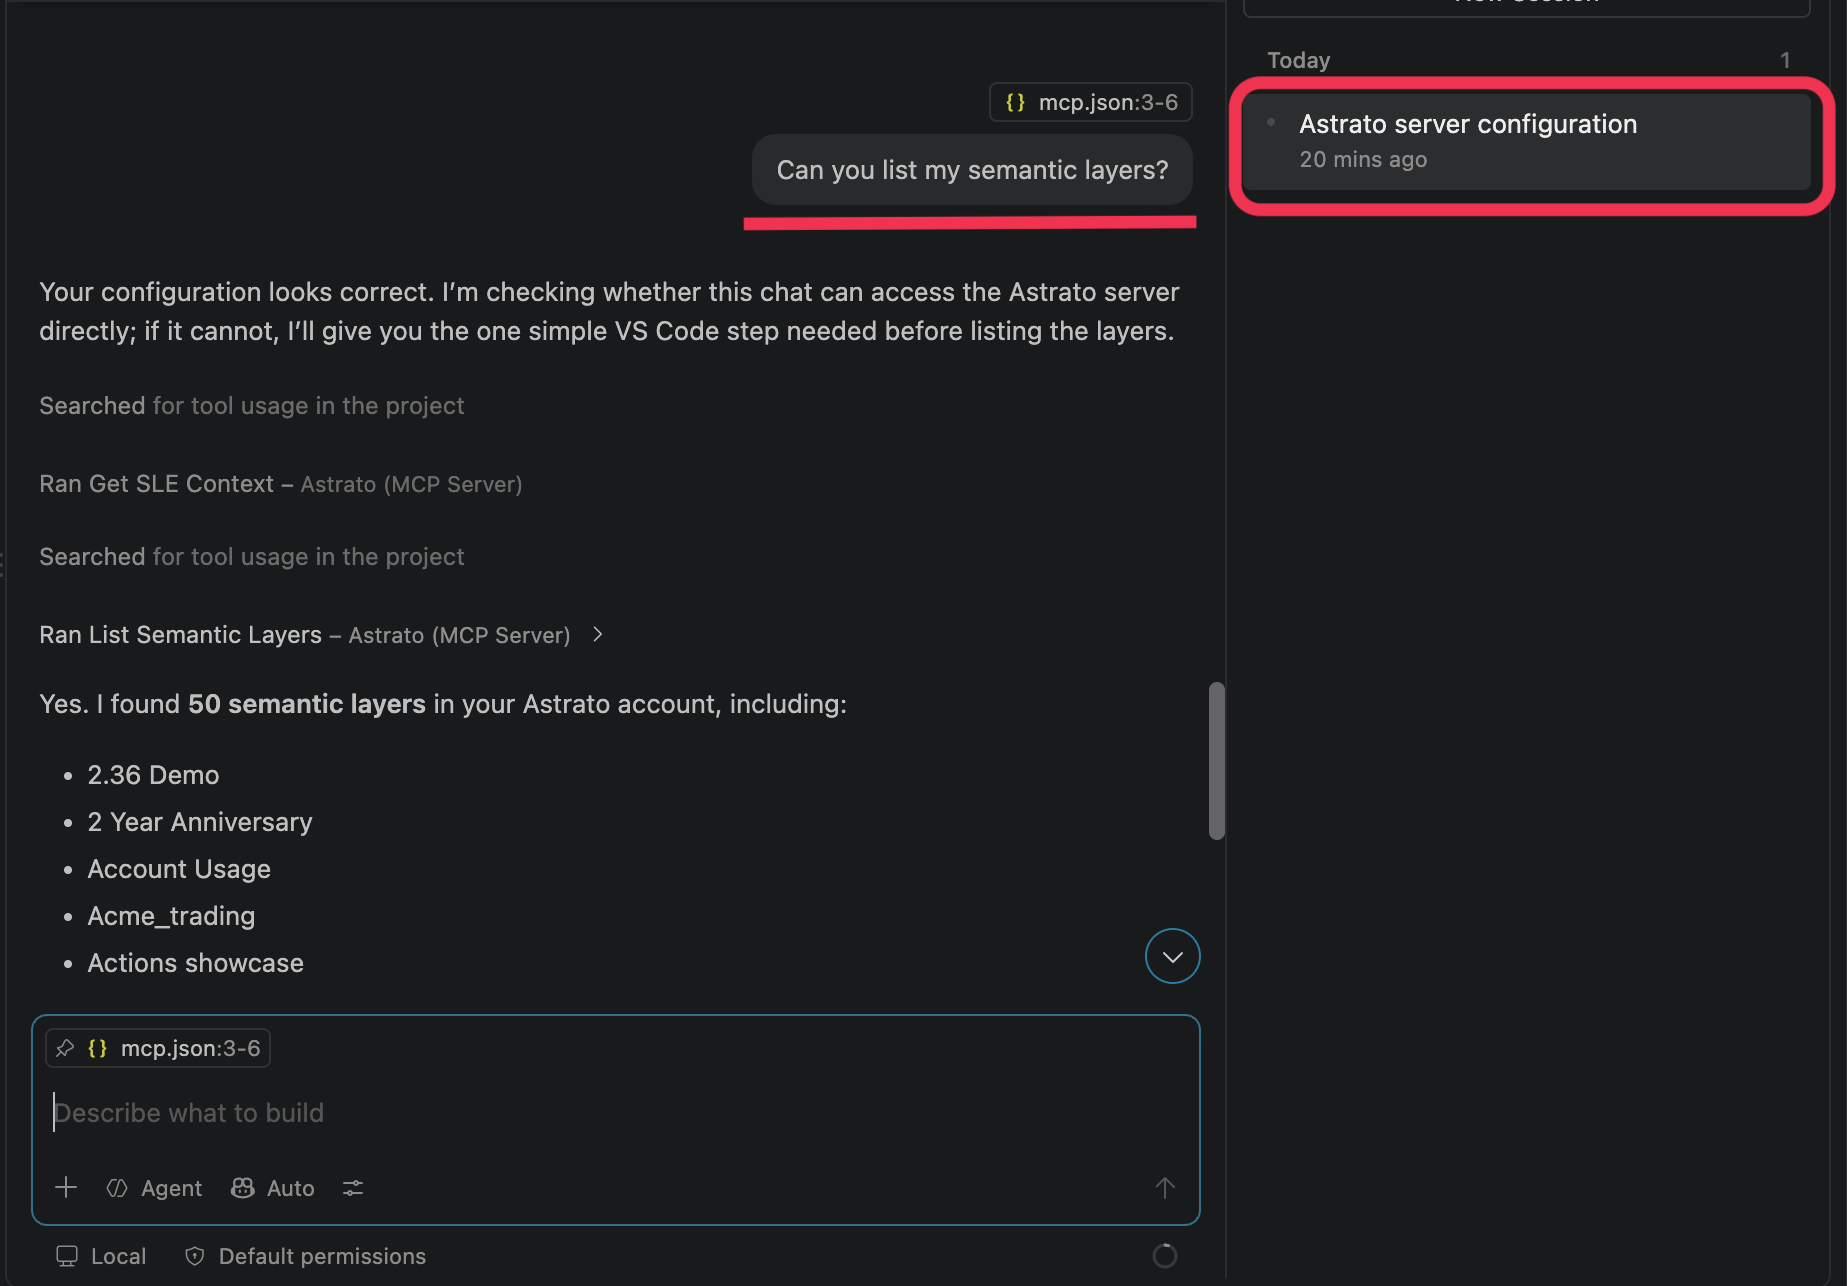
Result: Astrato is available to the assistant in the Chat panel. Ask it to list your semantic layers as a first test — you’ll see it call the Astrato tools and come back with your layers by name.
Claude Code
Section titled “Claude Code”If you’ve already connected Astrato in Claude, Claude Code has it too — there’s nothing extra to set up. Open Claude Code and ask it to list your semantic layers; you’ll see it call the Astrato tools and answer.
Using Claude Code without a Claude account? Add Astrato from the command line with one of the two routes below. Use only one, so Claude Code doesn’t hold two Astrato connections.
Personal access token: add the server with a token from protected secret storage or a user-only configuration, not as a command-line argument. See Configure an MCP client for the steps.
Sign in with your browser: ask your Astrato contact for a client ID and a callback port, then run:
claude mcp add --transport http --client-id YOUR-CLIENT-ID --callback-port YOUR-PORT astrato https://app.astrato.io/mcpFor this route, start Claude Code, type /mcp, pick astrato, and choose Authenticate.
Check it worked with claude mcp list — Astrato should appear — then ask Claude Code to list your semantic layers. If you add Astrato in Claude as well as on the command line, remove the extra connection with claude mcp remove astrato, or tell Claude which one to use.
OpenAI Codex
Section titled “OpenAI Codex”Codex builds the connection for you. You give it the Astrato address and its Plugin Creator does the rest — there’s no configuration to write.
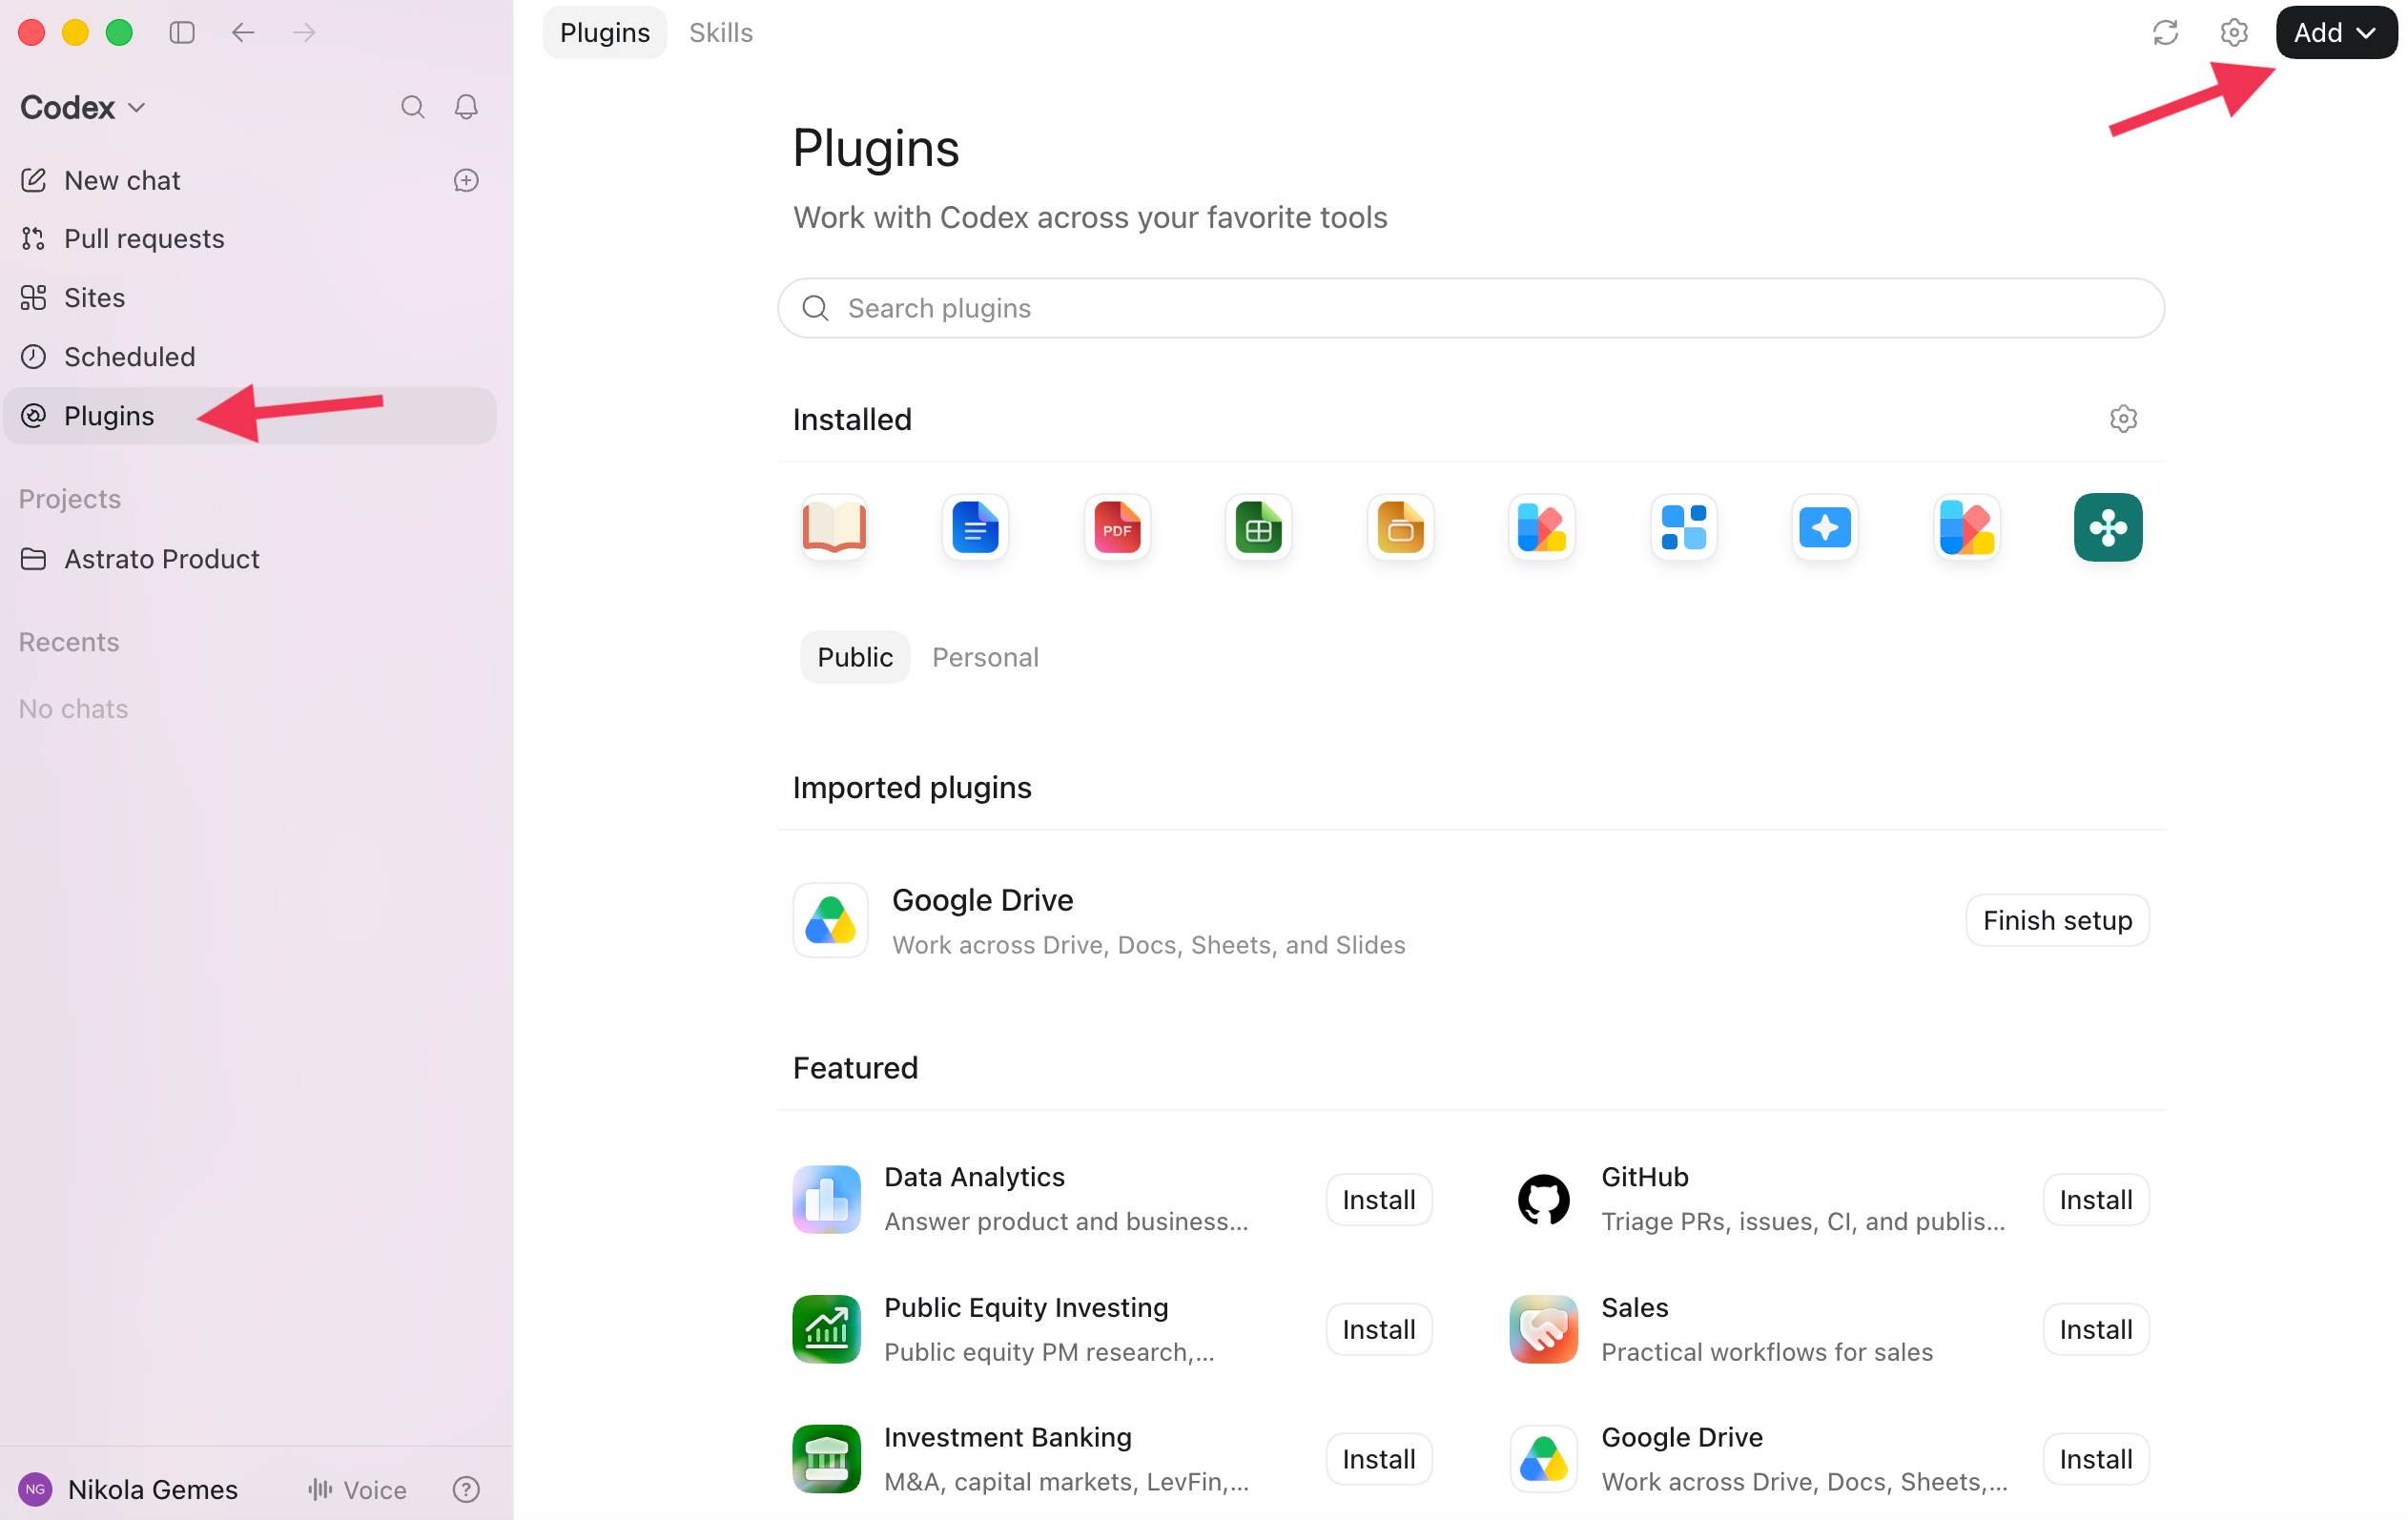
Step 1: Open Codex, go to Plugins, and click Add.
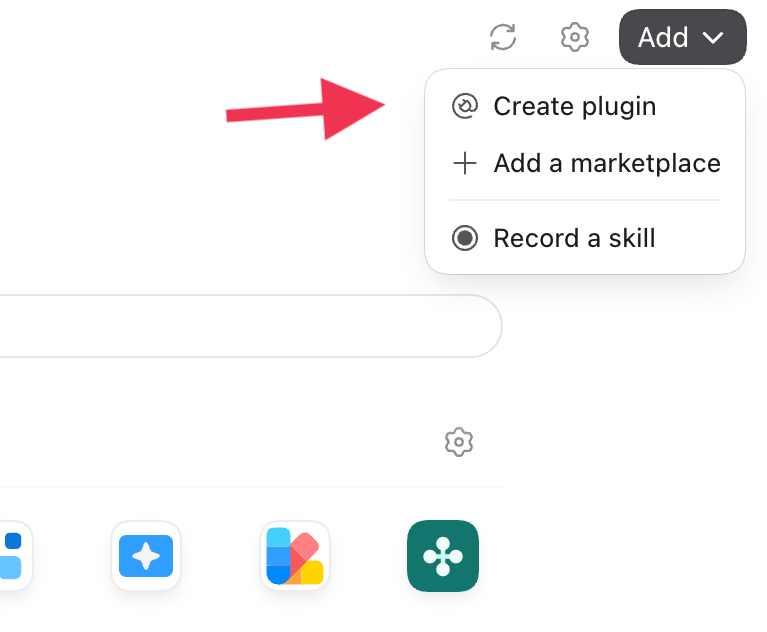
Step 2: Choose create plugin.
Step 3: A chat opens with a Plugin Creator prompt waiting to be finished. Paste your Astrato address followed by /mcp — for most organisations https://app.astrato.io/mcp — and send it.
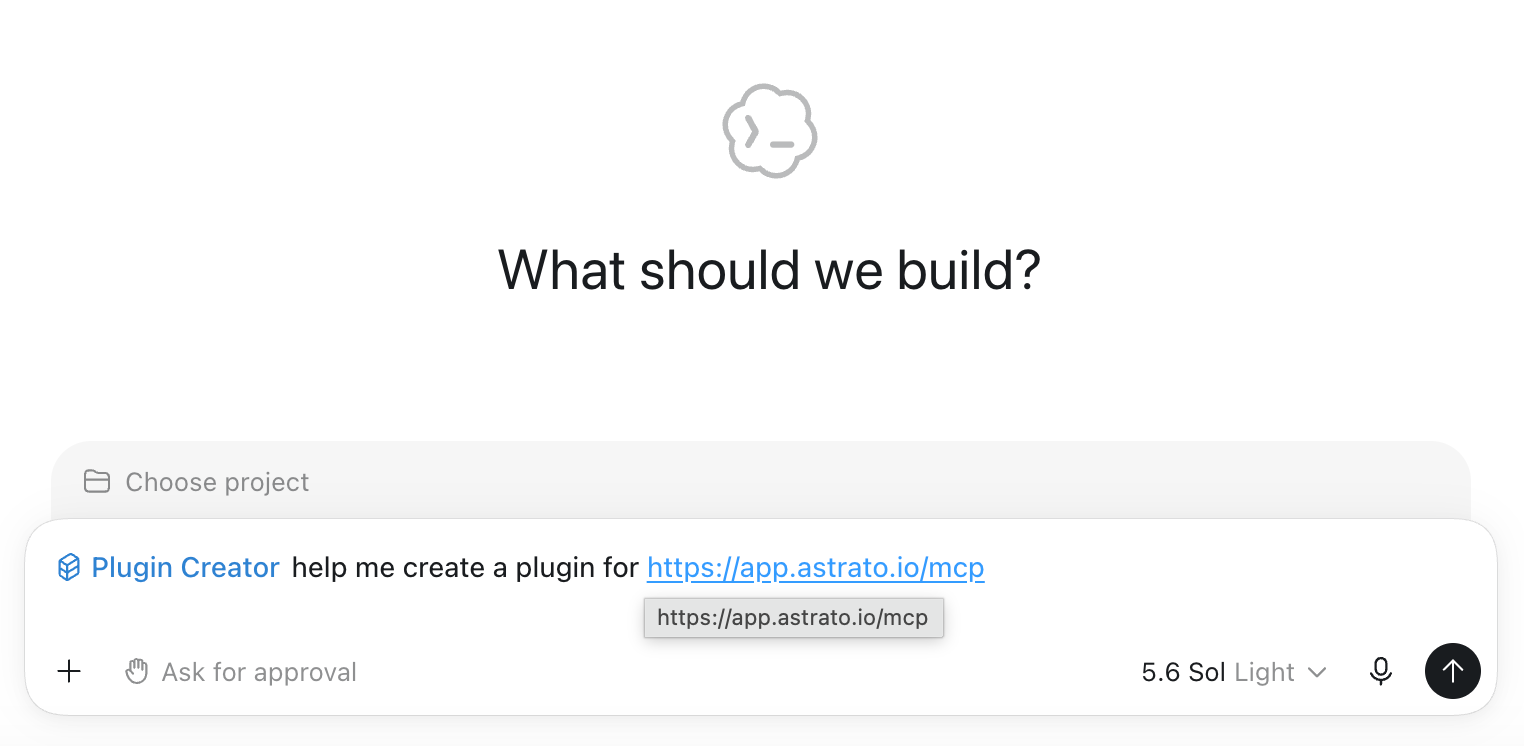
Step 4: Codex builds and checks the plugin, which takes a minute or two. When it’s done, click View astrato.
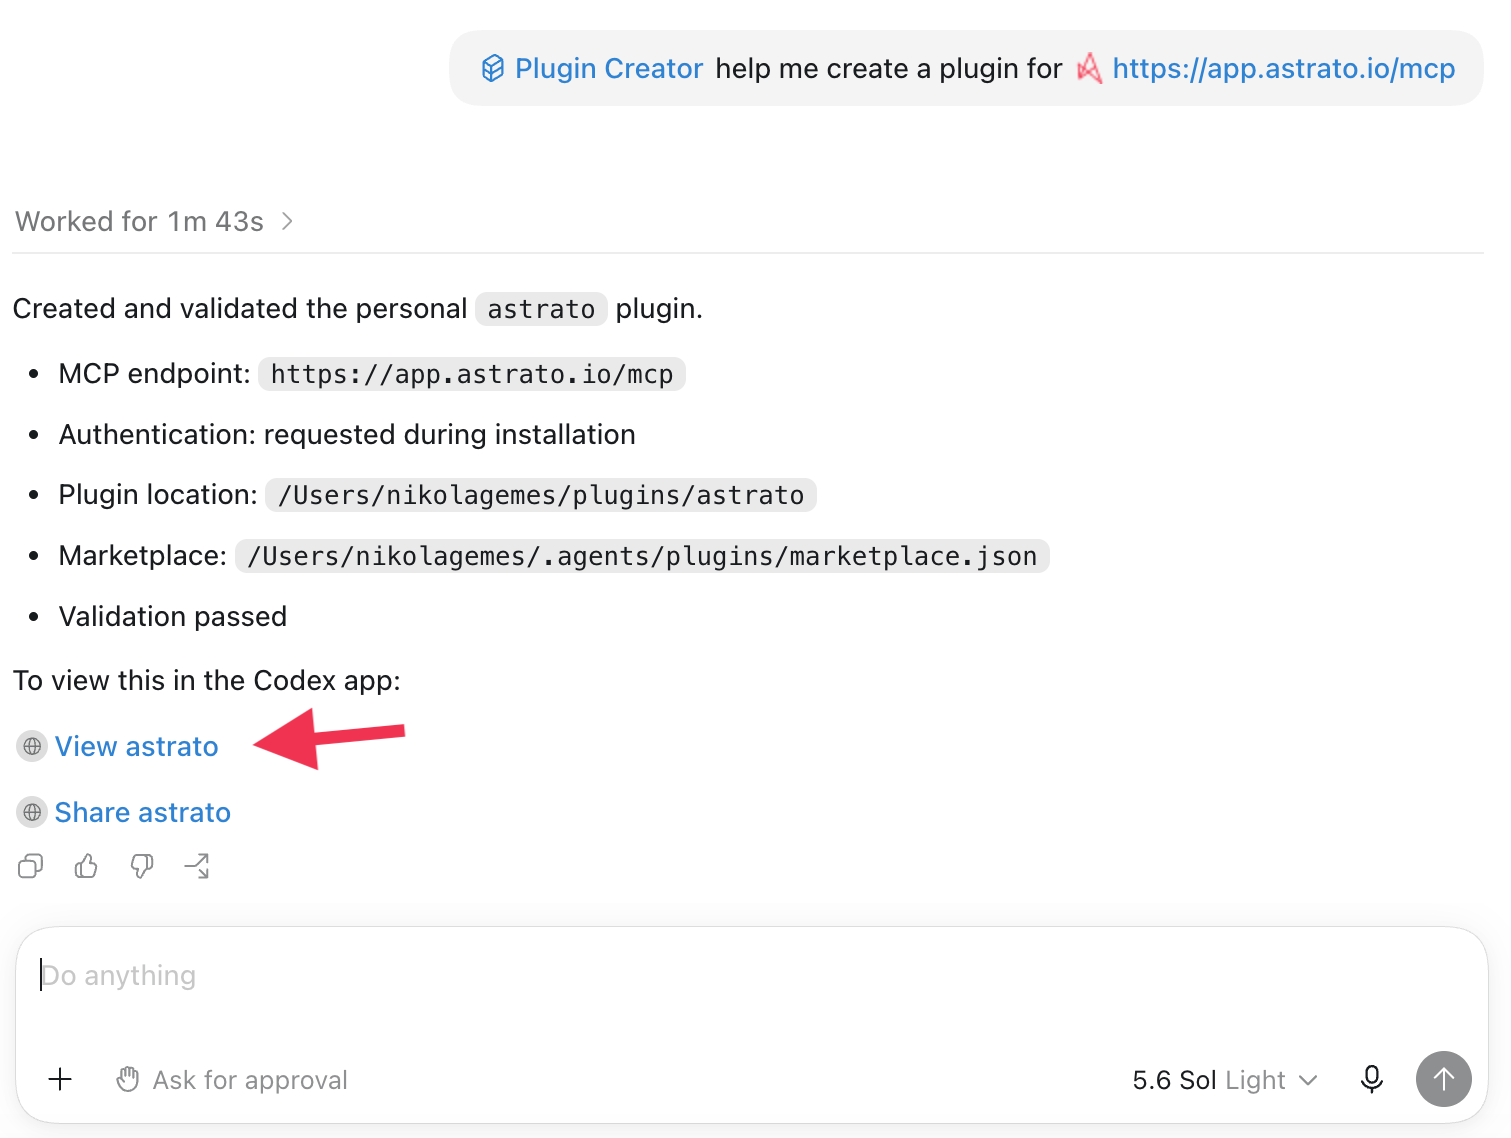
Step 5: Click Install plugin. Codex installs it, asks you to sign in to Astrato, and opens a chat ready to use it.
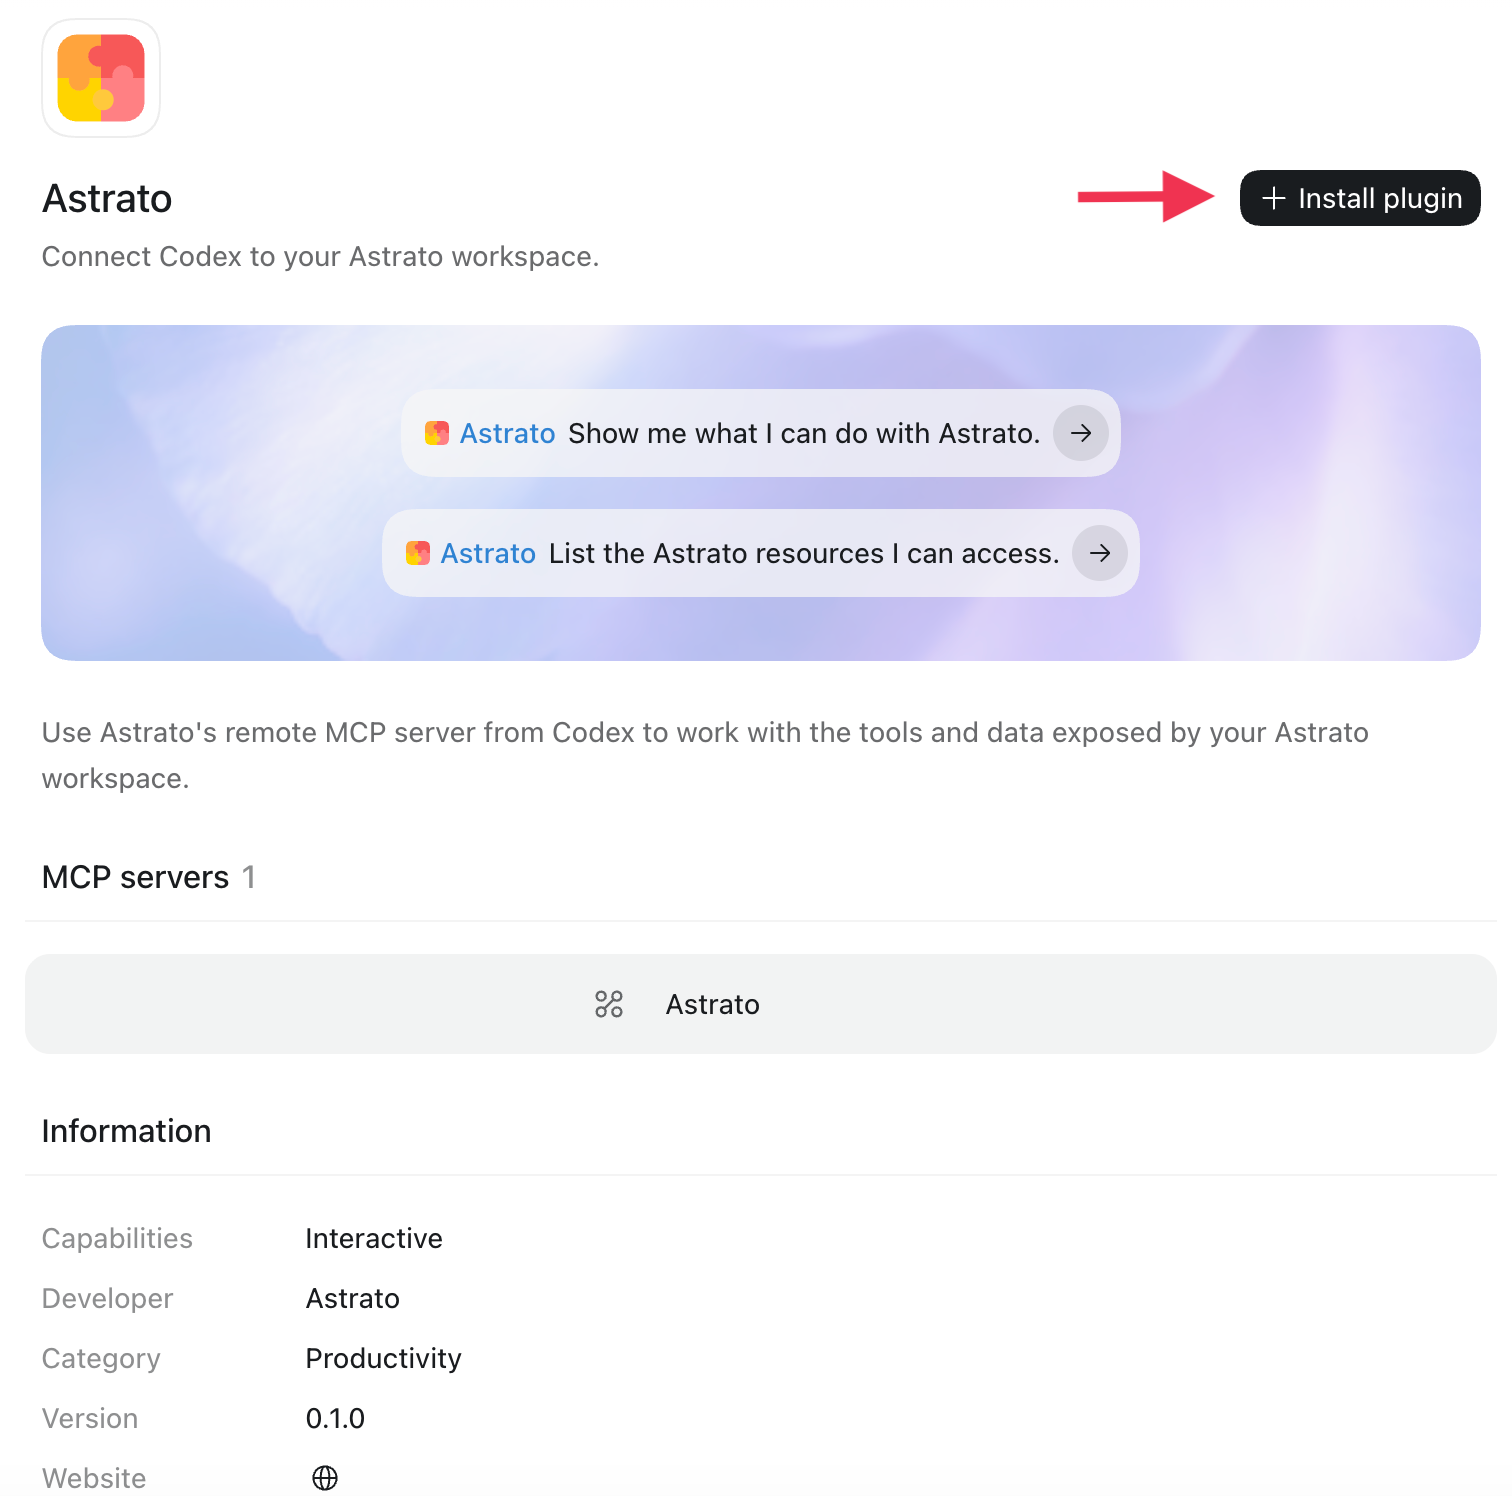
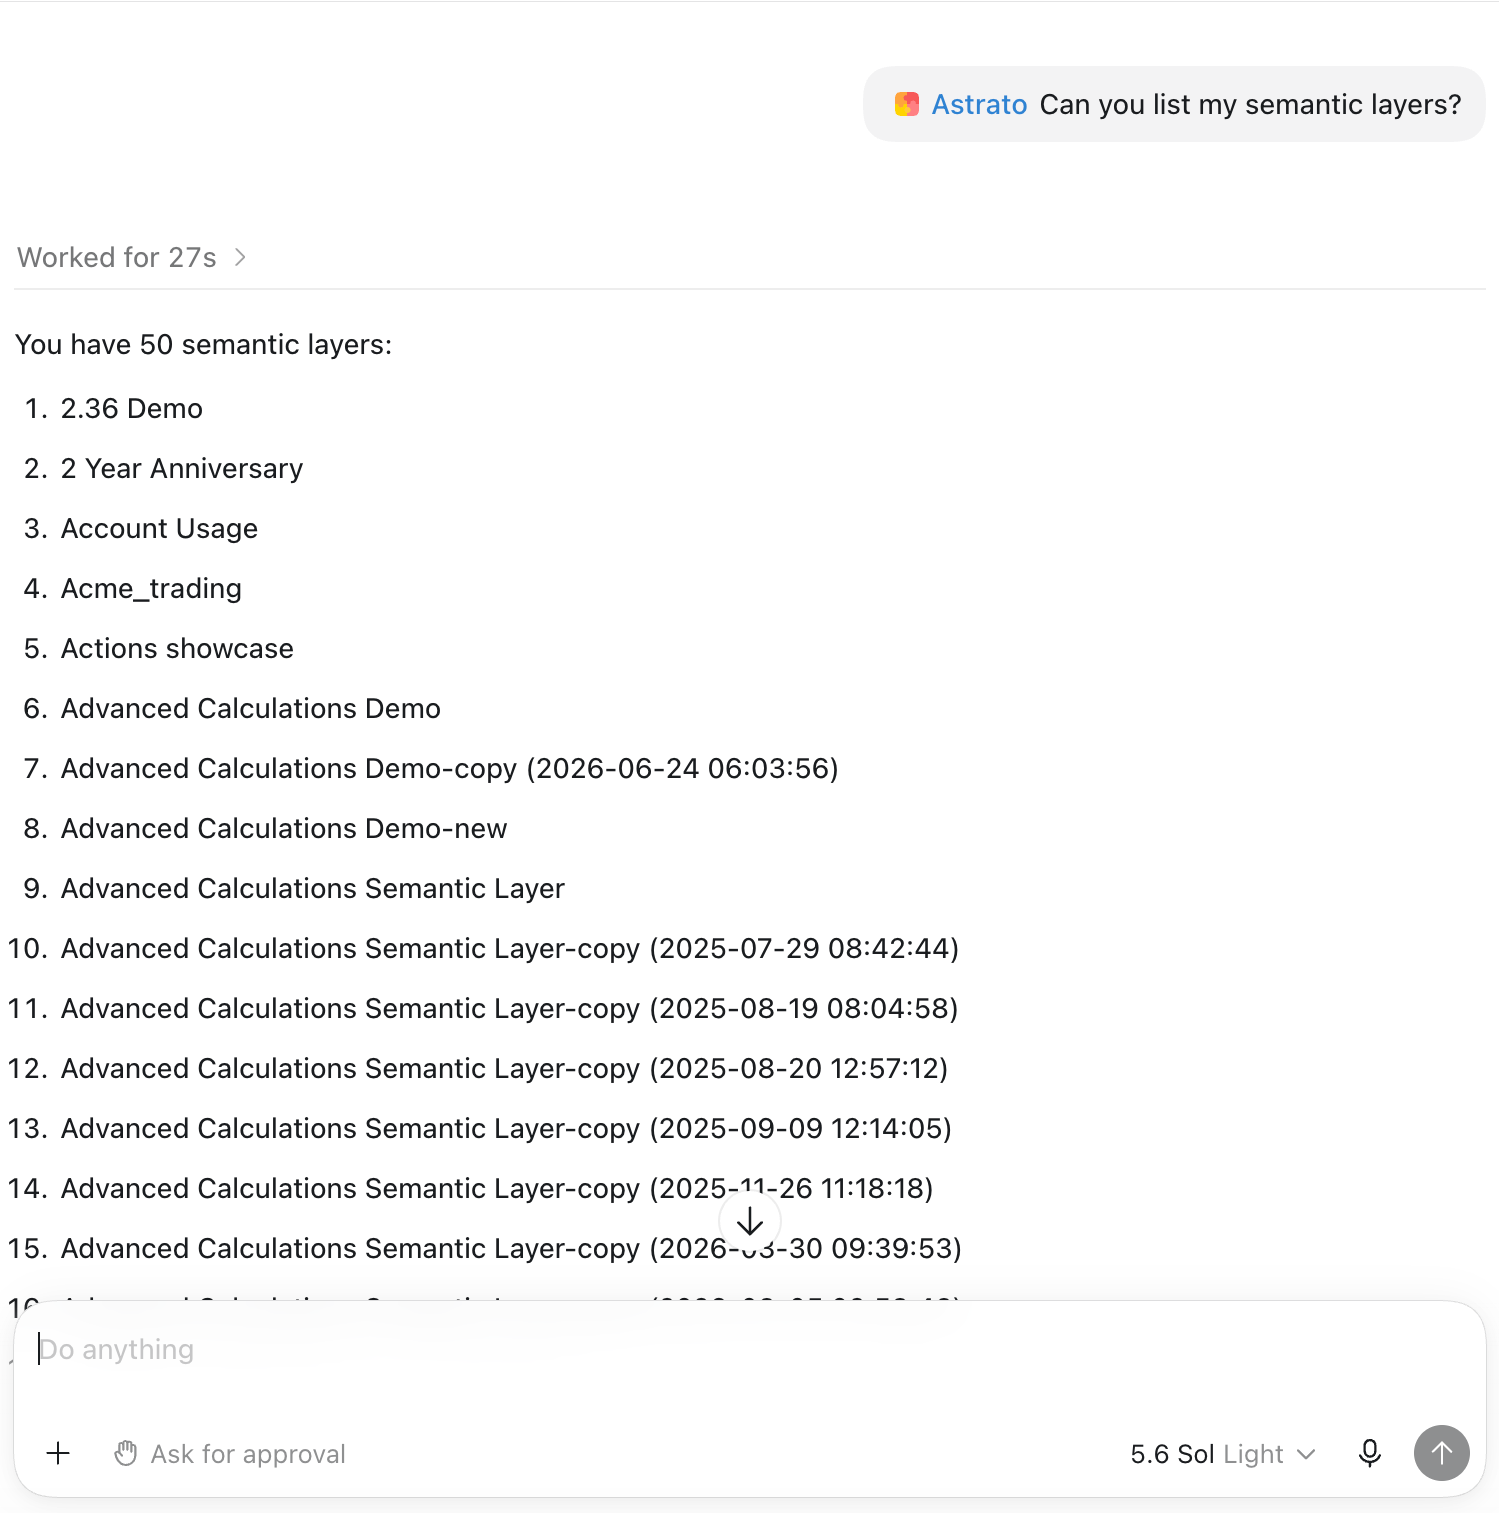
Result: Astrato is available in Codex. Ask it to list your semantic layers as a first test.
Snowflake Cortex Code
Section titled “Snowflake Cortex Code”Cortex Code is Snowflake’s own coding assistant — you may also hear it called CoCo. Connecting it works much like Visual Studio Code: you give it the address, and it handles sign-in itself.
Step 1: Open Cortex Code, go to Settings → MCP → MCP Connectors, and click + New.
Step 2: Fill in the form — Server Name: Astrato. Server Type: Remote (HTTP). Server URL: your Astrato address followed by /mcp, for most organisations https://app.astrato.io/mcp. Leave Headers and Environment Variables empty. Click Save.
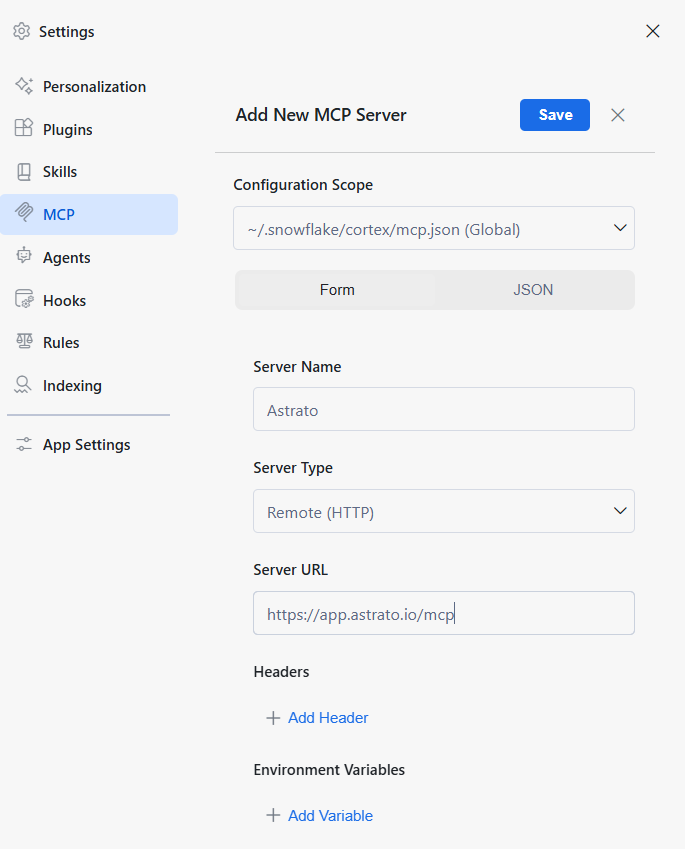
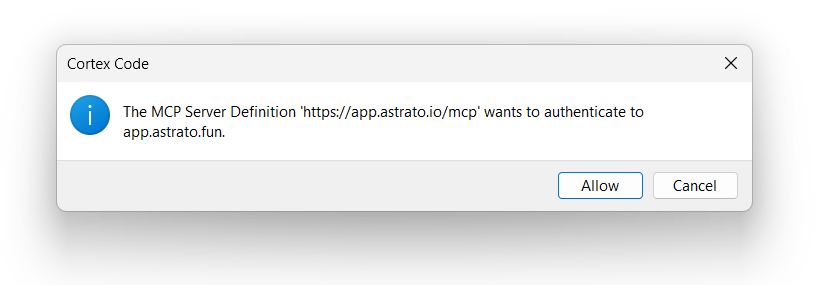
Step 3: Cortex Code asks whether it may authenticate. Click Allow.
Step 4: Sign in to Astrato when it asks — the same sign-in step as Claude.
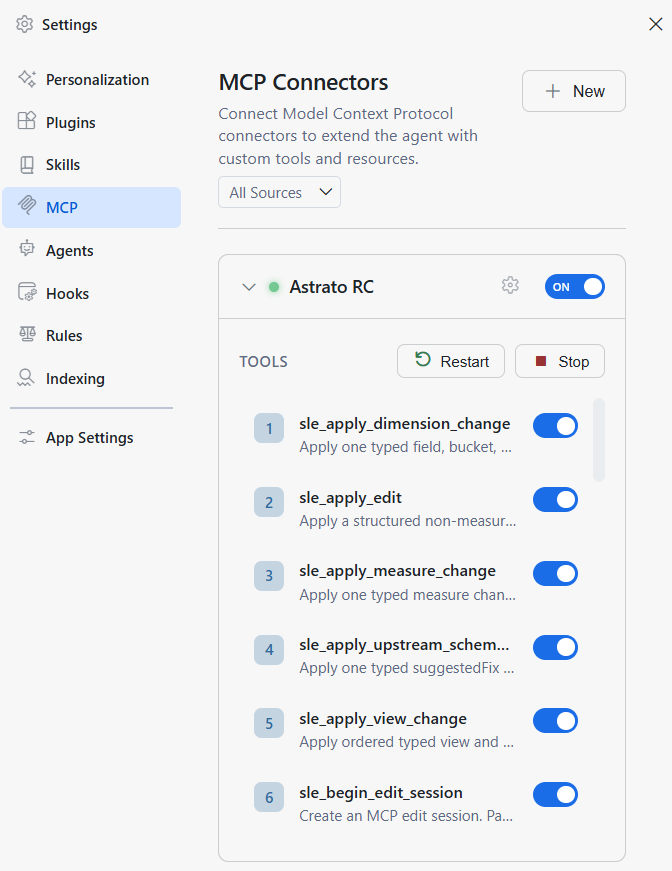
Result: Astrato appears in your MCP Connectors list, switched on, with its tools ready to use for reading, editing and versioning your semantic layer.
Install the Astrato skills for everyone (optional). The Astrato skills teach Cortex Code the Astrato workflows. Cortex Code Desktop loads skills from your own folders, from GitHub and from Snowflake stages. Cortex Code keeps the registration and source settings for your skill folders in ~/.snowflake/cortex/skills.json; the skill files stay in the folder you register. Project skills live in the workspace under .snowflake/cortex/skills/. See Snowflake’s skills documentation for the steps.
To make the skills available to all users in your organisation, publish them to a Snowflake stage or to the Skills Catalog, and grant read access to a shared role that your users hold. Each person then adds the skill from the Shared Skills section, and only people with that role can see it. Skills do not grant Astrato access; each person still signs in to Astrato.
Something else
Section titled “Something else”Other assistants may work — these are the ones we’ve confirmed. If yours isn’t listed, it needs to support connecting to an MCP server over the web. Your Astrato contact can check it for you.
Decide what your assistant may do
Section titled “Decide what your assistant may do”Once connected, most assistants let you set permissions tool by tool — allow something always, ask you each time, or never allow it.
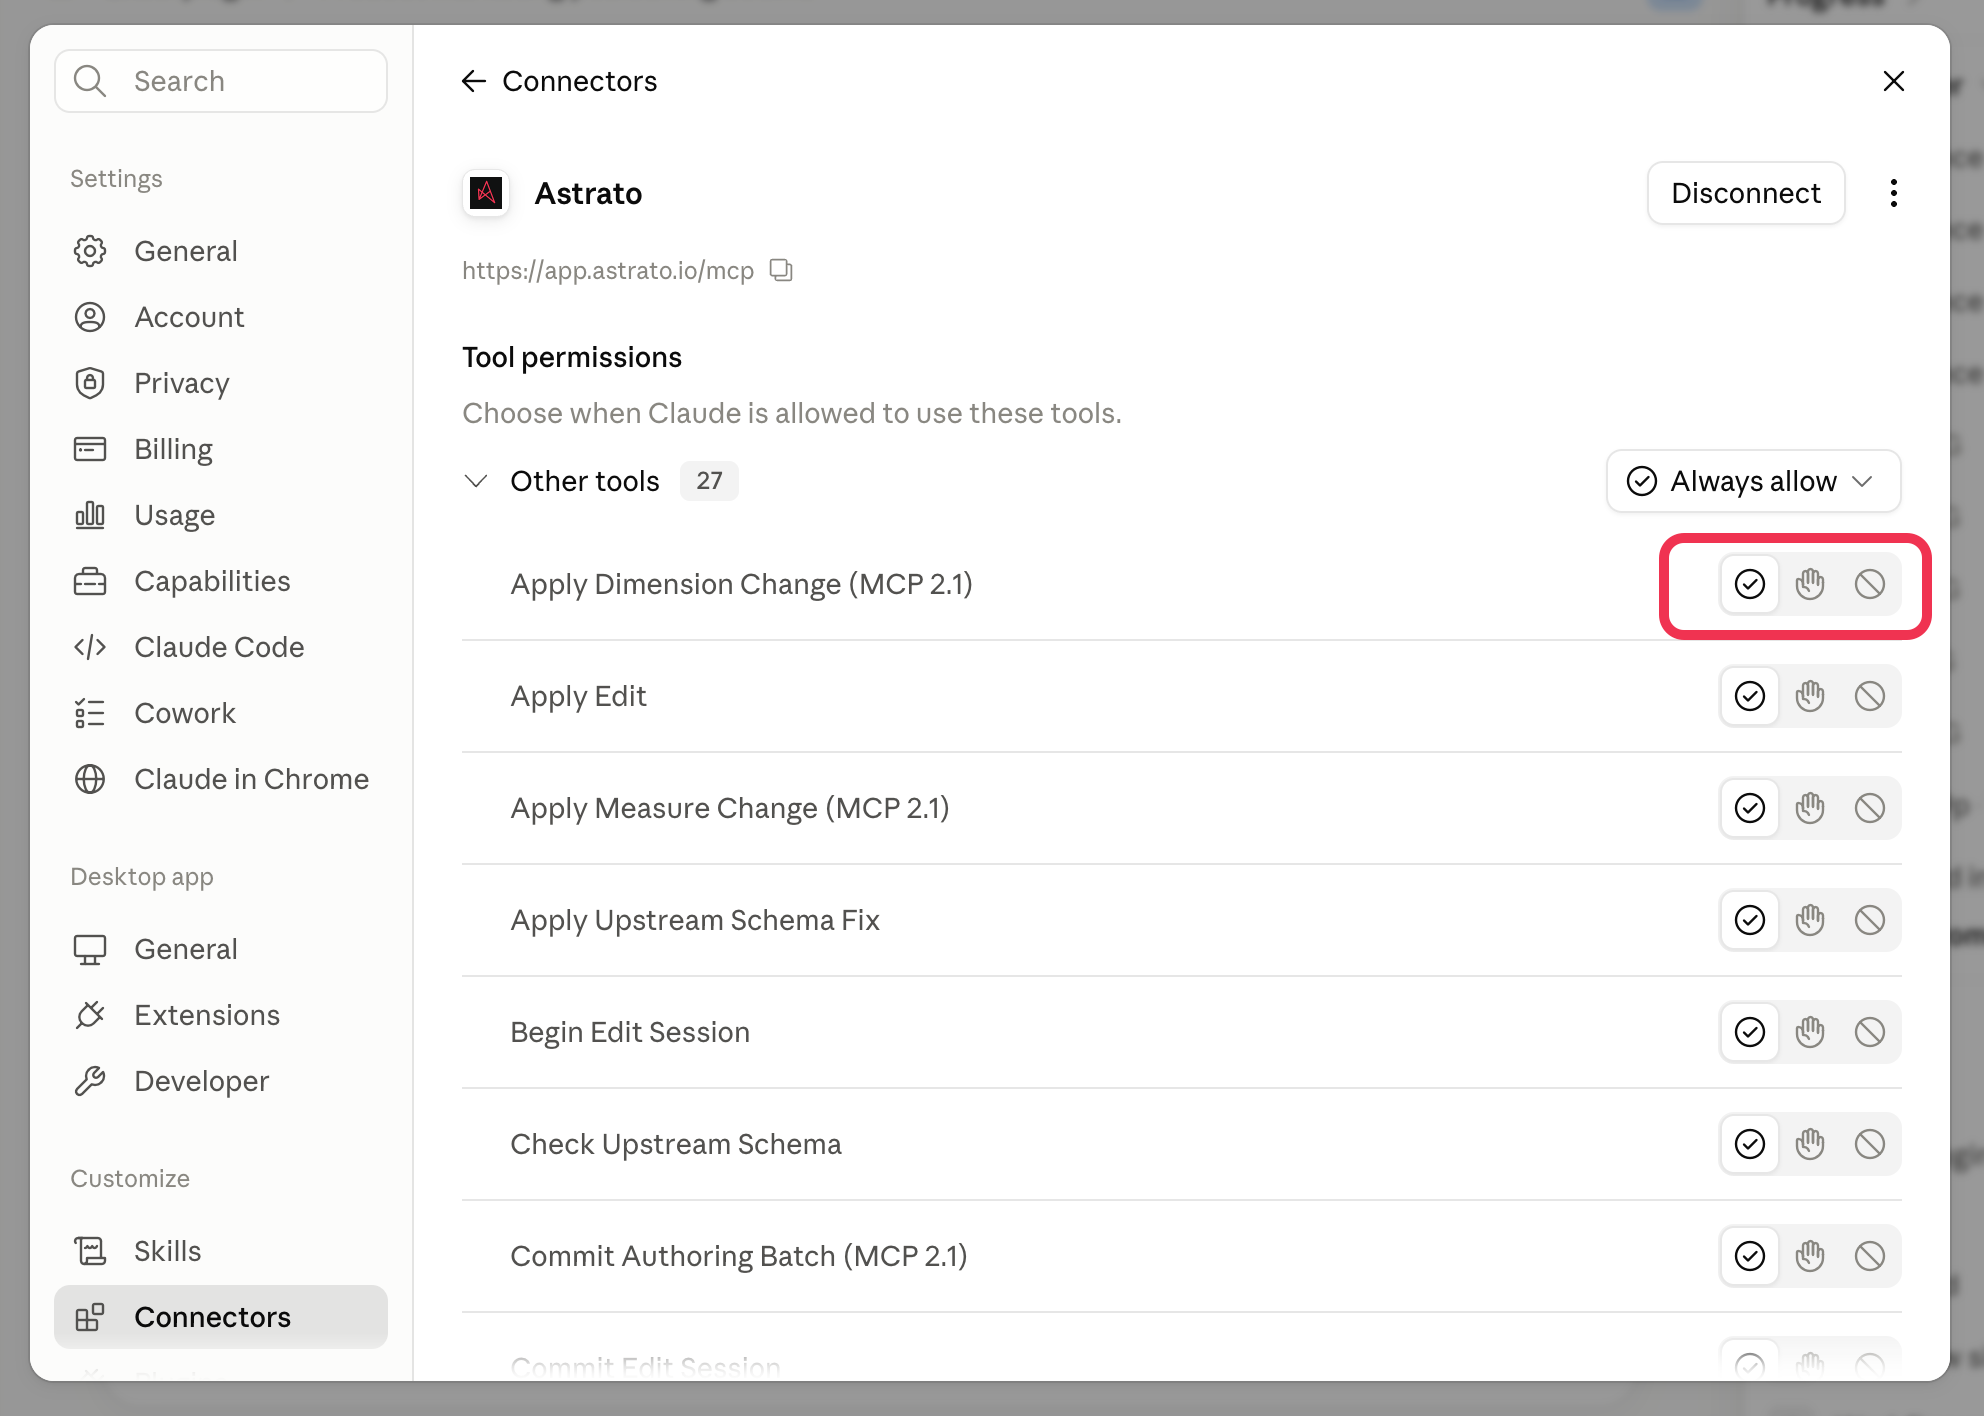
It’s worth a look before you let an assistant loose on a semantic layer other people depend on. Reading is harmless; editing and publishing are the ones to think about. Setting the editing tools to ask each time gives you a checkpoint without getting in your way.
Connect with a personal access token
Section titled “Connect with a personal access token”A few tools ask for a token instead of sending you to Astrato to sign in. If yours does, you create the token in Astrato and paste it in.
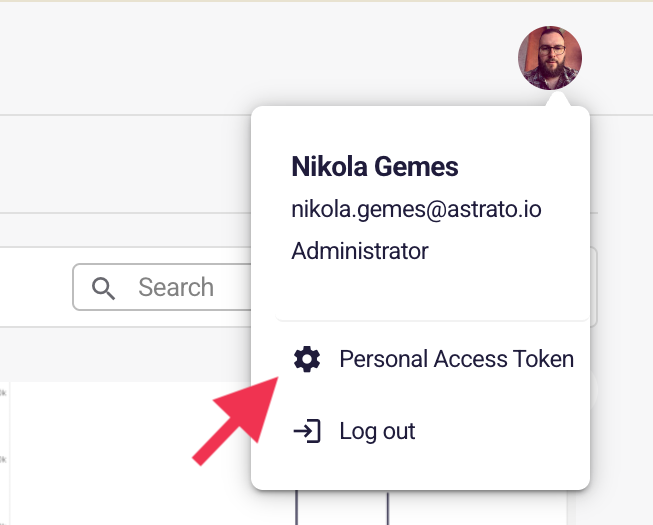
Step 1: On the Workbooks page, click your profile picture in the top right.

Step 2: Choose Personal Access Token.
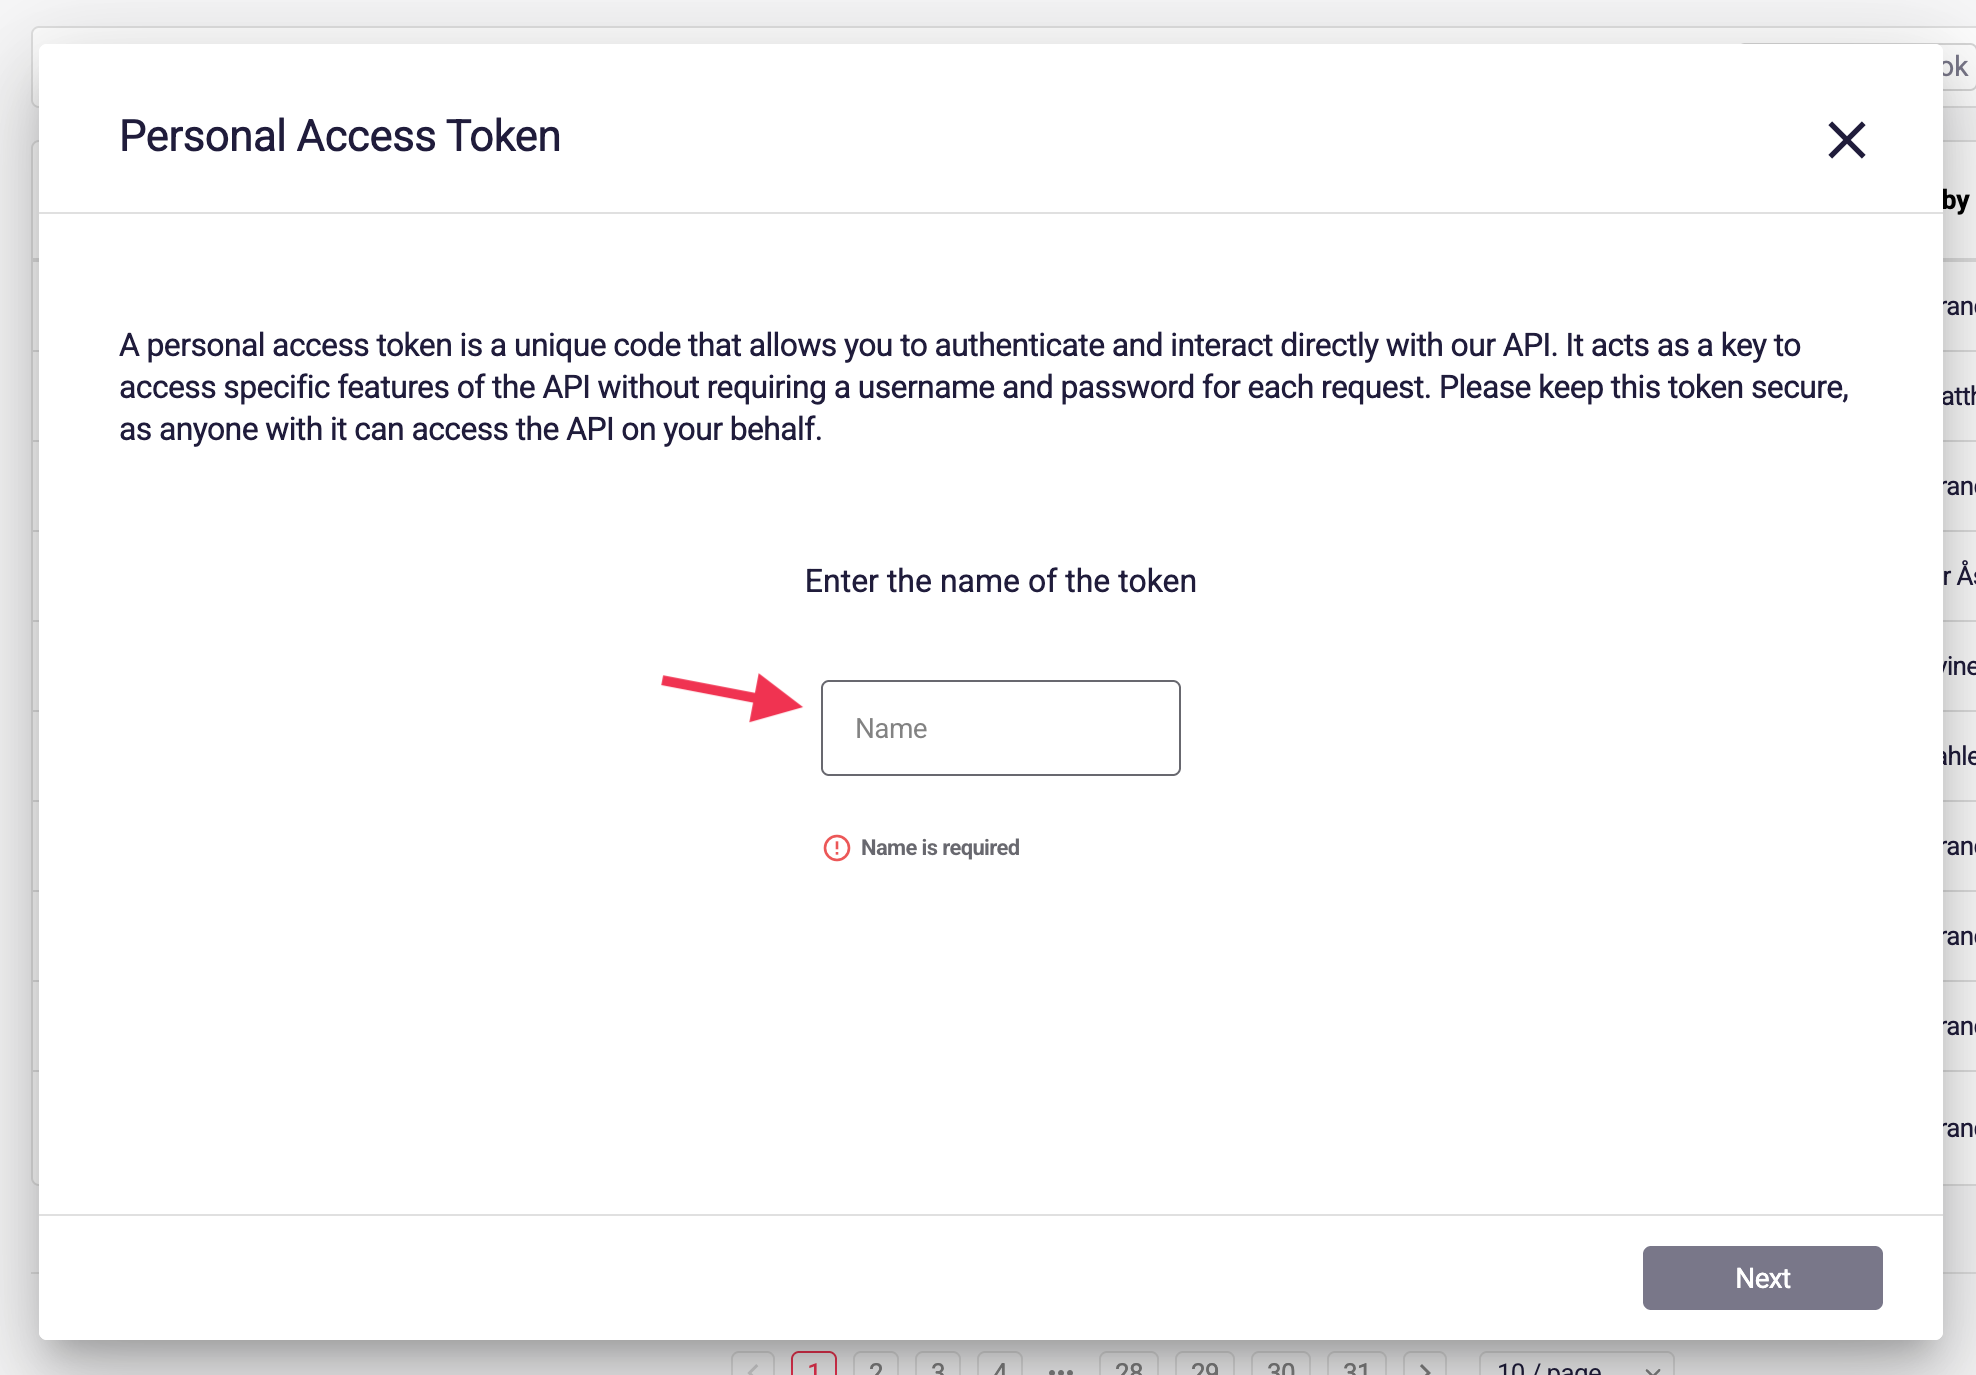
Step 3: Give the token a name you’ll recognise later — the tool it’s for is usually the clearest — then click Next.
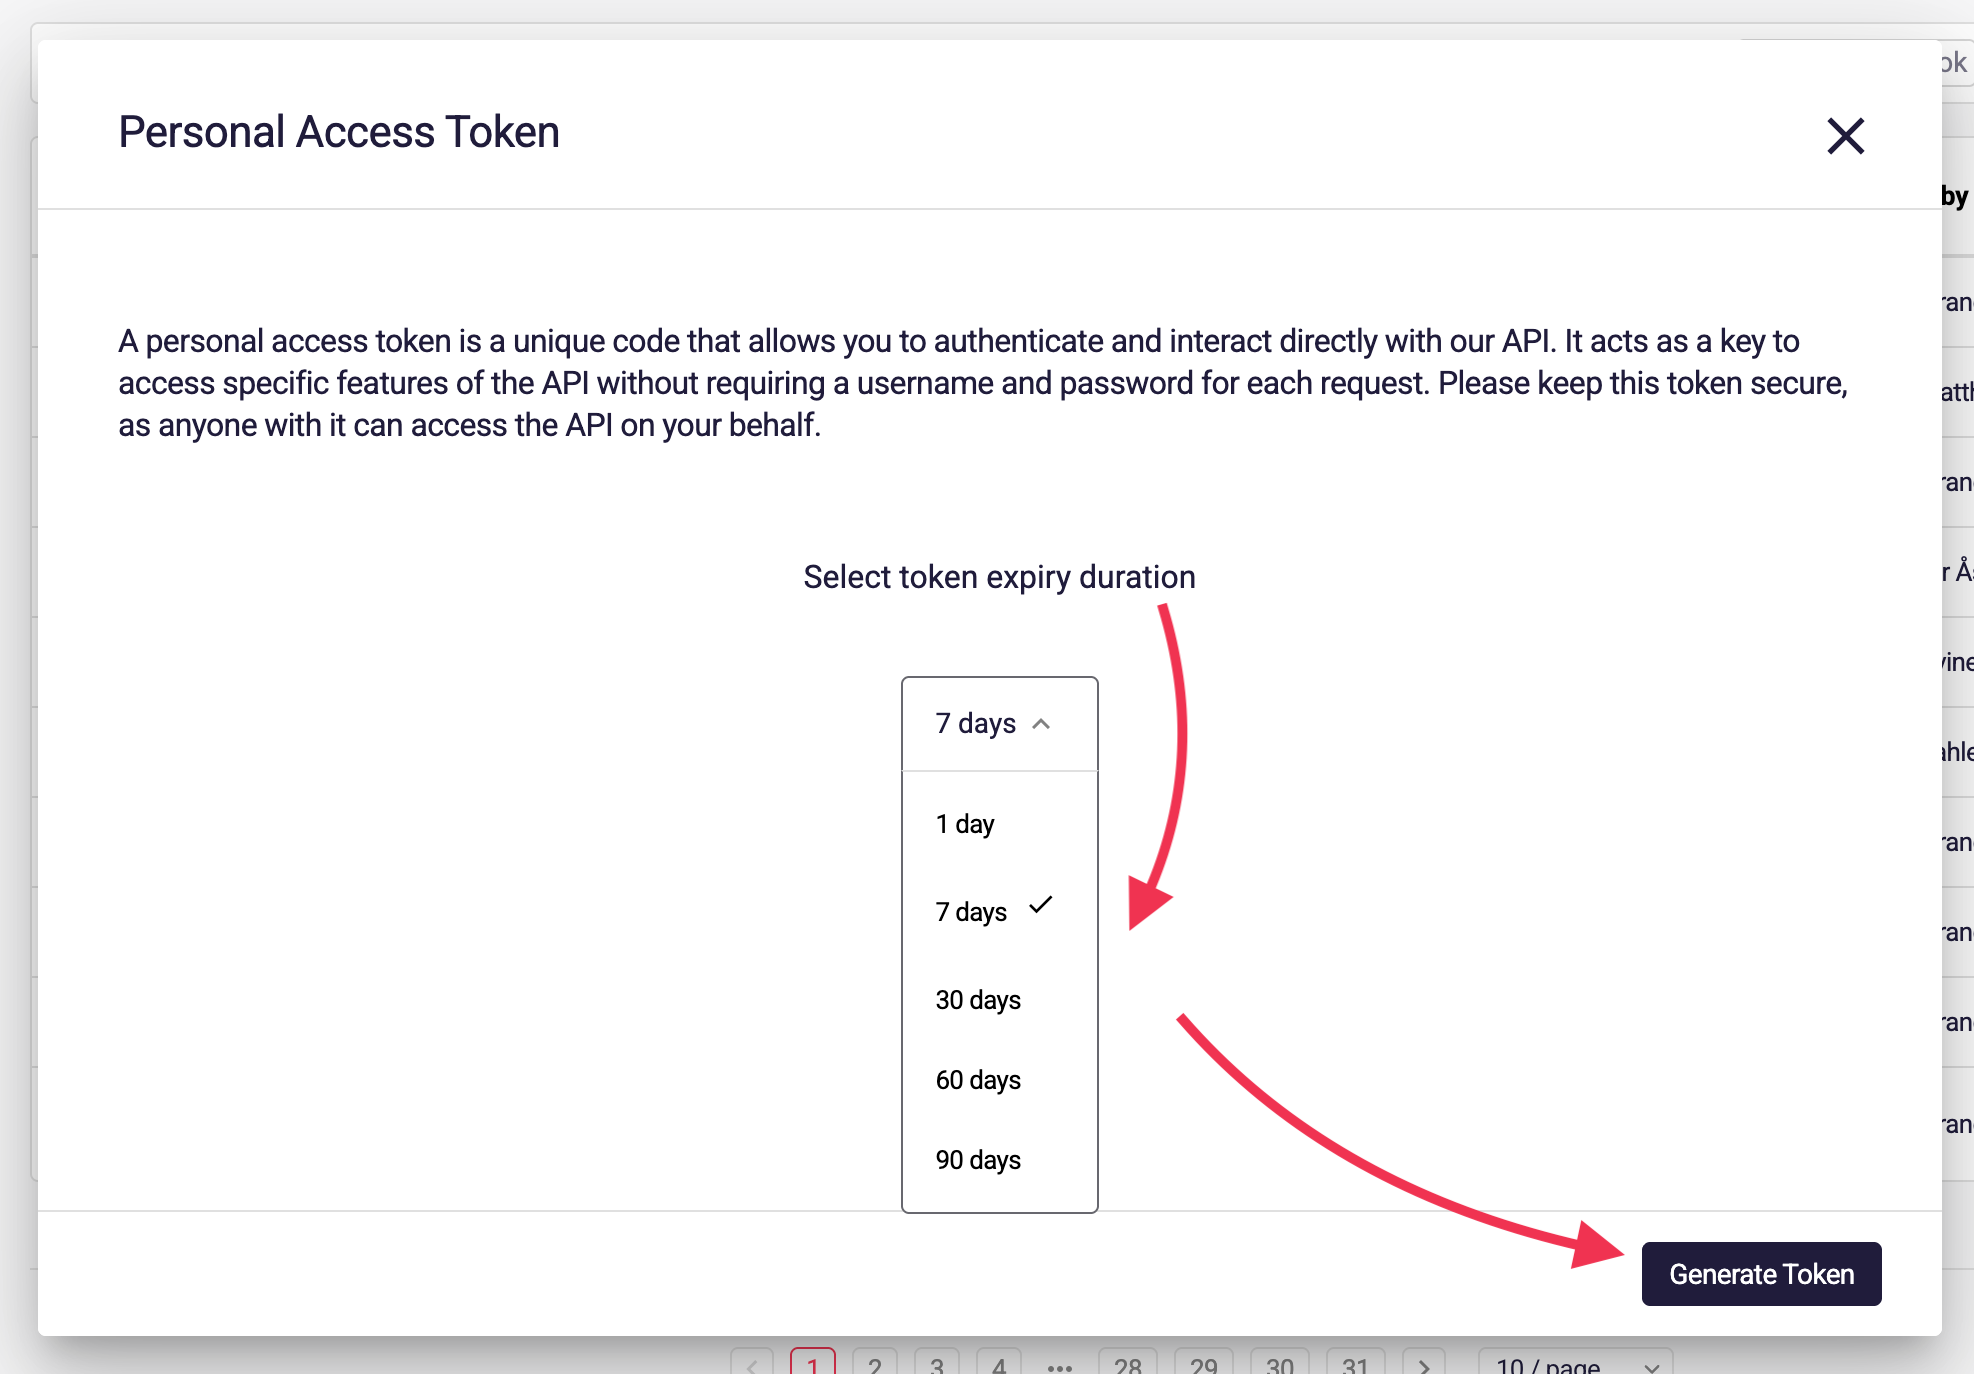
Step 4: Choose how long it should last: 1, 7, 30, 60 or 90 days. Then click Generate Token.
Step 5: Copy the token and paste it straight into the tool that needs it.
Result: the token works until the day it expires. There’s no automatic renewal — when it lapses, you come back here and make another. You can also delete a token from the same place, which stops it working immediately.
You only see it once. Astrato shows the token when you create it and never again. If you lose it, delete it and make a new one.
Can’t create one? Your organisation can switch personal access tokens off. If you don’t see the option in the menu, ask your Astrato administrator to enable them.
In the tool, give your Astrato address and the token:
{ "mcpServers": { "astrato": { "type": "http", "url": "https://app.astrato.io/mcp", "headers": { "Authorization": "Bearer your-personal-access-token" } } }}Treat a token like a password. It carries everything your account can do — reading, editing and publishing — so don’t paste it into a shared file or a chat window.
What your assistant can do
Section titled “What your assistant can do”Once connected, it can:
- Look around — list your semantic layers, summarise one, search for a field, measure or join, and check the model for problems.
- Make changes — create, rename, edit or delete measures and dimensions. It can work through several at once, and its changes land as an ordinary revision in your version history.
- Save a version — ask it to name a version before it starts, and you’ll have a clean point to come back to.
- Publish — when you ask it to.
- Answer business questions that are already defined in your model.
Everything it does is subject to your own permissions. It can’t see or change anything you couldn’t.
Tip: ask your assistant to name a version before letting it make a batch of changes. Everything it does then shows up in Versions like any other edit, and you can go back — see Go back to an earlier version.
If it won’t connect
Section titled “If it won’t connect”Check it’s enabled. This is the most common reason. Ask your Astrato contact whether the connection is switched on for your environment.
Clear the assistant’s saved sign-in and try again. Many assistants quietly remember an earlier attempt, so a stale sign-in can keep failing even after everything else is right.
Check you’re using the right address. It needs /mcp on the end, and it needs to be your organisation’s Astrato address.
If you’re setting this up for a tool that isn’t in the list above, or you need the full technical detail, your Astrato contact can point you at the developer documentation.
Next: Read How versioning works before you let an assistant change anything, so you know how to undo it.