

System settings
As a workspace Owner or Administrator, open Administration → System Settings. Choose a tab, make your changes, then select Save changes. Discard restores your last saved settings. If a save fails, your edits remain available to correct or retry.
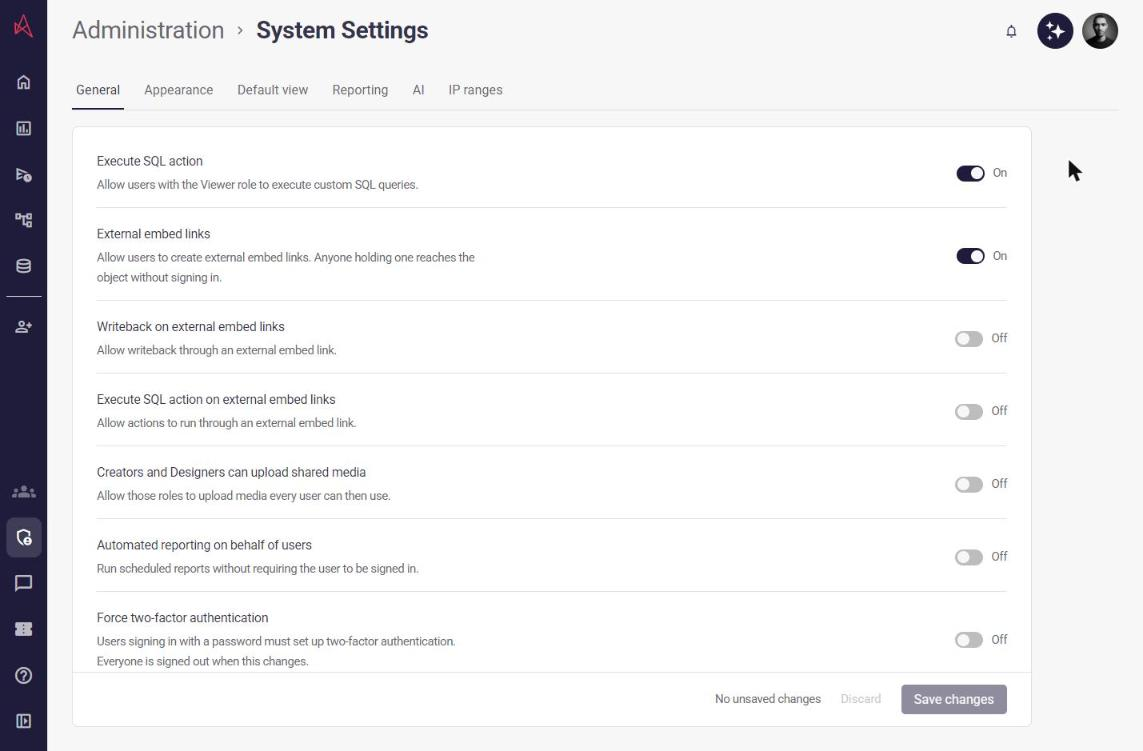
Settings appear in a bordered panel that limits their width on large screens and fills the available width on smaller screens. The tabs stay above it; Save and Discard remain in its footer while the settings scroll.
With a tab focused, use Left/Right Arrow to switch sections, or Home/End to select the first/last section. Tab moves into the selected section. Switching sections keeps your unsaved changes.
General
Section titled “General”General includes workbook-gallery visibility, Viewer SQL actions, external embedding, shared media, automated reporting, two-factor authentication, self-service, marketing email and support controls. Disabling external embedding also turns off SQL actions and writeback on external embeds. Re-enabling embedding leaves those two permissions off until you explicitly enable them again.
The following controls open a dialog in this screen. Each dialog applies its own changes; other unsaved General settings remain in your draft.
- SCIM provisioning: SSO must be enabled. Select Enable, then Enable SCIM to generate a base URL and JWT token for your SCIM provider. Copy the token before closing the dialog; it cannot be retrieved later. View shows the base URL, and Disable stops provisioning. Disabling and re-enabling SCIM generates a new token and reinitialises provisioning.
- OEM management API: Enable creates a client ID and secret for automated sign-in. These credentials can impersonate every tenant member and provide full control of the tenant. Copy and store the secret securely before closing the dialog. View shows the client ID; Rotate replaces the secret, and Delete revokes the credentials. Applications using an old secret must switch to the new one after rotation.
- Personal access tokens: Manage personal access tokens lets you enable PAT creation and choose the roles that may create tokens. Select Save to apply the policy. The red outlined Revoke all personal access tokens button removes existing tokens only after you select Confirm revocation. Cancel returns to your unsaved policy settings. Revocation cannot be undone; applications using those tokens lose access.
- Astrato for Excel access: Select Manage Astrato for Excel access and choose All users, Restricted, or Disabled. All users can connect unless they match a Deny selection. Restricted access requires an Allow selection. Select users, groups, or roles, then Save. Disabled allows only tenant Owners and Administrators, who always retain access. Deny overrides Allow. Roles, users, and groups share the dialog’s scroll area; Close and Save remain visible while you browse long lists.
Appearance and default view
Section titled “Appearance and default view”Choose a named theme, or select Custom before editing its two colours and font shade. Nature is the original default theme.
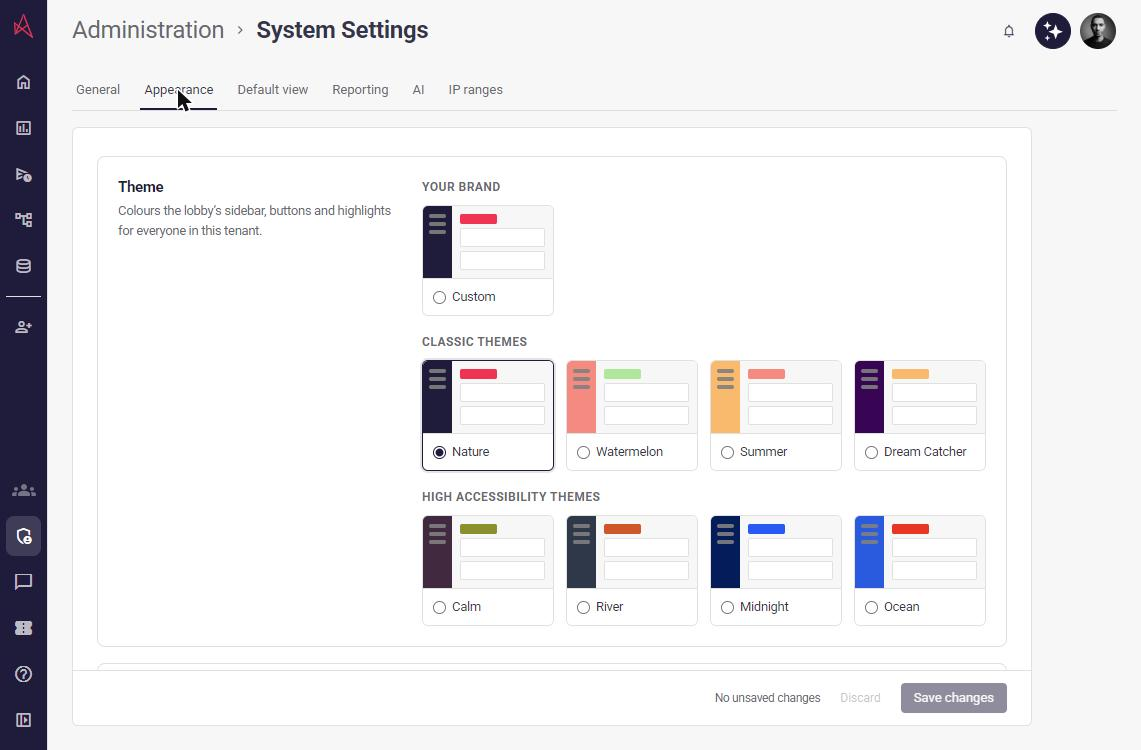
In the lobby, the New semantic layer, New connection and New AI Provider buttons take the theme’s secondary colour, shaded where needed so their label stays readable. Nature keeps them Astrato red.
Logo and Mobile logo each show the current image with controls to upload or replace it. Pick a file to preview it locally, then select Save changes to apply it to the tenant. Reset to Astrato previews the default logo and applies the reset when you save. Discard cancels either pending upload or reset. The two logos are independent: Logo appears in the lobby sidebar, while Mobile logo is used by Astrato’s mobile view. Reset mobile logo clears the separate mobile image when you save; mobile devices then use the main Logo, or Astrato’s default if no main Logo is set.
Logo files save separately from other settings. If a later save fails, completed logo changes remain applied; retrying saves only the remaining changes.
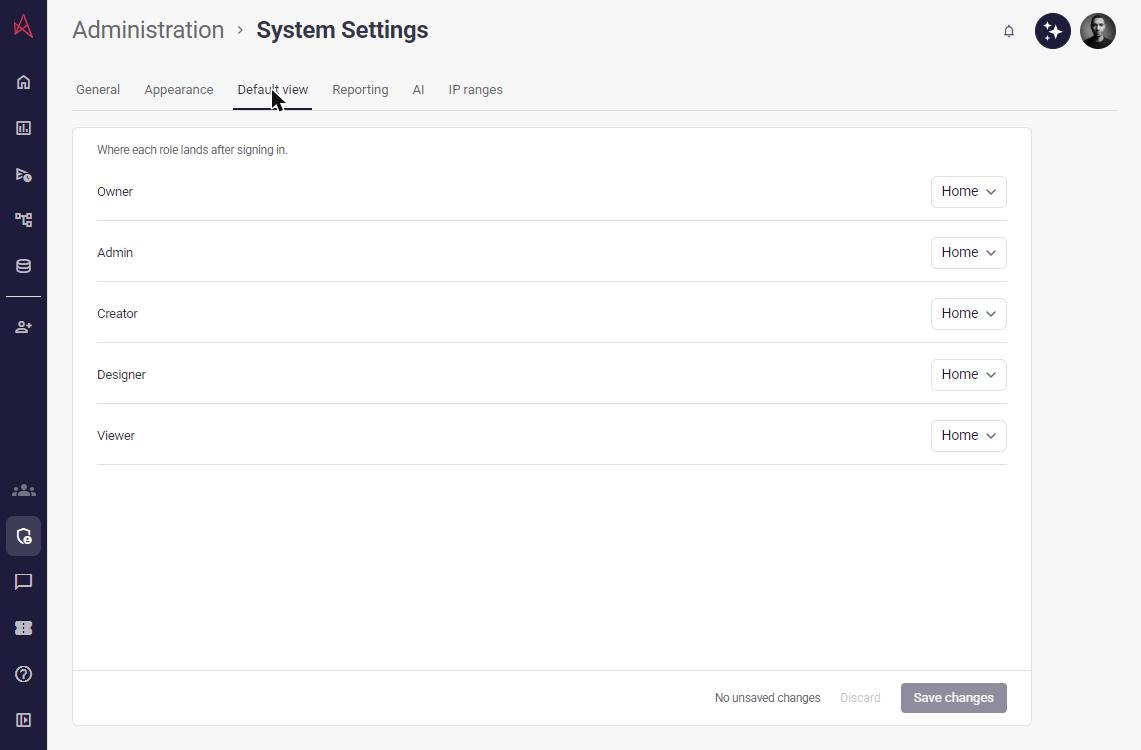
In Default view, choose Home or Analytics → Workbooks for each role. Owners, Administrators and Creators can also start in Data & AI. Viewer and Designer roles cannot select Data & AI as their default view. Existing Workbooks settings open Home; Collections settings open the Workbooks tab in Analytics. The saved default applies when you enter the lobby; direct links and later Home clicks keep their requested destination. If the setting cannot be loaded, the lobby opens Home.
Changing one custom-theme option or role’s default view retains the other supported values you loaded. Saves include only the theme options and roles managed by this screen.
Reporting
Section titled “Reporting”Choose a Default reporting email integration and select Save changes. Astrato default uses the platform SendGrid account. The dropdown also lists your saved SendGrid, Brevo, Gmail and Office 365 integrations by name and provider. Discard restores the saved selection. If an integration is unavailable or the list fails to load, the saved selection is retained; use Retry email integrations after a loading failure.
When Astrato default is selected, Sending address lists the available Astrato sender addresses. Choose an address and select Save changes; Discard restores the saved value. While the addresses load, a loading message is shown and the picker is disabled. The setting is hidden for custom email integrations, which use their own sender configuration. Switching integrations preserves your Astrato sender choice. If the address list fails to load, your current address is retained; choose Retry sending addresses. Other settings remain editable.
Under Parallel reports or Timeout, select Configure, enter a value, then select Apply. Apply updates the draft; select Save changes to save it for the workspace, or Discard to restore the saved settings. Cancel or Escape closes a configuration dialog without changing the draft.
The parallel limit accepts 1 to 1,000 executions, with a default of 10. The dialog previews the calculated ceilings for Highest, High, Medium, Low and Lowest priority. For a workspace-wide maximum of 10, these ceilings are 10, 8, 5, 2 and 1. They are additional restrictions: all priorities still share the workspace-wide maximum. The page shows the running count and saved limit for each priority; editing a draft does not change those live values.
The timeout covers report generation and workbook or object exports, and accepts 60 to 3,600 seconds. Its default is 180 seconds. Leave either dialog’s value empty to use its default. You can also enable Report tracing to help diagnose report failures.
Scheduler limits shows report, workflow and Astrato email usage for the current calendar month, alongside their read-only quotas. Usage refreshes every 10 seconds while the Reporting tab is open; Refresh usage reads it immediately. Missing usage is shown as a dash. A failed refresh retains the last values with a warning and Try again, so a loading failure is not presented as zero usage.
Self-service enables natural language custom report generation. It requires a configured AI provider. Change the switch and select Save changes, or Discard to restore the saved value. If AI providers fail to load, use Retry; the saved switch value is retained. This setting controls report generation; it does not enable users to sign themselves up.
Insights provider selects the model for insights, name suggestions and measure generation. Nash provider selects the default provider for Nash. The former Copilot provider setting and the per-object AI Assistant provider setting have been removed; use Nash for supported AI authoring tasks.
IP ranges
Section titled “IP ranges”Your IP shows the address Astrato sees for the current request. Select Copy to copy it. A proxy or network gateway can affect the address Astrato sees. If the lookup fails, use Retry IP address; you can still edit your ranges.
Add an IPv4 address or CIDR range before enabling Restrict access by IP. Your current address must remain allowed. Saving an empty list while restriction is enabled is refused; disable restriction explicitly if you want to remove all ranges. Astrato checks your current address when you enable restriction or change an enabled list. If no range covers it, the save is refused and the reason appears beside IP ranges. A rejected change leaves the previous settings in effect.