

Data connections
A data connection gives Astrato access to a database or other source. Once it exists, you can use it when creating a semantic layer. Connection management must be enabled for your workspace.
Create a connection
Section titled “Create a connection”-
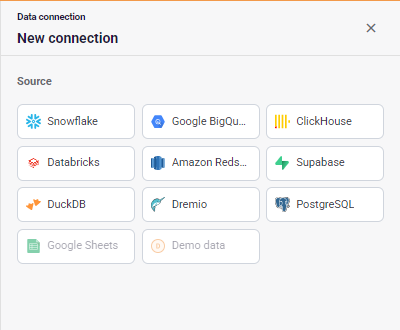
Open Data & AI → Data Connections, select New connection and choose your source.
-
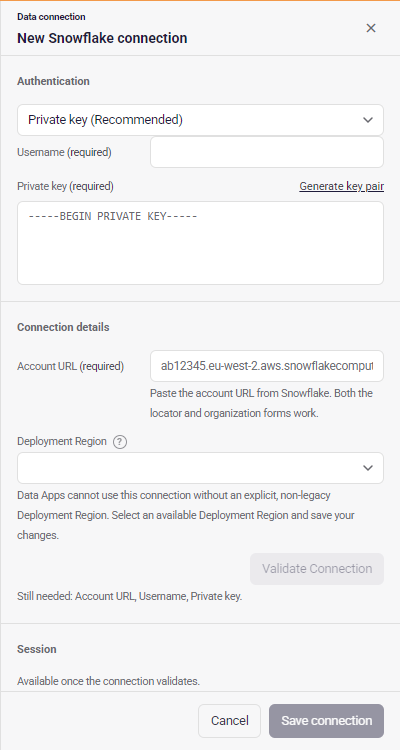
Choose an authentication method and enter credentials under Authentication. Enter host, project/dataset, and other source settings under Connection details. For Snowflake or Databricks OAuth, select a configured connection, select Sign in, and complete authorization in the new window. Once the editor confirms authorization, validate the connection. Existing authorization can be reused. DuckDB (MotherDuck) asks only for its service token, so its connection details hold only the Deployment Region: you choose its database after validating, from the databases the token can reach.
-
Select a Deployment Region if your workspace offers one. Every source except the demo dataset can route through one.
-
Select Validate Connection. A successful validation shows the databases accessible to the credential. Snowflake also offers role and warehouse choices; choose a warehouse before saving. Dremio lists its sources once a project is selected. If your token reaches only one project, it is selected automatically.
-
Choose the database, review the name and select Save connection.
-
Once the connection exists, choose a schema or leave it for later, then select Finish.
A source that cannot be created here is dimmed in the source list. Hover over or focus it to see why; selecting it shows the reason below the list. Google Sheets connections cannot be created in the new lobby yet: use the old lobby to create one (see Lobby navigation).
Schema browsing happens after the connection is created. If schema lookup fails, retry it or finish and choose the source later. The connection already exists; creating another is unnecessary.
A password with leading or trailing spaces is rejected. Use the explicit trim action to remove them before validating again. Private-key and service-account JSON documents have surrounding formatting whitespace removed.
When replacing credentials on an existing connection, Validate Connection tests the new credentials. Successful validation clears errors from loading choices with the old saved credentials and preserves your selected schema. Save the replacement before browsing schemas with it; schema browsing uses the saved connection.
Dynamic connections
Section titled “Dynamic connections”A dynamic connection uses each viewer’s connection settings in published workbooks. In the new lobby, this is available for Google BigQuery → Service account and ClickHouse → Password. BigQuery OAuth does not offer it. An unavailable option is disabled with an explanation.
- Enable Use dynamic connection, validate the default credentials and save the connection.
- Before Finish, select Add dynamic connection settings. Choose a user from your tenant, enter their settings and select Save user settings. BigQuery asks for a project and service-account JSON; ClickHouse asks for host, port, username and password.
- Repeat for other viewers. For BigQuery, all projects must contain the connection’s shared dataset; the dataset is not changed per user. The creator starts with the default credentials used to create the connection.
To manage an existing connection, open Properties → Dynamic connection, or choose Manage dynamic connection settings from Edit connection. Properties also shows whether the connection is dynamic. Editing a user’s settings keeps their stored credential unless you explicitly replace it. Stored credentials are never displayed. Settings that fail the source’s validation are marked for attention; edit them to supply a valid credential.
Adding settings does not grant access to the connection or its workbooks. A viewer needs both access and their own settings. Removing settings can prevent that viewer from reading published workbooks. See the BigQuery dynamic connection guide for the distinction between default authoring credentials and viewer settings.
Nash and MCP offer the same management workflow through a secure credential form; see Manage a data connection.
The Deployment Region is shared by the connection. Set it in the connection form, its properties, or the bulk Set Deployment Region flow below. Changing a viewer’s settings keeps that region; setting a region keeps the connection’s dynamic authentication and viewer settings.
Choose a Deployment Region
Section titled “Choose a Deployment Region”Deployment Region controls are available only when exit-node support is enabled for your workspace.
When it is disabled, the connection form, region column, properties and bulk-assignment warning are hidden.
Existing region settings are preserved when you edit other connection properties. MCP and Nash also
omit region options and refuse explicit region changes; omit exitNode to keep the saved setting.
The Deployment Region is the region where your Data Apps are deployed by default. It is a separate setting
from the region your data connection’s database lives in. Select the ? next to Deployment
Region for a reminder. We recommend choosing the region closest to your users and your data
source.
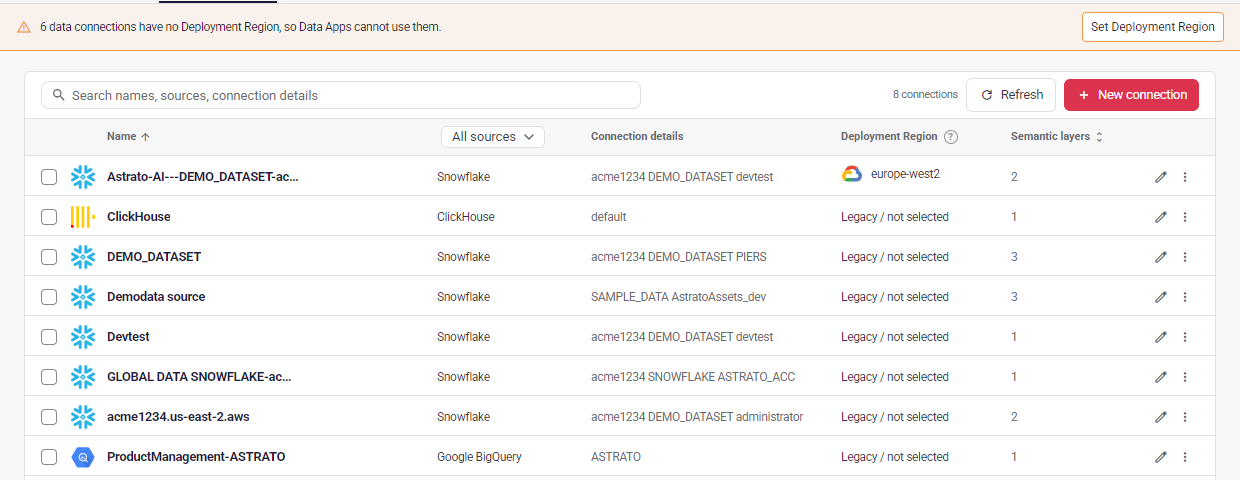
The Deployment Region column shows the query-routing provider logo and region, such as GCP
europe-west2. Select a connection to open its properties, choose Deployment Region and select
Save changes. You need permission to update that connection. The dropdown offers only
available provider-and-region combinations, including private nodes under their configured names.
In the connection form, changing only the name or Deployment Region keeps the saved credential, so no replacement or validation is needed. Changing to Legacy / not selected still requires a replacement credential and validation.
Changing Deployment Region routes queries through that node; it does not move your database. The database’s own cloud and region appear together under Database location. Ensure your database accepts traffic from the selected node before changing it.
Legacy / not selected means no explicit Deployment Region is configured. Publications require an explicit, non-legacy region: choose an available region and save before publishing. If no regions are available, ask your administrator to configure one.
When connections have no Deployment Region, or a legacy one, a warning appears at the top of Data & AI. Select Set Deployment Region to list them with each one’s source. Every data connection you can change starts selected; clear the ones you want to leave, choose a region and select Set on n data connections.
Highlighted rows must be set by hand and are left unchanged: a data connection you are not allowed to change needs its owner, and one whose change failed opens from its row. A save fails when Astrato could not validate the connection with its saved credential. Open it, re-enter the credential and set the region there.
The Semantic layers column
Section titled “The Semantic layers column”The connection list shows how many semantic layers read each connection, so you can see what depends on a connection before you change or remove it.
A dash (—) means the number is unknown rather than zero: the count could not be worked out, or the workspace holds too many layers to total exactly.
Creating, duplicating or deleting a semantic layer from Data & AI updates the number straight away. Otherwise counts are reused for about five minutes, so a layer added or removed elsewhere in Astrato can take that long to show here.
Like the matching count in the semantic layer list, this column is shown to workspace owners and administrators only — see Who sees this column for why.
Create or update through an assistant
Section titled “Create or update through an assistant”Ask the assistant to prepare the connection using non-secret settings. It opens a short-lived secure form where you enter credentials directly. The assistant receives a completion receipt, not your password, token, private key or service-account document.
Never paste credentials into the conversation. For credential replacement, the assistant binds the secure form to the existing connection and the revision being updated. See the MCP connection workflow for the tool contract.
Direct access to Deployment Regions
Section titled “Direct access to Deployment Regions”With a Deployment Region selected, connection validation, database and role discovery, and schema browsing go from your browser to that region’s exit node. The browser must be able to reach the exit node, and its TLS endpoint must allow the editor’s origin.
Preparation sends only non-secret settings. Validate Connection sends the credentials you entered from your browser to that region’s exit node, and the editor sends them to Astrato again when you save; saving does not repeat the connection test. The assistant’s secure form validates the same way before submitting encrypted credentials. Catalog browsing through MCP runs on Astrato’s servers.
Expired or interrupted operations
Section titled “Expired or interrupted operations”Preparations last fifteen minutes; secure forms last five minutes. If either expires, prepare again. If a connection write cannot be confirmed, check the saved connection before trying another change or create. An interrupted response or failed read-back does not prove that the write failed.
Demo connections cannot be provisioned through this workflow. A successful validation and subsequent source access confirm that your chosen connection works.
OAuth connections
Section titled “OAuth connections”Snowflake and Databricks use OAuth connections configured by your workspace administrator in Astrato settings. If the picker is empty, ask the administrator to configure and verify an integration. Select a Deployment Region to validate and access these OAuth connections through that region. BigQuery supports the Default Google connection or a verified custom Google connection. Projects load automatically once Google authorization is confirmed. If needed, select Sign in and complete Google authorization first. Use the refresh icon beside Project to reload the list. Choose a project and dataset before validating. Use the refresh icon beside Dataset to reload its list; a spinner appears and the dropdown shows its loading status while either list is loading. Discovery and validation use the same selected Google connection and Deployment Region. Choose a dataset; it is saved as the connection’s database. With a service-account key, no project is asked for: once you paste the key, datasets load from the project it names, and you choose one before validating.
The OAuth picker indicates whether your selected integration is already authorized, expired, or needs sign-in. When you sign in from Astrato, it waits for authorization, updates automatically, and closes the sign-in window when the browser allows it. Select Cancel to stop waiting. If your browser keeps the sign-in window open, you can close it yourself once authorization is confirmed. BigQuery approval must include BigQuery access; Sheets-only approval is insufficient. If authorization status is unavailable, sign-in and validation remain available. The hint reflects stored approval metadata; validation checks whether the connection actually works.
The editor never receives provider access tokens or client secrets. It uses the selected integration identifier for validation and saves it with the data connection, so subsequent requests can use each user’s authorized access. When editing an OAuth connection, the selected integration is retained; sign in again if its authorization has expired.
MCP and Nash can prepare an OAuth connection using authMethod: "oauth" and the non-secret
settings.integrationUrl for Snowflake or Databricks. For BigQuery, use settings.authInfo
with the Google client ID (or an empty string for Default), settings.projectID and the required
settings.datasetID. A BigQuery service-account connection also requires settings.datasetID.
The dataset is saved as the connection’s database; omit generic source selection for BigQuery.
astrato_data_create_connection requires the dataset for BigQuery as settings.datasetId
(settings.datasetID and settings.database are accepted too). Complete any required sign-in in the browser before validating or saving. The secure-action form offers sign-in for the exact OAuth connection selected during
preparation and enables continuation after Astrato confirms authorization. If sign-in is cancelled
or validation fails, retry before the action expires; an expired action must be started again.
Provider credentials must not be sent through chat.
Sign in from a remote MCP operation
Section titled “Sign in from a remote MCP operation”Saved connections can require each caller to sign in. When catalog browsing, queries, previews,
analysis or another remote data operation reports missing, expired or insufficient provider
authorization, MCP and Nash offer a secure browser action for that exact account and its required
permissions. Sign in and choose Confirm authorization. This action does not create or change
a connection. Clients supporting MCP 2026-07-28 URL elicitation can resume reads after Astrato
confirms authorization; other clients receive the same browser URL and can retry the read.
A sign-in action is offered only when the exact provider and account have a compatible sign-in
option for the required permissions. Astrato refreshes a usable grant before asking you to sign
in. If configuration cannot support the flow, MCP returns administrator guidance without creating a
pending action. Discovery service failures are retryable.
Mutations require checking current state and a fresh request because earlier work may have been applied. Provider tokens stay with Astrato.
Sign in from the semantic layer editor
Section titled “Sign in from the semantic layer editor”If your saved OAuth connection needs authorization, the editor offers Sign in to the provider, or Reconnect when authorization has expired or been revoked. If additional permissions are required, choose Grant access to the provider and approve the requested permissions. Complete sign-in in the new window. Astrato checks the connection and refreshes source data automatically, without reloading your semantic layer or discarding unsaved edits.
Choose Continue editing to work without source data. A banner keeps the sign-in action available. If your browser blocks the sign-in window, allow pop-ups for Astrato and try again. Select Cancel to stop waiting. Missing connection permissions or invalid connection settings continue to use their own recovery actions; signing in does not grant workspace permissions.
Data Explorer and other chart previews also offer this action directly on a chart whose data request needs datasource authorization. Complete sign-in to refresh data access and resume the preview with the current field selections. An ordinary query or database permission error continues to show its own diagnostic message.