

Administrator or above
Set up single sign-on
Single sign-on (SSO) lets people sign in to Astrato with the account your company already uses, such as Okta, Microsoft Entra ID or Google Workspace, instead of a separate Astrato password. In Astrato an SSO setup is called a login connection, and you manage it under Administration → Enterprise Connection.
Before you start
Section titled “Before you start”- You are a workspace owner or administrator. Only those roles can change Enterprise Connection.
- You can sign in to your identity provider’s admin console and register an application there.
- You know the domains your people sign in with, for example
example.com. - A workspace can have one login connection. To switch provider later, delete the existing one first.
- Whether SSO is included in your plan is not covered here. If Enterprise Connection is missing or the connection cannot be created, ask your Astrato contact.
Do not lock yourself out
Section titled “Do not lock yourself out”Workspace owners and administrators can always sign in without SSO, so a mistake in the setup cannot remove your own access. Even so, follow these habits:
- Keep your current Astrato session open in one browser window for the whole setup.
- Do the test sign-in in a separate private (incognito) window.
- Do not close the provider window that opens during verification until Astrato reports the result.
- Tick Allow users outside the identity provider domain to sign in without SSO while you set up (it is cleared by default), and keep it ticked until you have confirmed that SSO works for a normal user.
Choose your provider
Section titled “Choose your provider”Pick the guide for your identity provider. Each covers the provider side: which values to copy from Astrato’s Configuration tab, and where to find the values its Setup tab asks for. In Select a Login provider, choose the entry named after your provider when there is one.
| Your identity provider | Choose in Select a Login provider | Issuer URL | Guide |
|---|---|---|---|
| Microsoft Entra ID (Azure AD) | Microsoft Entra ID | https://login.microsoftonline.com/<tenant-id>/v2.0 |
Entra ID setup |
| Okta | Okta | https://<your-org>.okta.com |
Okta setup |
| Amazon Cognito | Amazon Cognito | https://cognito-idp.<region>.amazonaws.com/<user-pool-id> |
Cognito setup |
| Keycloak | Keycloak | https://<keycloak-host>/realms/<realm> |
Keycloak setup |
| Ping Identity | Ping Identity | The issuer your Ping environment publishes | Ping Identity setup |
| Google Workspace | Google Workspace | None: it asks for your workspace domain instead | Google Workspace setup |
| Any other OpenID Connect provider | Open ID Connect | The issuer your provider publishes | Open ID Connect setup |
Entries that are not released yet are unavailable in the list.
To check an issuer URL before you enter it, open it in a browser with
/.well-known/openid-configuration added to the end. A correct issuer returns a JSON document
whose issuer value matches it.
Set up the connection
Section titled “Set up the connection”-
Open Administration → Enterprise Connection and stay on the Login connections tab.
-
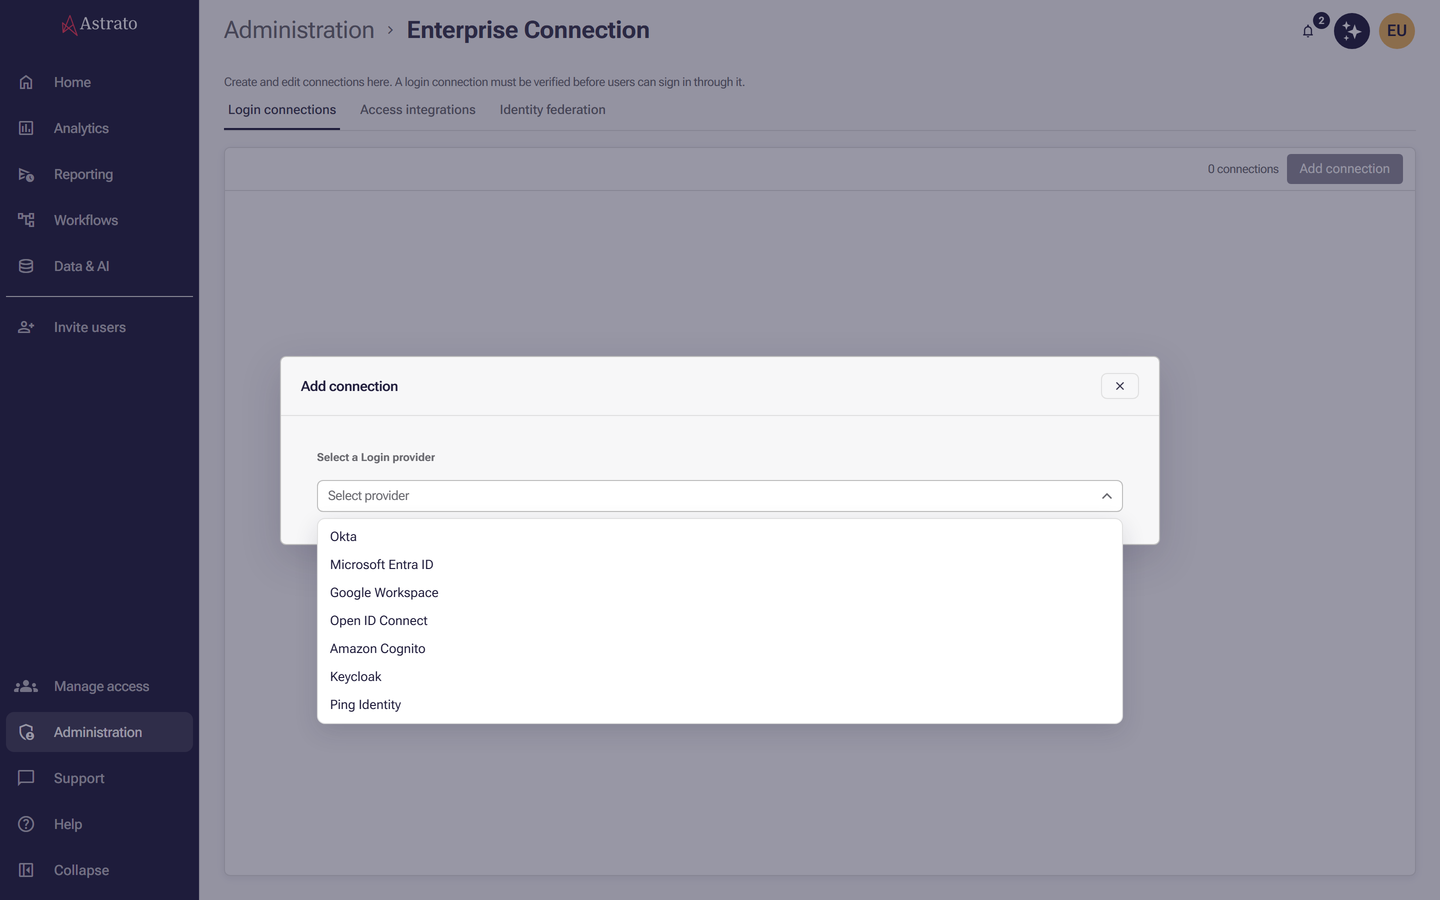
Select Add connection, then choose your provider.
-
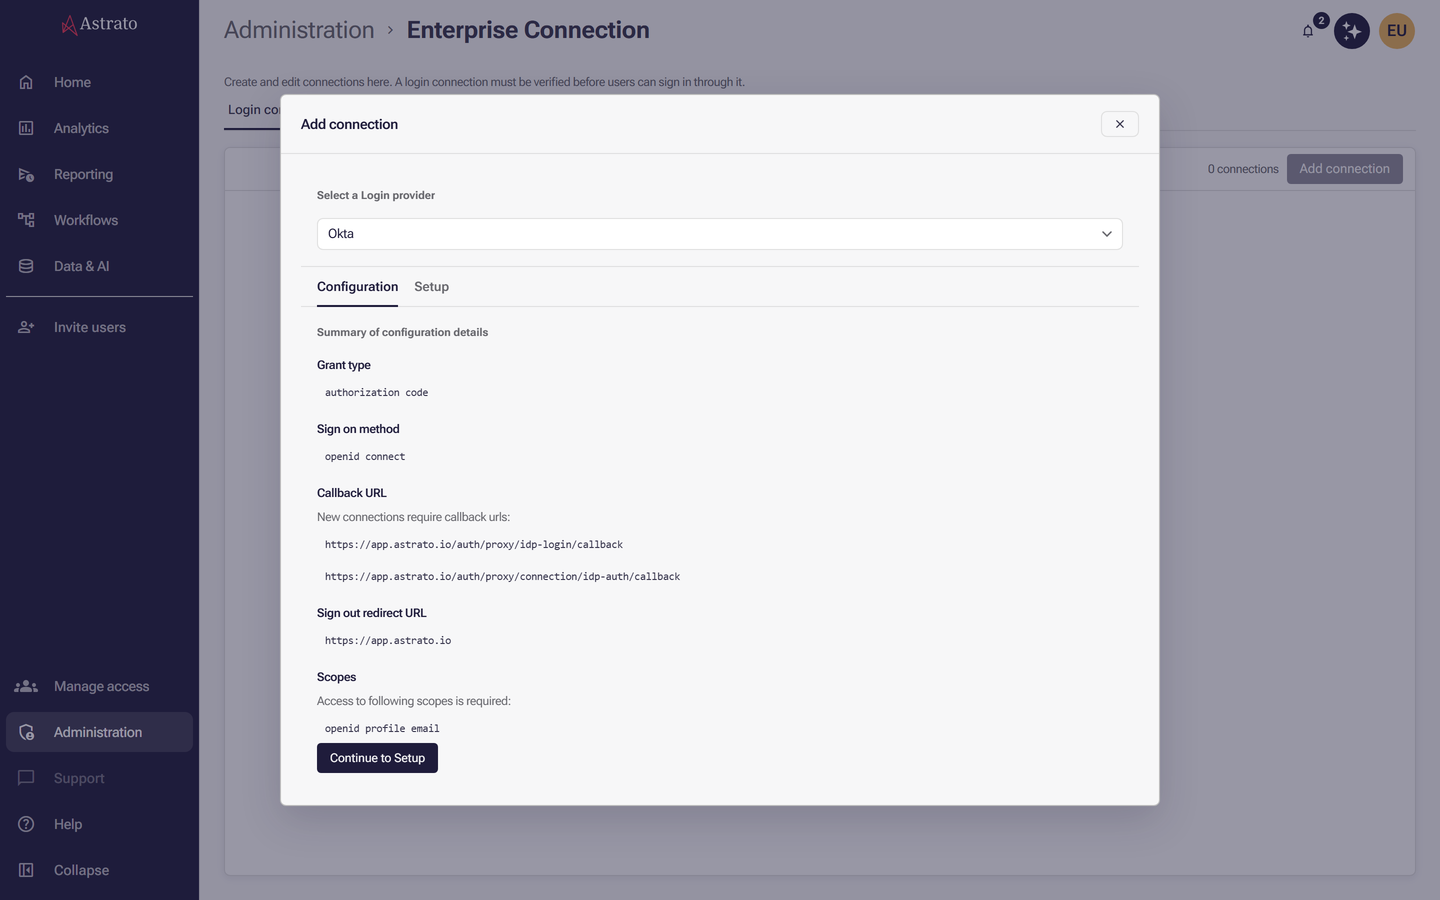
On the Configuration tab, copy the callback URLs and scopes shown. Register them as the sign-in redirect in your identity provider and note the client ID and client secret it gives you.
-
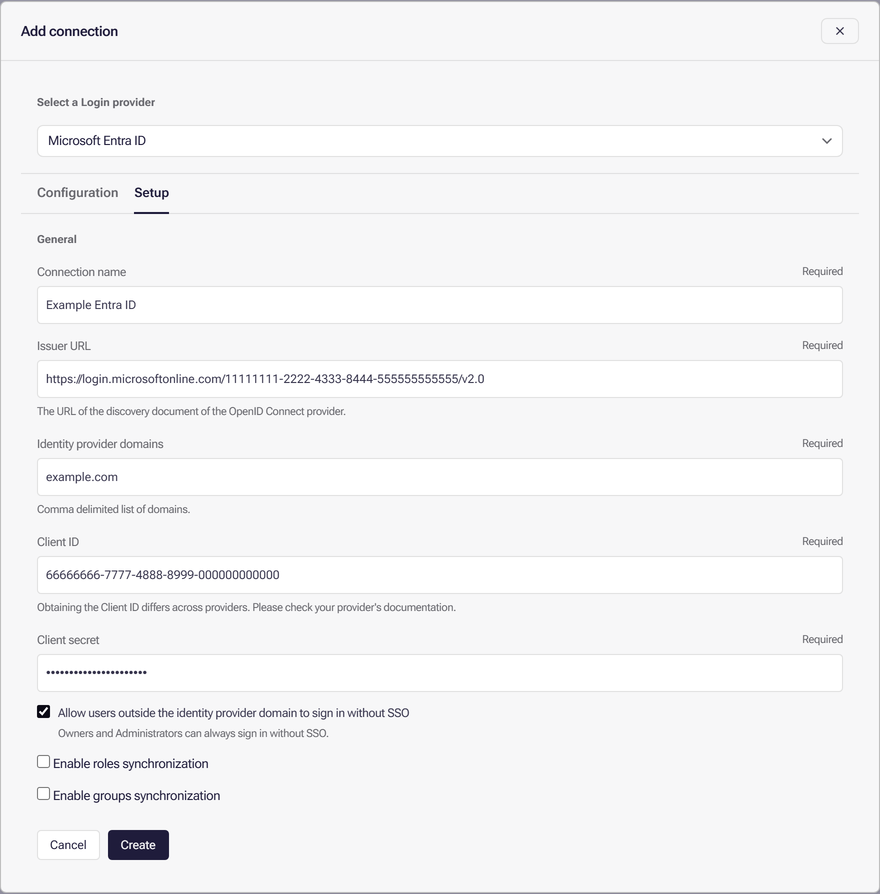
Select Continue to Setup and fill in the form: a unique connection name, the issuer URL, the client ID, the client secret and the identity provider domains (a comma-separated list). Google Workspace asks for its workspace domain instead of an issuer URL and domain list. Okta and Amazon Cognito also offer an optional Scope field for extra scopes. Tick Allow users outside the identity provider domain to sign in without SSO (see above). Enable roles synchronization and Enable groups synchronization are optional, and not offered for Google Workspace. Decide now: they cannot be changed on Setup later. See Sync groups and roles.
-
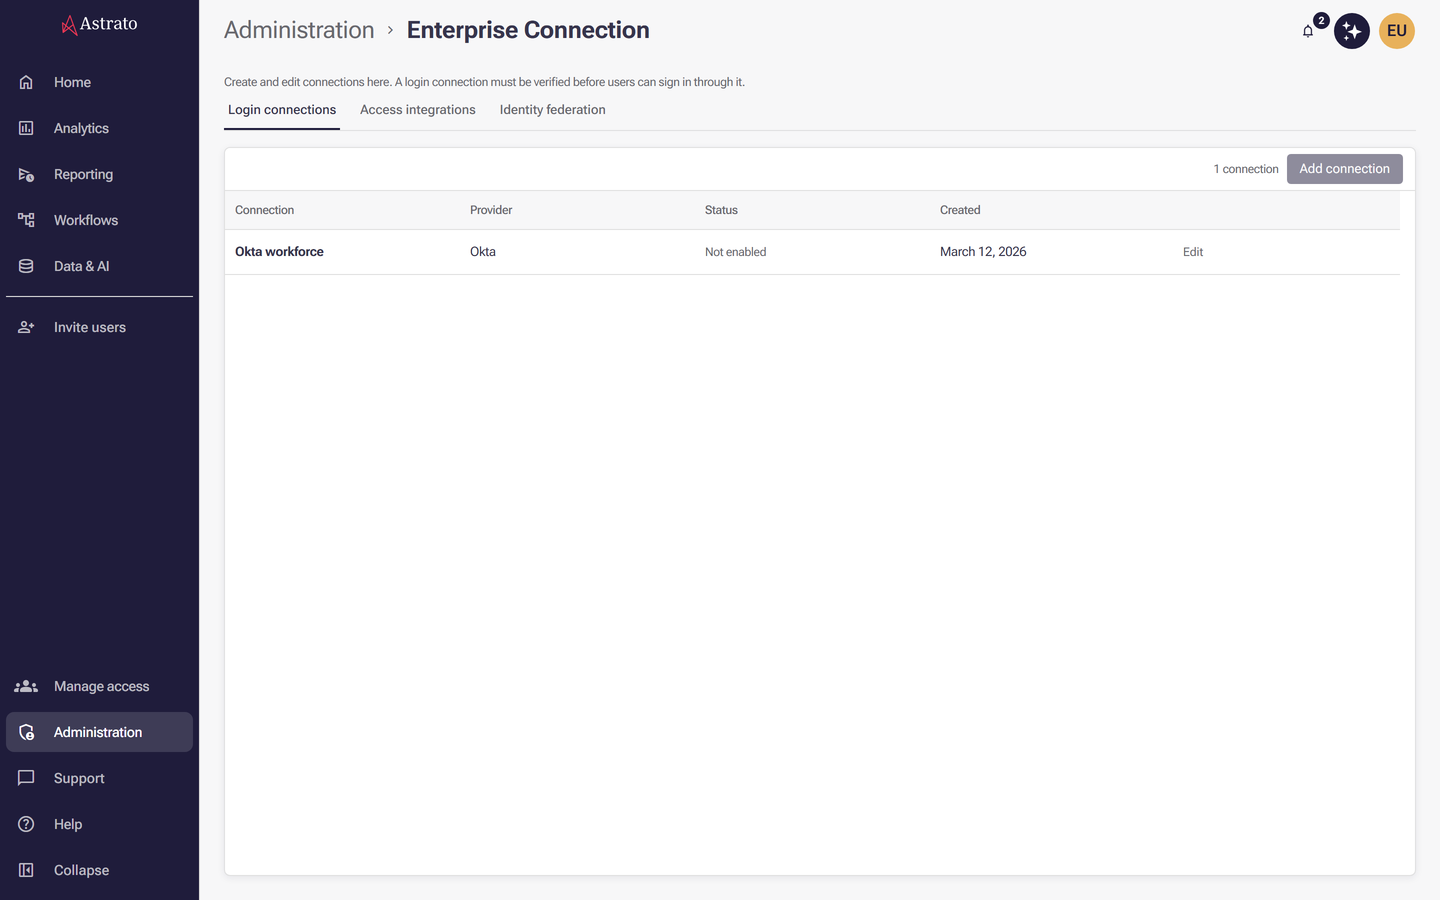
Select Create. The connection’s properties open on Setup, and the connection appears in the list as Not enabled.
If creation fails, correct the error shown. Your entries stay in the form.
Verify the connection
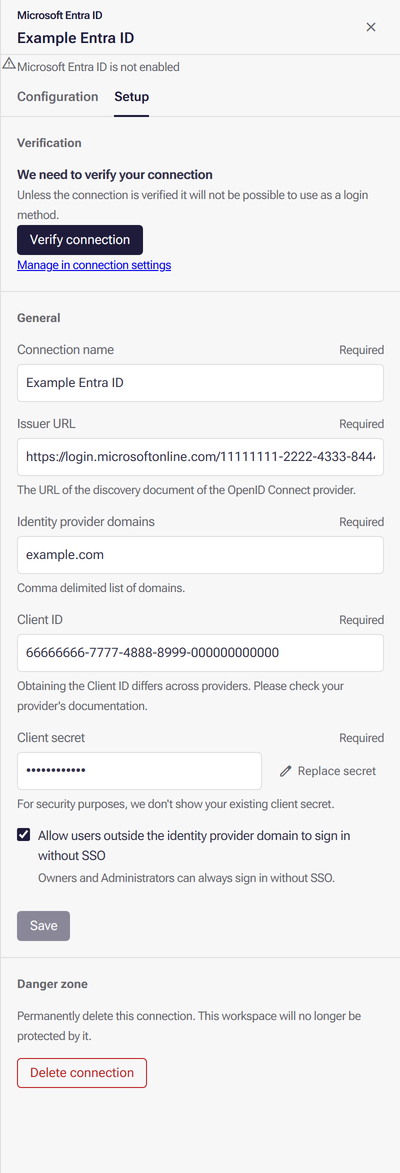
Section titled “Verify the connection”A login connection cannot be used until it is verified. Verifying opens a provider window, signs you in there and confirms to Astrato that the settings work.
-
Select the connection in the list and open Setup. If you changed anything, select Save first; Verify connection is unavailable while there are unsaved changes.
-
Select Verify connection. Astrato shows Complete sign-in in the provider window.
-
Sign in with your identity provider in the new window. Allow pop-ups if your browser blocks it, and keep the window open until it finishes. Astrato waits up to 10 minutes.
You are done when the status changes to Enabled, the Verification section disappears and a Login URL section appears in the connection’s properties.
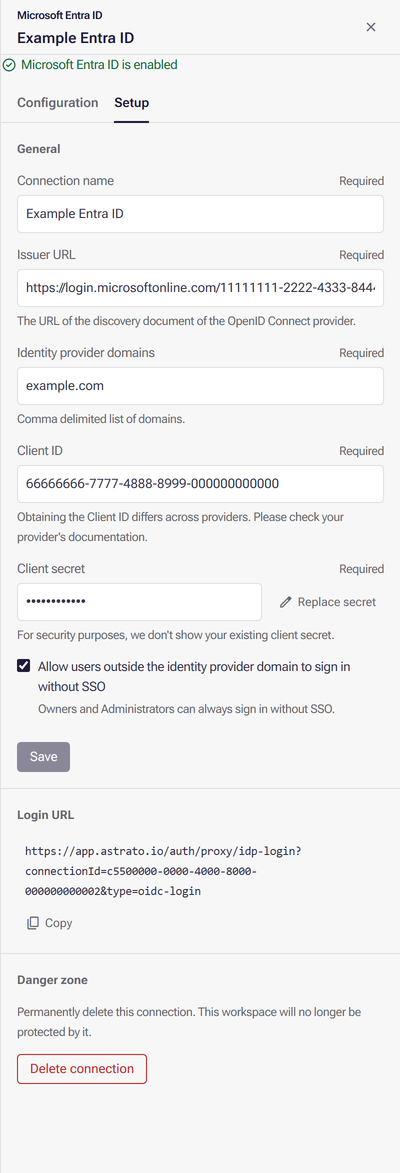
If verification does not succeed, the Verification section shows why:
- Verification failed. Check the provider settings and try again. The provider sign-in did not complete. Check the values against Common errors.
- Verification timed out. Please try again. The provider window was not completed within 10 minutes.
- Allow pop-ups for Astrato, then try verifying again. The browser blocked the provider window.
Test a normal sign-in
Section titled “Test a normal sign-in”- In Login URL, use the copy button to copy the address.
- Open a private browser window and paste the address. Your session in the first window stays untouched.
- Sign in with the identity provider account of an ordinary user.
You are done when that user lands in Astrato signed in. If it fails, you are still signed in in the first window, so you can fix the settings and try again.
Only after this works should you clear Allow users outside the identity provider domain to sign in without SSO (on Setup, under General), if you want SSO to be the only way in for people on your domains. Select Save to apply it; you do not need to enter the client secret again.
Common errors
Section titled “Common errors”| What you see | Likely cause | What to do |
|---|---|---|
| Allow pop-ups for Astrato, then try verifying again. | The browser blocked the provider window | Allow pop-ups for Astrato and select Verify connection again |
| Verify connection is greyed out | Unsaved changes in Setup | Select Save, then verify |
| The provider reports a redirect or callback mismatch | The URLs registered in the provider differ from those on Astrato’s Configuration tab | Copy the callback URLs again, exactly as shown, into the provider |
| The provider rejects the sign-in | Wrong client ID or client secret | Enter both again in Setup and save; the secret is never shown after saving |
| Verification cannot reach the provider | Wrong issuer URL | Check the issuer URL against your provider’s OpenID Connect settings |
| A user is not sent to SSO | Their email domain is not in Identity provider domains | Add the domain in Setup and save |
| Add connection is unavailable | A login connection already exists | Open it, or delete it from the Danger zone on Setup first |
| The provider signs the user in, but Astrato does not | The provider sent no email for the user: the account has none, or the app does not grant the email scope |
Give the account an email address, and grant the scopes openid profile email listed on Configuration |
| The provider says the user is not assigned to the application | The provider app admits only assigned people or groups, and this user is not one of them | Assign the user, or a group they are in, to the app in your provider |
| The user signs in but sees You don’t have access to analytics, or an empty Library | Signing in proves who they are; what they can open depends on their role, license team and what is shared with them | Check them in Users, then share content with them or a group |
Send people to a specific page after sign-in
Section titled “Send people to a specific page after sign-in”The login URL accepts a returnTo parameter that sends people to a path inside Astrato after they
sign in.
- Copy the Login URL from the verified connection.
- Take the path you want, without the domain and starting with a slash, for example
/collections. - URL-encode it (
/collectionsbecomes%2Fcollections) and add it to the login URL as&returnTo=%2Fcollections. - Share the extended address with your users.