Connect to Snowflake
This guide connects Astrato to a Snowflake account. When you finish, the connection appears in Data & AI → Data Connections and you can build a semantic layer on it. The form is the one described in Data connections; this page covers what is specific to Snowflake.
Before you start
Section titled “Before you start”Check each of these. Most failed validations come from one of them.
- Astrato permission. You need a workspace role that can create data connections: Owner, Admin or Creator. See Create a connection for how to check your role.
- Your account URL. In Snowsight, open the account menu and use Copy account URL. Either
form works:
ab12345.eu-west-2.aws.snowflakecomputing.com(account locator) ormyorg-myaccount.snowflakecomputing.com(organization and account name). A leadinghttps://is accepted. - A Snowflake user and role that can use a warehouse and read the data you want. See Set up a service user and Role and privileges.
- Network access. If your Snowflake account or user has a network policy, Astrato’s addresses must be allowed. See Network policy.
- A credential for the sign-in method you choose. See Choose an authentication method.
If the account URL you copied is rejected, run this in a Snowflake worksheet. It lists the host
names your account answers on; the SNOWFLAKE_DEPLOYMENT and SNOWFLAKE_DEPLOYMENT_REGIONLESS
rows are the two forms of the account URL.
-- List the host names for this Snowflake accountSELECT t.value:type::varchar AS type, t.value:host::varchar AS host, t.value:port AS portFROM TABLE(FLATTEN(input => PARSE_JSON(SYSTEM$ALLOWLIST()))) AS tWHERE t.value:type::varchar LIKE 'SNOWFLAKE%';Choose an authentication method
Section titled “Choose an authentication method”The Authentication list of a new Snowflake connection offers three methods, in this order:
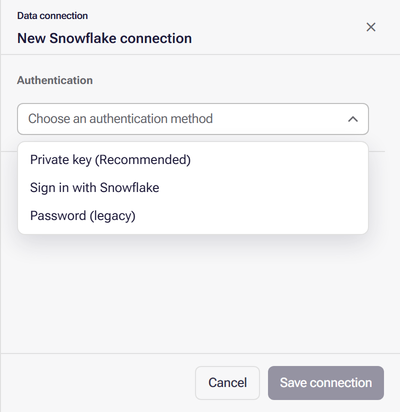
| Method | Choose it when | What you enter |
|---|---|---|
| Private key (Recommended) | You connect as one shared Snowflake user, normally a service user. | Username and Private key, then Account URL |
| Sign in with Snowflake | Each person should query with their own Snowflake identity. An administrator first sets up an access integration. | An OAuth connection, then Sign in |
| Password (legacy) | Your Snowflake account still lets this user sign in with a password alone. See Multi-factor authentication. | Username and Password, then Account URL |
Private key
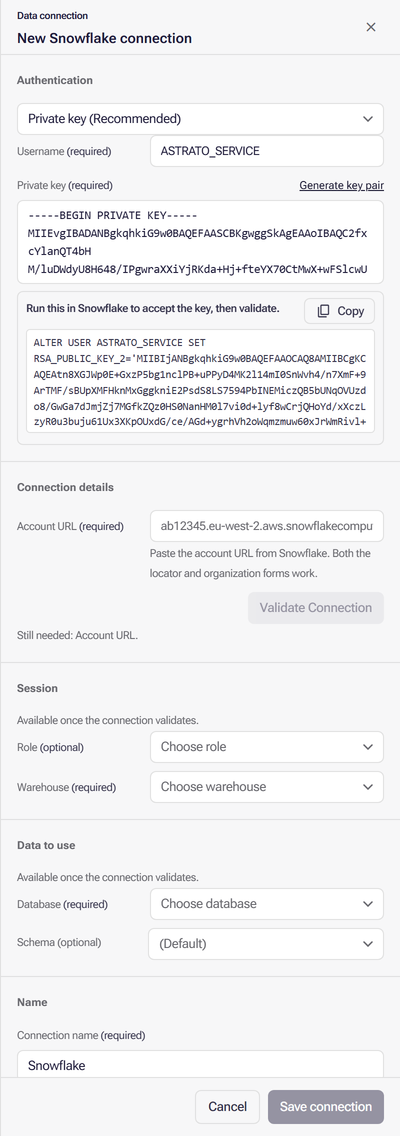
Section titled “Private key”You do not need a key pair already. With Private key (Recommended) selected, Generate key pair beside the field creates a 2048-bit RSA key pair in your browser and fills in the private key. Below it, Astrato shows the statement to run in Snowflake, headed “Run this in Snowflake to accept the key, then validate.”, with a Copy button. The statement has this shape:
ALTER USER <username> SET RSA_PUBLIC_KEY_2='<public key>'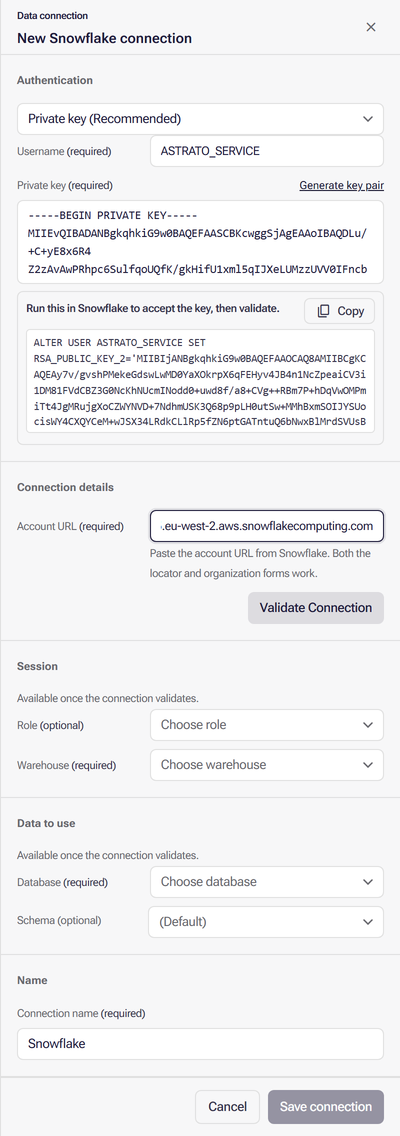
It uses Snowflake’s second key slot, so a key already in the first slot keeps working. Running it needs a role that can alter the user, such as SECURITYADMIN, or ownership of the user. The statement names the Username you entered and updates if you change it. If your browser cannot generate the key, Astrato says so; paste an existing private key instead.
To use a key you already have, paste the private key in PEM form, from
-----BEGIN PRIVATE KEY----- to -----END PRIVATE KEY-----. The form has no passphrase field.
Create keys with your own tooling, such as OpenSSL on your machine, as Snowflake describes in
Key-pair authentication. Never create a
production key on a website.
If you are not a Snowflake administrator
Section titled “If you are not a Snowflake administrator”You can still use Private key (Recommended) without a role that can alter users. The statement Astrato shows holds only the public half of the key, which is safe to send to someone else; the private key stays in your browser until you validate.
- Fill in Username, select Generate key pair, and select Copy beside the statement.
- Send the statement to whoever administers Snowflake users, and ask them to run it. If the user does not exist yet, ask them to create it as in Set up a service user at the same time.
- Keep the New Snowflake connection panel open while you wait. The generated private key exists only in that panel: if you close it, generate a new pair and send the new statement.
- When they confirm, paste the Account URL and select Validate Connection.
If your account has a network policy, the same person can add Astrato’s addresses; see Network policy. If your workspace already has a verified Snowflake access integration, Sign in with Snowflake needs no key at all: you sign in as yourself.
Sign in with Snowflake
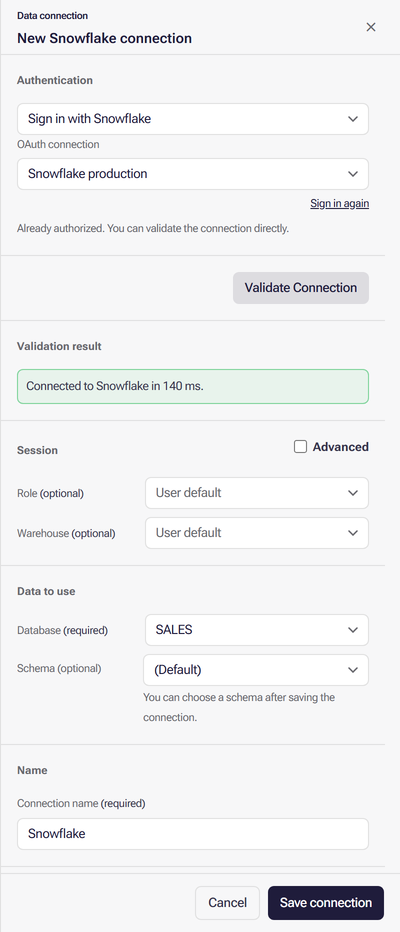
Section titled “Sign in with Snowflake”Choose the access integration under OAuth connection, select Sign in and complete sign-in to Snowflake in the window that opens. The hint below the list says whether you are already authorized, need to sign in, or need to sign in again because authorization has expired. When you are already authorized, the link reads Sign in again and you can validate straight away.
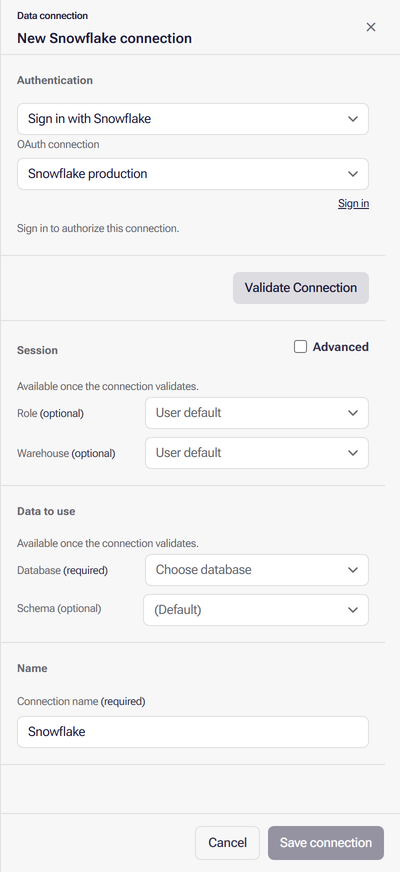
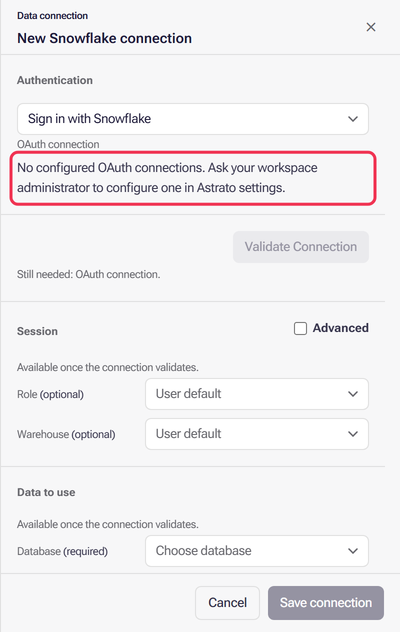
If the list shows “No configured OAuth connections. Ask your workspace administrator to configure one in Astrato settings.”, nobody has set up an access integration yet; see Set up Sign in with Snowflake. How Astrato reuses an existing authorization is in OAuth connections.
Password (legacy)
Section titled “Password (legacy)”Password (legacy) asks for Username and Password. It has no field for a second factor, so it works only for a user Snowflake still lets sign in with a password alone. Snowflake is removing single-factor password sign-in in phases, for people and for service users; see Multi-factor authentication before you rely on it.
Multi-factor authentication
Section titled “Multi-factor authentication”Snowflake’s plan for the deprecation of single-factor password sign-ins sets out when each kind of user loses password-only sign-in on your account. The two Astrato methods that keep working are:
- Private key (Recommended) for a shared connection. Make the Snowflake user a service user
(
TYPE = SERVICE), which signs in with a key and never with a password or a second factor. See Set up a service user. - Sign in with Snowflake for per-person access. Each person signs in on Snowflake’s own page, where Snowflake applies its multi-factor authentication, and Astrato then uses the token Snowflake issues.
TYPE = LEGACY_SERVICE kept password sign-in for service users as a temporary measure, and
Snowflake’s plan retires it too. Move such a connection to a private key: edit it from the
Data Connections list, change Authentication to Private key (Recommended), paste a
private key, and validate again. On an edit, Generate key pair appears only after you select
Save changes once and the form asks for the missing key.
Create the connection
Section titled “Create the connection”These are the steps of Create a connection with Snowflake’s fields.
-
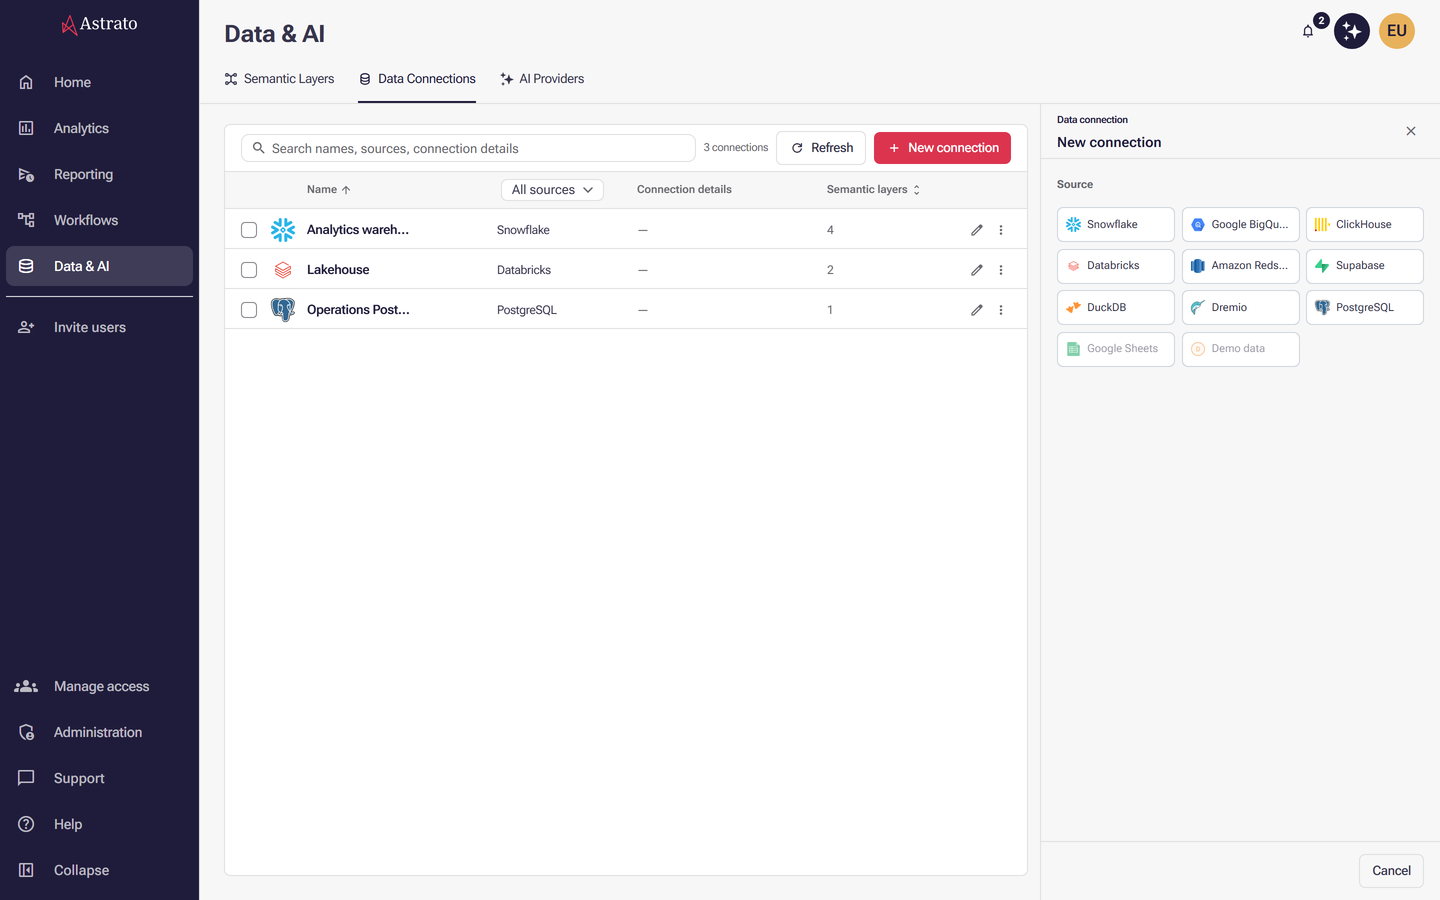
Open Data & AI → Data Connections, select New connection and select Snowflake. The panel title changes to New Snowflake connection.
-
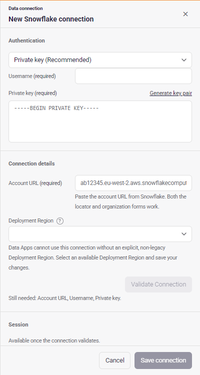
Under Authentication, choose a method and fill in its fields (see Choose an authentication method).
-
Under Connection details, paste the Account URL. Sign in with Snowflake has no account URL here: it comes from the access integration. If your workspace shows Deployment Region, you can leave it unset for now; see Choose a Deployment Region.
-
Select Validate Connection. It stays unavailable while a required field is empty, and the form lists those fields after “Still needed:”.
-
Under Session, choose the Role and Warehouse:
- With Private key (Recommended) or Password (legacy), the Warehouse is required before you can save; if the user has a default warehouse, it is already chosen. Role is optional; left empty, the user’s default role is used.
- With Sign in with Snowflake, Role and Warehouse both read User default and cannot be changed: each person who uses the connection queries with their own Snowflake user’s default role and warehouse. To set them for everyone instead, select Advanced beside the Session heading and choose them. Clearing Advanced returns both to User default.
-
Under Data to use, choose the Database. It lists only the databases the role can see. Schema stays at (Default) until the connection is saved.
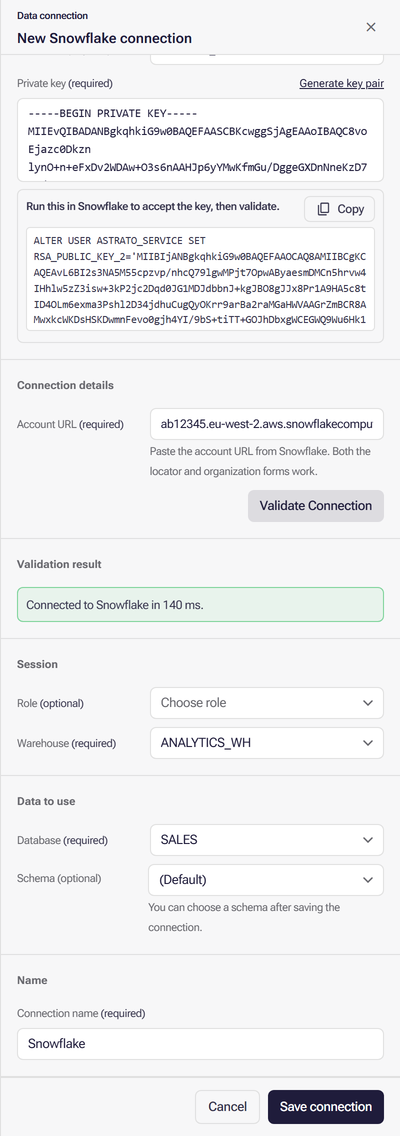
With Sign in with Snowflake, the same step looks like this:
-
Under Name, change the suggested Connection name to something people will recognise, such as the database’s name, and select Save connection.
-
The panel shows Connection created. Choose a schema or leave it as Choose later, then select Finish.
What success looks like, and how to check that the connection can read your tables, are in Data connections.
Set up a service user
Section titled “Set up a service user”A service user is a Snowflake user for an application rather than a person. Snowflake does not let it sign in with a password or ask it for a second factor, so it suits a shared Private key (Recommended) connection. Snowflake documents the user types under CREATE USER.
Run this in a Snowflake worksheet with a role that can create users, such as USERADMIN or SECURITYADMIN. The names are examples; the role is created in Role and privileges.
CREATE USER ASTRATO_SERVICE TYPE = SERVICE DEFAULT_ROLE = ASTRATO_READER DEFAULT_WAREHOUSE = ANALYTICS_WH COMMENT = 'Astrato data connection';Then give the user its key: enter ASTRATO_SERVICE as the Username in Astrato, select
Generate key pair, and run the ALTER USER statement the form shows (see
Private key).
To turn an existing user into a service user, run ALTER USER <username> SET TYPE = SERVICE;.
From then on it cannot sign in with a password, so any connection using Password (legacy)
with that user stops working until you give it a private key.
Snowflake recommends rotating key pairs regularly; see
Key-pair authentication. To rotate a key, edit the connection, select Replace private key, then Generate key pair,
run the statement it shows, then validate and save. The statement always sets the second slot
(RSA_PUBLIC_KEY_2): a key in the first slot keeps working, but a key Astrato generated earlier is
in the second slot and is replaced, so the saved connection stops working from the moment the
statement runs until you save the new key.
Role and privileges
Section titled “Role and privileges”Astrato reads Snowflake with the role you pick under Session (or the user’s default role). That role needs to use a warehouse and read the databases, schemas and tables you will model. This is a typical read-only setup in Snowflake’s own access control; rename the objects to match yours and follow your own security policy:
USE ROLE SECURITYADMIN;
CREATE ROLE IF NOT EXISTS ASTRATO_READER;GRANT USAGE ON WAREHOUSE ANALYTICS_WH TO ROLE ASTRATO_READER;GRANT USAGE ON DATABASE SALES TO ROLE ASTRATO_READER;GRANT USAGE ON ALL SCHEMAS IN DATABASE SALES TO ROLE ASTRATO_READER;GRANT SELECT ON ALL TABLES IN DATABASE SALES TO ROLE ASTRATO_READER;GRANT SELECT ON ALL VIEWS IN DATABASE SALES TO ROLE ASTRATO_READER;
GRANT ROLE ASTRATO_READER TO USER ASTRATO_SERVICE;ALTER USER ASTRATO_SERVICE SET DEFAULT_ROLE = ASTRATO_READER DEFAULT_WAREHOUSE = ANALYTICS_WH;
ALL TABLES and ALL VIEWS cover only objects that exist now. For tables created later, add
GRANT SELECT ON FUTURE TABLES IN DATABASE SALES TO ROLE ASTRATO_READER; and the same for views.
Writing data back from Astrato needs more than SELECT; see Writeback.
Network policy
Section titled “Network policy”If your Snowflake account or the connecting user has a network policy, Snowflake refuses connections from addresses that are not on it, and Validate Connection fails. Allow the addresses listed in Allow Astrato’s addresses: with a Deployment Region selected, the form names them under the region.
Changing a network policy needs a Snowflake administrator. To add the addresses, they edit the
policy, for example with ALTER NETWORK POLICY <policy> SET ALLOWED_IP_LIST = (...). SET
replaces the whole list, so include the addresses already on it. For a private network path
instead, see AWS PrivateLink.
Set up Sign in with Snowflake
Section titled “Set up Sign in with Snowflake”Sign in with Snowflake needs an access integration: a Snowflake OAuth security integration, registered in Astrato. A workspace owner or administrator sets it up once; after that, each person who creates or uses the connection signs in to Snowflake as themselves.
Before you start: you need the Owner or Admin workspace role in Astrato, and a Snowflake role that can create security integrations, such as ACCOUNTADMIN.
-
In Astrato, open Administration → Enterprise Connection, select the Access integrations tab and select Add integration.
-
Under Select a Data provider, choose Snowflake from the Provider list. The Configuration tab lists what the Snowflake side needs: grant type
authorization code, a Callback URL ending in/auth/proxy/connection/snowflake-verify/callback, and the scopesession:role-any. Copy the Callback URL exactly as shown; it names your Astrato host.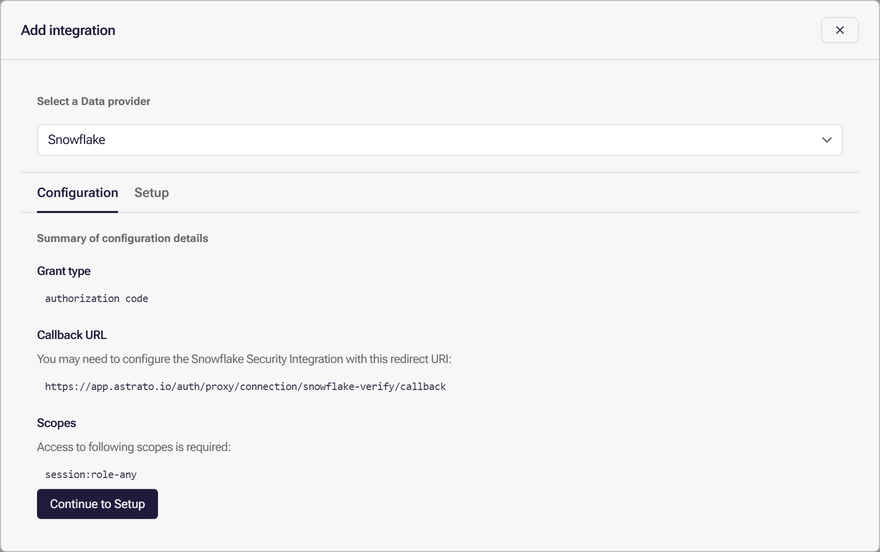
-
In a Snowflake worksheet, create the security integration with that callback URL:
CREATE SECURITY INTEGRATION ASTRATO_OAUTHTYPE = OAUTHENABLED = TRUEOAUTH_CLIENT = CUSTOMOAUTH_CLIENT_TYPE = 'CONFIDENTIAL'OAUTH_REDIRECT_URI = '<Callback URL from Astrato>'OAUTH_ISSUE_REFRESH_TOKENS = TRUEOAUTH_REFRESH_TOKEN_VALIDITY = 7776000;Refresh tokens let Astrato renew each person’s short-lived access token;
7776000seconds is 90 days, after which people sign in again. Follow your own policy for these values and for which roles to block. -
Read the client ID and secret from Snowflake.
DESC SECURITY INTEGRATION ASTRATO_OAUTH;showsOAUTH_CLIENT_ID, andSELECT SYSTEM$SHOW_OAUTH_CLIENT_SECRETS('ASTRATO_OAUTH');returns the client secret. -
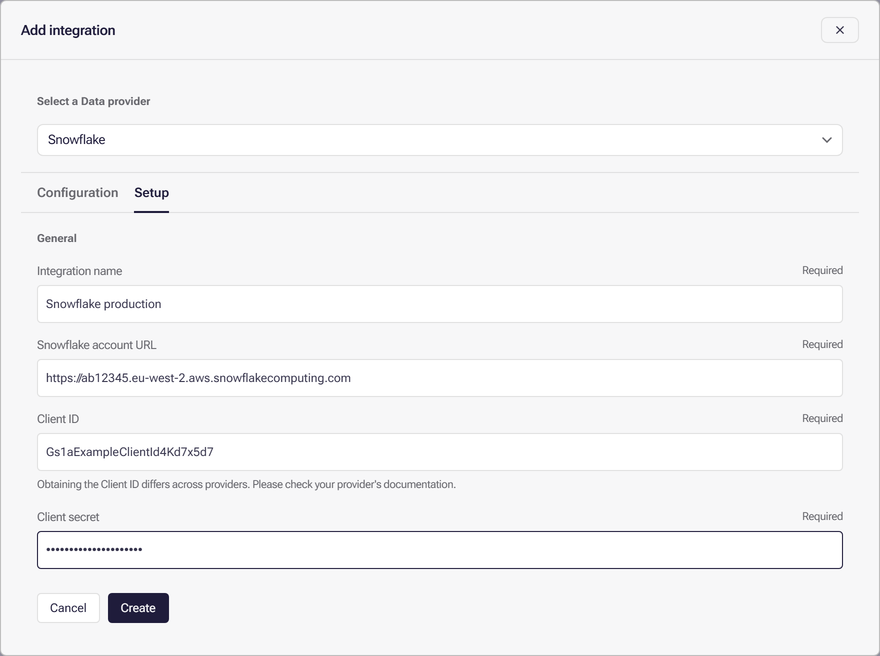
Back in Astrato, select Continue to Setup and fill in:
- Integration name: the name people will see when they choose an OAuth connection, such as
Snowflake production. - Snowflake account URL: your account URL with
https://, such ashttps://ab12345.eu-west-2.aws.snowflakecomputing.com. - Client ID and Client secret: the values from step 4.
- Integration name: the name people will see when they choose an OAuth connection, such as
-
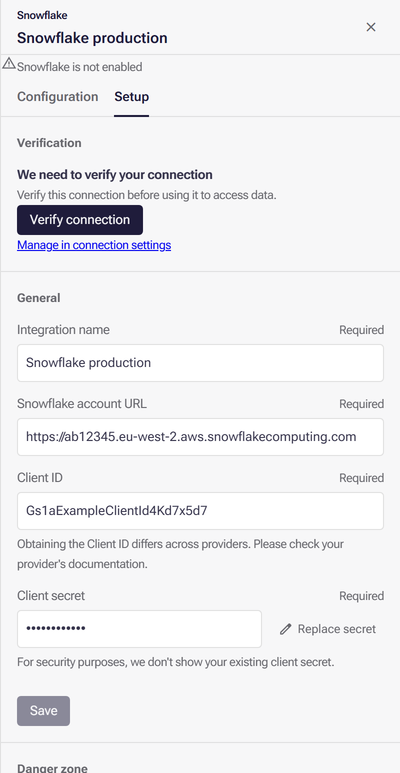
Select Create. The new integration opens, reading “Snowflake is not enabled”.
-
Under Verification, select Verify connection and sign in to Snowflake in the window that opens. When sign-in succeeds, the status changes to “Snowflake is enabled”. Verify the integration before using it to access data.
People creating a connection then choose Sign in with Snowflake and pick this integration under OAuth connection; see Sign in with Snowflake.
To change the integration later, select Edit on its row in Access integrations. The stored client secret is never shown: select Replace secret to enter a new one, then select Save. While the integration is not yet verified, Verify connection stays unavailable until you save your changes.
To let people reach Snowflake as themselves without a second sign-in, through a trust between Astrato or Microsoft Entra ID and Snowflake, see Identity federation.
Snowflake specifics
Section titled “Snowflake specifics”Once the connection works, these Snowflake features have their own pages:
- Query insights. In the Data Explorer, View query insights shows the SQL that ran and the query’s ID. When Snowflake returns a query profile, the dialog adds the Cartesian, Union, Memory and Pruning checks, Estimated credits and Rows scanned. See Download the result and see the query.
- Functions in your account. A user-defined function that already exists in Snowflake can be registered for the semantic layer to call. See Register a database function in UDFs.
- Semantic views. You can import a Snowflake semantic view into a semantic layer, or create one from a layer.
- Cortex. Snowflake Cortex can be an AI provider for Astrato. See Snowflake Cortex LLM runs in your warehouse.
- Warehouse cost and performance. See Optimizing Snowflake warehouses.
Common errors
Section titled “Common errors”| What happens | Likely cause | What to do |
|---|---|---|
| Validation fails straight away | Wrong Account URL, username or credential | Copy the account URL again from Snowsight, check the username, and re-enter the credential |
| Validation fails with a password that works in Snowsight | Snowflake asks this user for a second factor, which Password (legacy) cannot provide | Switch to Private key (Recommended); see Multi-factor authentication |
| Validation fails with a generated key | The ALTER USER statement was not run, or was run for another user |
Run the statement shown under the private key with a role that can alter the user, then validate again |
| Validation fails only from Astrato | A Snowflake network policy blocks Astrato | Allow the addresses in Network policy |
| “This credential reported no databases. Check its grants, or validate again.” | The role has no USAGE on any database |
Grant the privileges in Role and privileges, or choose another Role |
| Save connection stays unavailable | No Warehouse or Database chosen, or the role cannot use a warehouse | Choose both; if the warehouse list is empty, grant USAGE on a warehouse to the role |
| “No configured OAuth connections. Ask your workspace administrator to configure one in Astrato settings.” | No Snowflake access integration is set up in Astrato | Ask a workspace administrator to set one up, or use Private key (Recommended) |
| “Authorization has expired. Sign in again before validating.” | Your Snowflake sign-in for this integration has run out | Select Sign in again |
Every message the connection panel can show, for every source, is in When a data connection will not validate.
What next
Section titled “What next”- Create a semantic layer on the new connection.
- Manage resource access to let other people build on this connection.
- Advanced data connection settings for Deployment Regions and dynamic connections.