Connect to Amazon Redshift
This guide covers what is specific to Amazon Redshift. The steps themselves, from New connection to Finish, are the same for every source and are shown in Create a connection.
Before you start
Section titled “Before you start”-
A role that can create data connections. See Create a connection.
-
The cluster’s endpoint and port, from the Amazon Redshift console. The endpoint looks like
analytics.abc123.eu-west-2.redshift.amazonaws.com:5439/dev; you enter its parts separately. -
A database user that can sign in and read the tables you want to model, for example:
GRANT USAGE ON SCHEMA public TO astrato_reader;GRANT SELECT ON ALL TABLES IN SCHEMA public TO astrato_reader;Astrato lists only the schemas the user has
USAGEon, and only the tables and views it canSELECTfrom. Adjust the grants to your own policy. -
Network access. The cluster must accept connections from Astrato. See Allow Astrato through your network.
Create the connection
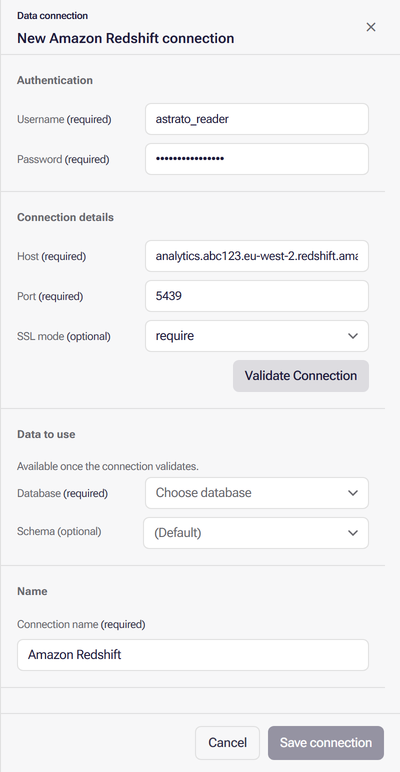
Section titled “Create the connection”In Data & AI → Data Connections, select New connection, then Amazon Redshift. The panel title changes to New Amazon Redshift connection.
| Field | Section | Example | Notes |
|---|---|---|---|
| Username | Authentication | astrato_reader |
Required |
| Password | Authentication | Required. Leading or trailing spaces are rejected | |
| Host | Connection details | analytics.abc123.eu-west-2.redshift.amazonaws.com |
Required. The endpoint without the port and database: everything before :5439 |
| Port | Connection details | 5439 |
Required. Filled in with Redshift’s default, 5439 |
| SSL mode | Connection details | require |
Optional. Defaults to require |
Then follow Create a connection from Validate
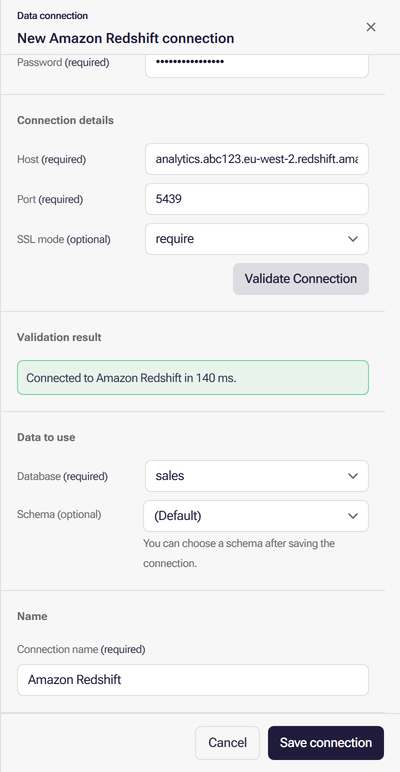
Connection on. When validation succeeds, the Validation result reads “Connected to Amazon
Redshift in n ms.” Choose the Database under Data to use. The list shows every database
on the cluster, not only those the user can open, so choose one the user can read. Until you change
it, the suggested Connection name is Amazon Redshift; rename it to something people will
recognise.
If your workspace shows Deployment Region, see Choose a Deployment Region.
Sign-in method
Section titled “Sign-in method”Amazon Redshift connections sign in with a database username and password. There is no other method.
SSL mode
Section titled “SSL mode”Unlike the PostgreSQL form, the Redshift form has SSL mode only, with no certificate boxes. Keep
it at require, which encrypts the connection. verify-ca and verify-full are listed but cannot
be used, because they need certificates the Redshift form has no boxes for.
The dev database
Section titled “The dev database”Astrato tests the credential by signing in to the dev database, the one Amazon Redshift creates by
default unless a different database name was set when the cluster was created, and lists the
cluster’s databases from there. The user must be able to connect to dev, even if you then choose
another database.
Allow Astrato through your network
Section titled “Allow Astrato through your network”The cluster must accept connections from the addresses Astrato connects from, on the cluster’s port. With a Deployment Region selected, the form names that region’s addresses as “Allow traffic from … at your database.”; without one, allow the addresses listed in Allow Astrato’s addresses. A connection with no Deployment Region cannot be used by a Data App; see Choose a Deployment Region. On AWS, that means an inbound rule for each address in the cluster’s VPC security group, on a cluster that is publicly accessible; see Amazon’s Connecting to an Amazon Redshift cluster.
For a cluster that is not publicly accessible, use AWS PrivateLink or AWS Transit Gateway.
Common errors
Section titled “Common errors”When validation fails, read the notice’s “Source message:” line first: it carries Redshift’s own error. When a data connection will not validate explains each notice. These are the Redshift causes:
| Symptom or source message | Cause | Fix |
|---|---|---|
| Validation times out or “did not respond in time” | The security group does not allow Astrato’s addresses, or the cluster is not publicly accessible | Allow Astrato through your network |
Host includes :5439/dev |
The whole endpoint was pasted into Host | Keep only the part before the colon; the port goes in Port |
password authentication failed for user … |
A typo, an expired password, or the wrong user | Sign in with the same values from another tool to confirm them |
database "dev" does not exist, or permission denied for dev |
The cluster has no dev database, or this user cannot connect to it |
Let the user connect to dev; see The dev database |
| A schema or table you expected is missing after saving | The user lacks USAGE on the schema or SELECT on the table |
Grant them, as in Before you start, then check that it works |
A password with leading or trailing spaces shows “Remove leading or trailing spaces before validating.” Select Trim it, then validate again.
What next
Section titled “What next”- Create a semantic layer on the new connection.
- Check that it works: open Add → Tables & Views to confirm the connection can read your tables.
- Manage resource access to let other people build on it.
- Connect to PostgreSQL for firewall rules and private addresses, which work the same way.