Connect to ClickHouse
This guide connects Astrato to a ClickHouse service, such as ClickHouse Cloud. When you finish, the connection appears in Data & AI → Data Connections and you can build a semantic layer on it. The form is the one described in Data connections; this page covers what is specific to ClickHouse.
Before you start
Section titled “Before you start”- Astrato permission. You need a workspace role that can create data connections: Owner, Admin or Creator. See Create a connection for how to check your role.
- The host and secure native port of your ClickHouse service. In ClickHouse Cloud, the
service’s Connect dialog lists them. Astrato connects with ClickHouse’s native protocol over
TLS, so use the secure native port, usually
9440, not the HTTPS port. - A ClickHouse user and password that can read the databases you want to use.
- Network access. If the service has an IP access list, it must allow Astrato’s addresses. See Allow Astrato’s addresses.
Create the connection
Section titled “Create the connection”-
Open Data & AI → Data Connections, select New connection and choose ClickHouse. The panel becomes New ClickHouse connection.
-
Under Authentication, enter the Username and Password. Leave Use dynamic connection unticked unless each viewer should connect with their own credentials; see Dynamic connections.
-
Under Connection details, enter the Host and Port. Port starts at 8443, which is ClickHouse’s HTTPS port: change it to the secure native port, usually
9440. Database is optional.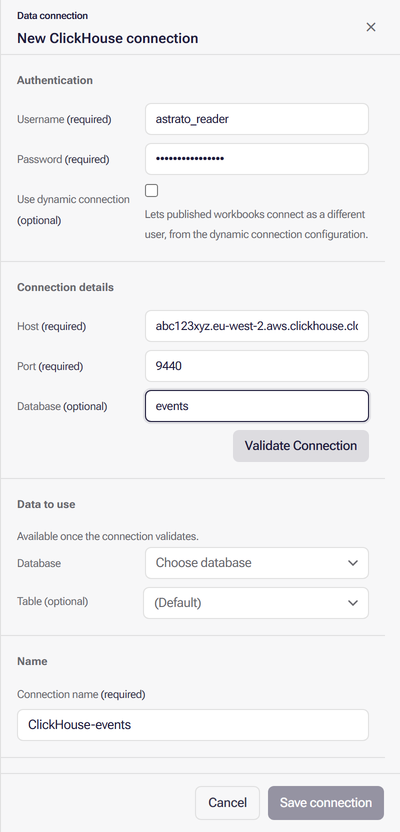
-
If your workspace shows Deployment Region, choose one or leave it for now; see Choose a Deployment Region.
-
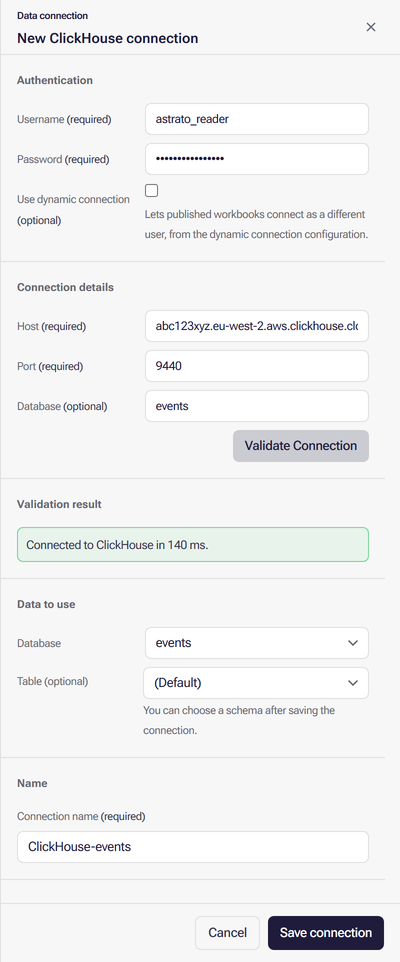
Select Validate Connection. The Validation result reads “Connected to ClickHouse in n ms.”
-
Under Data to use, choose the Database; it is already chosen if you typed one. Astrato does not list ClickHouse’s databases at this step: the list offers the database you typed under Connection details. If you left it blank, you can still save. Leave Table on (Default).
-
Review the Connection name, select Save connection, then select Finish.
In the semantic layer editor, each ClickHouse database is listed as a schema.
Use the PostgreSQL interface instead
Section titled “Use the PostgreSQL interface instead”ClickHouse can also accept PostgreSQL clients through its PostgreSQL interface. To connect that way, enable the interface on your service and create a PostgreSQL connection with the interface’s host and port, as in the PostgreSQL guide. The ClickHouse source above is the direct route and the only one that offers dynamic connections.
Dynamic connections
Section titled “Dynamic connections”With Use dynamic connection ticked, each person queries the connection with their own host, port, username and password. Use it when each customer or team has its own ClickHouse service with the same tables, typically for embedded analytics: you build the semantic layer against your own settings, and each viewer’s query runs against theirs. The credentials you enter when creating the connection become your own settings; after Save connection, select Add dynamic connection settings to add each other person’s. Someone with access to the connection but no settings of their own may not be able to read through it. Adding settings does not grant access; see Manage resource access.
Dynamic connections walks through adding and changing the settings, with screenshots of the ClickHouse forms.
Change the password
Section titled “Change the password”Select the pencil on the connection’s row in Data & AI → Data Connections; the panel opens as Edit connection. Select Replace password, enter the new one, select Validate Connection and then Save changes.
Common errors
Section titled “Common errors”| Symptom | Fix |
|---|---|
| Validation fails or times out with Port at 8443 | 8443 is ClickHouse’s HTTPS port. Enter the secure native port, usually 9440 |
| Validation fails against a server without TLS | Astrato always uses TLS, except for a host named localhost or starting 127.. Enable the secure native port on the server |
| “Connection validation failed: the source did not respond in time.” | The service’s IP access list may refuse Astrato. Allow the addresses in Allow Astrato’s addresses |
| “Connection validation failed: the source refused the credentials or sign-in.” | Check the username and password by signing in with another ClickHouse client |
| A database you expected has no tables in the editor | The user cannot read it. Grant it SELECT on that database’s tables |
When a data connection will not validate explains every notice the panel shows.
What next
Section titled “What next”- Create a semantic layer on the new connection.
- Manage resource access to let other people build on this connection.
- What each source supports, including custom SQL and CSV uploads on ClickHouse.
- Store Astrato activity in ClickHouse to turn your query log into a usage dataset.