Private Preview
Let users edit data and save it back
This tutorial takes you from a data connection to a Data App whose viewers change a row and see that change in your warehouse. Astrato does not let an App write to the warehouse directly. The write is a named Business Workflow that you register in the semantic layer, and the App runs it by name.
The worked example below lets viewers change the status of an order in an Orders table whose
rows are identified by order_id. Swap in your own table and field names.
Before you start
Section titled “Before you start”- You have built a first app, or are about to. See Your first Data App.
- Business Workflows are enabled for your tenant. If Business Workflows is missing from Business Context in the semantic layer editor, ask your Astrato administrator. The tab row shortens the name to Workflows; hover it to see the full name.
- The database user on your data connection can read and write the table you
want to change. Astrato applies the warehouse’s own privileges, so a missing
UPDATEorINSERTright makes the save fail. - The table has a column, or columns, that identify one row, such as an ID. An update or delete needs them as key fields.
- The data connection has a Deployment Region selected: an explicit, non-legacy region, the
same one every Data App needs to load data. Check it in the connection’s properties; see
Choose a Deployment Region. Without it, a save is
refused with
exit_node_required. - Data-action access is turned on for your Astrato environment. This is not a setting on the
layer, the App or the publication, and you cannot change it from the lobby, App Builder or the
CLI: it lets a signed-in viewer’s sign-in carry the
data:actionpermission. Ask your Astrato contact whether it is on. See Run Business Workflows from a Data App. - The App must be published and viewed by a signed-in user. The preview in App Builder is read-only, and a public App refuses workflows. See Business Workflows and Apps.
1. Map the table in the semantic layer
Section titled “1. Map the table in the semantic layer”Open the semantic layer for your connection. Select Add → Tables & Views and add the table you want people to edit. Only tables mapped in the layer can be written. See Semantic layer editor.
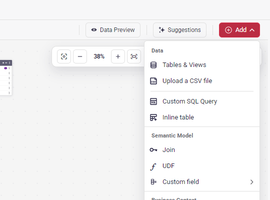
You are done when the table appears in the layer. Note the names of its fields as the layer shows
them, such as order_id and status: the App sends its values under those names.
2. Register a writable table
Section titled “2. Register a writable table”- Open Business Context → Business Workflows (Workflows in the tab row).
- Select Add → Writable table. The workflow starts on the layer’s first mapped table. Choose yours under Writes to.
- Select one operation: Insert rows, Update rows or Delete rows. For an edit, choose Update rows.
- Under Key fields, select + and pick the field or fields that identify one row.
- Under Writable fields, add each field a person may change. Fields you do not list cannot be written.
- Give the workflow a name you will recognise, then select Create.
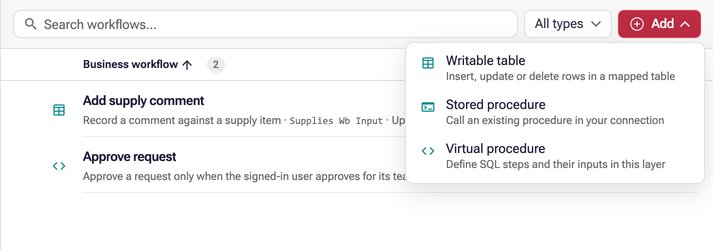
For the example, choose Orders under Writes to, Update rows, order_id as the key field
and status as the writable field, and name the workflow Update order status. Every step of this
panel is shown in Create a writable table workflow.
Update needs at least one writable field in addition to its keys. Insert takes writable fields only, and delete takes keys only. If the shape is wrong, Issues reports an error on the workflow and the publish check can block the layer. See Business Workflows and Semantic layer issues.
A workflow allows one operation. A screen that both edits rows and adds new ones needs two workflows: one with Update rows and one with Insert rows.
You are done when the workflow appears in the list with no error in Issues. Saving a workflow writes nothing to the warehouse.
3. Publish the layer
Section titled “3. Publish the layer”Select Publish in the toolbar. An App runs the published version of a workflow, never a saved draft, so republish after every change to a workflow. See Publish your changes.

You are done when the publish finishes without a blocking issue.
4. Build the editing screen
Section titled “4. Build the editing screen”App Builder has no ready-made editable table. Nash writes the edit control into your app’s code, usually a text input or a list in each row, together with the Save button. Ask for it in App Builder in one message that names the workflow exactly. For the example:
Add a page with a table of Orders showing order_id, amount and status. Make status editable in each row, with a Save button. When I select Save, ask me to confirm, then run the Business Workflow “Update order status” with app.runDataAction, passing order_id and status for that row. Show a success message when it saves, show the error message when it fails, and reload the table after a successful save.
Ask for the confirmation: Astrato adds none of its own.
How the Save button maps to the workflow
Section titled “How the Save button maps to the workflow”Each key field and writable field you added in step 2 becomes an argument of the same name: the field’s name in the layer, not the warehouse column name. For the example, the call behind Save is:
const result = await app.runDataAction({ name: 'Update order status', arguments: [{ order_id: 1042, status: 'Shipped' }],});nameis the workflow’s name exactly as it appears in the Business Workflows list.- Each argument object carries every key field and every writable field, and nothing else. A
field you did not list, or a misspelt name, is refused with
unknown_parameter; a missing one withmissing_parameter. - With two or more key fields, send each of them in the same object.
- A field whose value you set from a user attribute in the workflow is filled by Astrato, so the App does not send it. See Set parameter and field values.
To check what Nash built, open Source files in App Builder, find runDataAction, and compare
its name and argument keys with the workflow. See
Business Workflows and Apps for the call and its result.
The Builder preview cannot save: a run there is refused with “Write operations are not enabled for App previews.” Publish the App to try it. See Manage Data Apps.
You are done when the published App shows your rows, an edit control and Save, and the code names your workflow and its fields.
5. Save a change and check the warehouse
Section titled “5. Save a change and check the warehouse”- Open the published App signed in as a user who can access the semantic layer.
- Change one writable value and select Save.
- Run
SELECTon the table in your warehouse, filtered to that row’s key.
You are done when the warehouse shows the new value.
What the viewer sees
Section titled “What the viewer sees”Astrato shows nothing of its own when a workflow runs. The viewer sees whatever your App shows, so ask Nash for both outcomes as in step 4:
- On success, the call resolves and each outcome has
status: "ok"andeffects: "committed". Show a confirmation, such as a toast, and run the table’s query again: existing results do not refresh by themselves. - On failure, the call either rejects with an error code and a short message, or resolves with
an outcome whose
statusis notok. Show the message to the viewer. A workflow’s own message reaches the App; warehouse diagnostics and SQL do not.
If the save fails
Section titled “If the save fails”A refused run rejects with a code. The common ones:
| You see | What to do |
|---|---|
data_action_not_found |
Check the name, and publish the layer. |
invalid_parameter_value |
Send each value in its parameter’s type, for example a JSON number for an integer or float, a boolean for a boolean, text for a string. Only a decimal parameter takes decimal text. |
invalid_arguments, unknown_parameter, missing_parameter |
Send exactly the workflow’s key and writable fields, under their names in the layer. |
data_action_refused |
The warehouse or the workflow refused the write. Check privileges and key values. |
exit_node_required |
Select an explicit, non-legacy Deployment Region on the data connection. |
forbidden |
The viewer cannot open the App or its data, or data-action access is not on for your environment. Ask your Astrato contact. |
data_action_forbidden, data_action_anonymous_refused |
The viewer must be signed in and allowed to run it. Public Apps cannot. |
app_unavailable |
The layer was published again. Republish the App. |
data_action_outcome_unknown |
Do not run it again. Check the warehouse first: the write may have happened. |
The full list is in Business Workflows and Apps.
Which route is this?
Section titled “Which route is this?”This tutorial is the route for Apps published in Astrato. The SDK routes in Writeback and SQL are for externally hosted apps with a trusted server only. Published Apps cannot use them. Editable tables in Workbooks are covered by the older article Using the Table’s writeback/edit capability.
What next
Section titled “What next”- Business Workflows: stored procedures, virtual procedures and the write policy.
- Business Workflows and Apps: the
runDataAction()reference. - Writeback and SQL: the SDK route for externally hosted apps.
- Manage Data Apps: publishing and access.