Add a custom field to a table
A custom field is a column you add to a table in the semantic layer rather than in your database. Its value is an expression over the table’s own columns — a trimmed name, a month name taken from a date, a price multiplied by a quantity, or a flag that marks particular rows. Your warehouse computes it for each row when a query uses it; your source table is not changed.
The editor calls the result a Calculated column. Once created, it is a field of its table like any other: it is listed in the table’s Fields section and on the map, and you can build dimensions and measures on it, except that custom groups cannot use one as their Base field. Like every edit, it stays in your draft until you publish.
Where to start one
Section titled “Where to start one”A custom field belongs to exactly one table, so each way in starts from a table:
- Add → Custom field asks which table, with a search box reading Choose table to create a custom field in.
- On the map, a table’s Table actions menu offers New custom field, which opens on the visual builder, and New custom SQL field, which opens on the SQL editor.
- In a table’s details, the Fields section has a Custom field button. An inline table shows Edit there instead, so start its custom fields from the map or the Add menu.
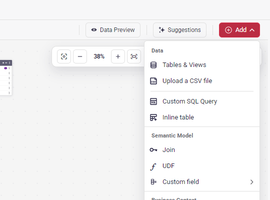
Each opens the same panel, New custom field, with a Name (it starts as new_field), the
Table it belongs to, and an Expression.
A custom field can use only the columns of its own table. Some tables and sources cannot carry one at all:
- A table built from a Custom SQL Query has no custom fields; put the calculation in the query instead. The menus leave these tables out.
- A Google Sheets connection has no custom fields, and on ClickHouse and Amazon Redshift the visual builder is not offered, so you write the expression as SQL. The comparison of sources lists what each supports.
Build the expression visually
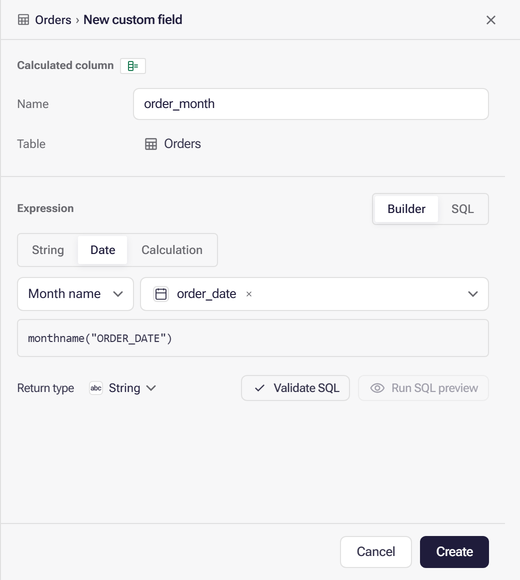
Section titled “Build the expression visually”Where your source supports it, the Expression section has a Builder / SQL switch. The builder has three kinds, chosen with String, Date and Calculation:
- String applies a Function to any column of the table: Concatenate joins several fields with a Separator you pick (Space, Dash ( - ), Comma ( , ) and so on), Replace swaps one piece of text for another, Substring keeps a number of characters from the Left or Right, and Trim removes spaces or the characters you name from either or both ends.
- Date takes a Date part of a date or time column: Day, Day name, Week, Month, Month name, Quarter, Year, Month Year or Quarter Year.
- Calculation combines numeric columns and fixed numbers with +, −, × and ÷. Add operation adds the next term.
Each kind lists only the columns its SQL can use — numeric columns for a calculation, date and time columns for a date part — and never another custom field. The SQL the builder writes appears under it as you go, with each column quoted the way your data source expects. Switch to SQL to see or extend it there. Only a plain calculation (columns, numbers and the four operators) is read back into the builder. Anything else leaves the builder as you left it. If you switch back to Builder after editing the SQL, the field is saved from the builder, and switching to SQL again replaces your edits with the builder’s SQL.
Write the expression as SQL
Section titled “Write the expression as SQL”In SQL, you write the expression for the value only, with no AS alias: the field’s name comes
from Name. The expression can call your warehouse’s own functions, but it can read only the
columns of this table, by their physical names. That is the Source name
in the table’s field list, not the Field name, and a quoted name must match it exactly. The SQL
editor suggests those names as you type.
The editor checks the expression as you type and says what is wrong: an unknown quoted or bracketed
column name, a reference to another table, unbalanced brackets, or an operator in the wrong place.
A misspelled name without quotes is caught when Validate SQL or Create runs the expression
against your data source. It reads -- as two minus
signs, so leave SQL comments out of a custom field.
Parameter inserts a placeholder such as {region:string} for a value supplied when the query
runs, with a type of string, int, float, boolean, date, int_list or string_list. Each parameter
needs a default, which you set under Parameters. Parameters belong to the table, so the list
can include ones other fields use, and changing a default there changes it for all of them.
Parameters in a custom SQL query covers
the types, the defaults and how a query sets a value.
Check it, then create it
Section titled “Check it, then create it”Return type is the data type the field will have: Boolean, Date, Float, Int, String, Time, Timestamp or Timestamp (TZ). The builder proposes one — a Month name is a string, a Year an integer — and you can change it in either mode.
Two actions beside it run the expression against your data source:
- Validate SQL checks that the expression runs.
- Run SQL preview shows its first 10 values, under the field’s name. It is available once the expression has passed Validate SQL.
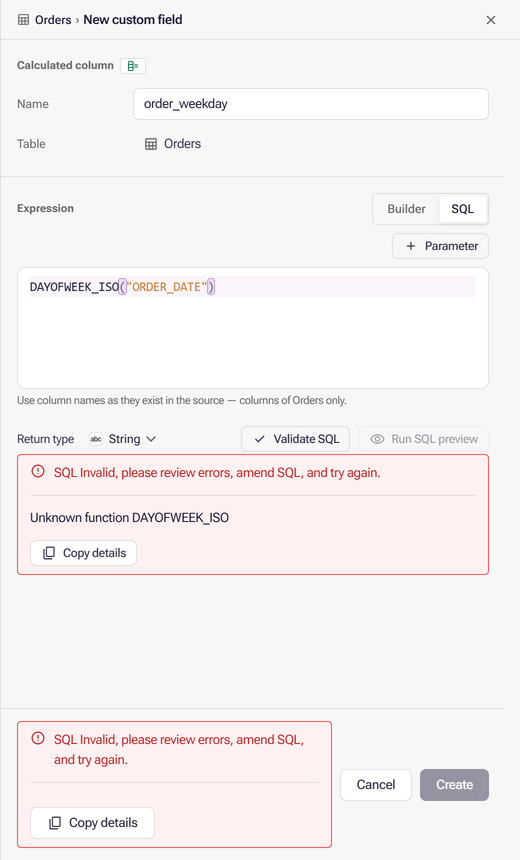
Create checks the SQL against your data source again before it saves anything, and reads Checking SQL… while it waits. If the source rejects it, nothing is created: the panel says SQL Invalid, please review errors, amend SQL, and try again. and shows the source’s own error under the expression. Create also stays unavailable while the name is empty or already taken in the table, or while the expression or a parameter default is incomplete; the panel, or the button’s tooltip, says which.
Example: flag the first weekday of each month
Section titled “Example: flag the first weekday of each month”This field marks the first Monday-to-Friday date of each month with Y, the other weekdays with
N, and leaves weekends empty, so a report can pick out month-start business days. The expression
is Snowflake SQL and expects a DATE column; ORDER_DATE stands for yours.
Before you start: open a semantic layer on a Snowflake connection in the editor, on the Semantic Model → Map tab, with the table that holds your date column on the map.
- On the map, open Table actions on the table that holds the date column and select New custom SQL field.
- In Name, enter
first_weekday_flag. - Paste the expression below into the SQL editor, and replace each
ORDER_DATEwith your column’s Source name. - Leave Return type as String.
- Select Validate SQL, then Run SQL preview to see the first values.
- Select Create.
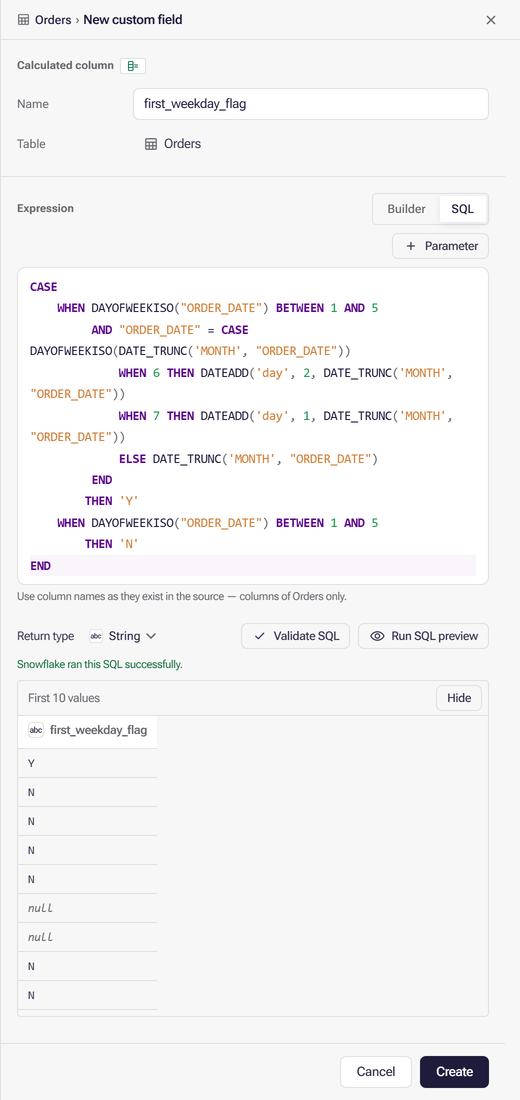
CASE WHEN DAYOFWEEKISO("ORDER_DATE") BETWEEN 1 AND 5 AND "ORDER_DATE" = CASE DAYOFWEEKISO(DATE_TRUNC('MONTH', "ORDER_DATE")) WHEN 6 THEN DATEADD('day', 2, DATE_TRUNC('MONTH', "ORDER_DATE")) WHEN 7 THEN DATEADD('day', 1, DATE_TRUNC('MONTH', "ORDER_DATE")) ELSE DATE_TRUNC('MONTH', "ORDER_DATE") END THEN 'Y' WHEN DAYOFWEEKISO("ORDER_DATE") BETWEEN 1 AND 5 THEN 'N'ENDDAYOFWEEKISO numbers Monday 1 and Sunday 7 whatever your Snowflake week-start setting, so 1 to 5
are the weekdays. The inner CASE finds the month’s first weekday: the 1st itself, or the Monday
after it when the 1st falls on a Saturday (6, two days on) or a Sunday (7, one day on). A weekday
equal to that date gets Y.
To filter or group by the flag, make it a dimension: on the map, open Field actions (⋮) on the new field’s row in its table and select Add dimension, or see Create a field dimension.
Change or remove a custom field
Section titled “Change or remove a custom field”After Create, the new field’s own panel opens, headed Calculated column. Select the field in its table to open it again later. There you can rename it, give it a Display label, and change its expression in either mode; Update runs the same check against your data source before it saves. Renaming a field others use offers to update them too.
Remove lists everything in the layer that uses the field before it goes. To see every custom field in the layer at once, open Tables & Fields and choose Custom field in Filter by data type.
Before you rename or remove a field that reports depend on, Lineage shows which workbooks and Data Apps use it.