Creator or above
Administration
Administration is where a workspace is run: who is in it, what they can reach, how they sign in, where reports are delivered and how Astrato looks. Select Administration at the foot of the lobby’s side rail. It opens on a Search administration box above a list of cards, one per section, each with a View link.
The search matches a card’s title or its description; System Settings also answers to Personal access tokens, PAT and API tokens, which it holds without naming them on its card. When nothing matches, the page reads Nothing in Administration matches that.
Each section has its own address under /web/administration/, such as
/web/administration/groups/, so you can bookmark or share a link to one directly.
Who sees what
Section titled “Who sees what”Your workspace role decides which cards are there.
| Role | What Administration shows |
|---|---|
| Owner or administrator | All fourteen sections |
| Creator | Four sections: Users, Groups, Tenant Permission Requests, Embed Links |
| Designer or viewer | No Administration button in the rail |
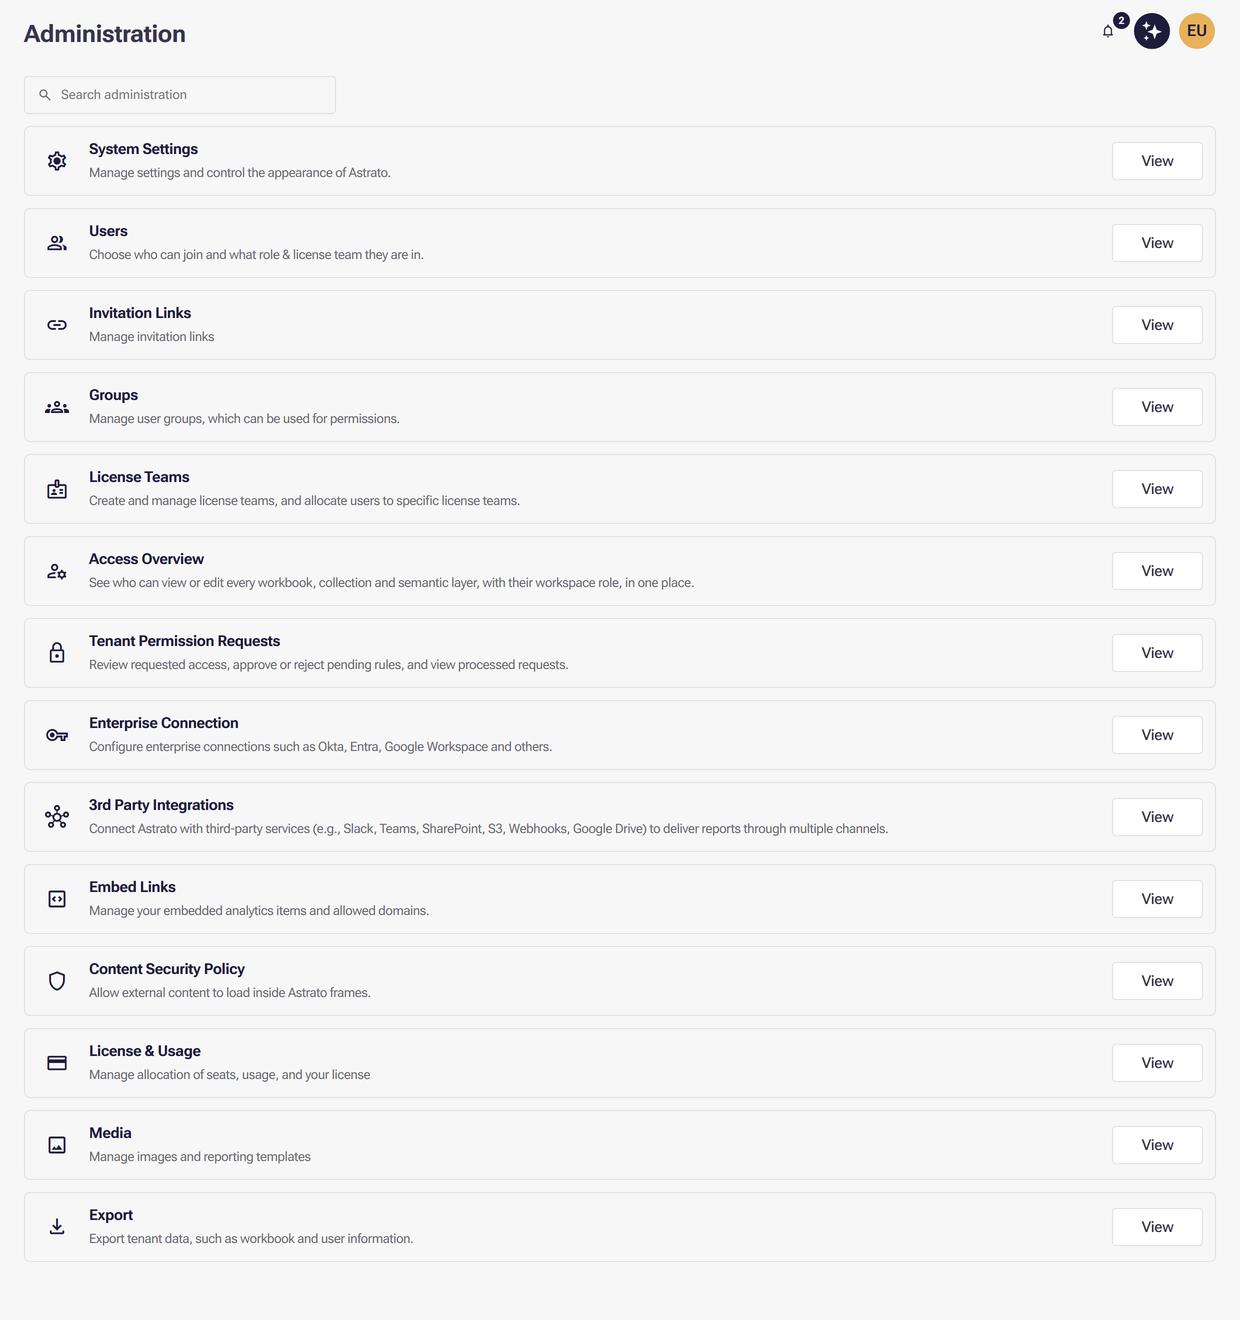
A designer or viewer who opens an Administration address is told Administration is available to the workspace owner and administrators, with restricted access for creators. A creator who opens the address of one of the other ten sections is told This administration section is available to the workspace owner and administrators.
The owner and administrators see the same sections. The difference is inside System Settings: only the owner gets Transfer tenant ownership on its General tab, described in System settings.
What a creator can do there
Section titled “What a creator can do there”Three of a creator’s four cards carry their own descriptions: Users reads Browse users, their roles and license teams., Groups reads Browse user groups and their members., and Embed Links reads Browse your embedded analytics items.
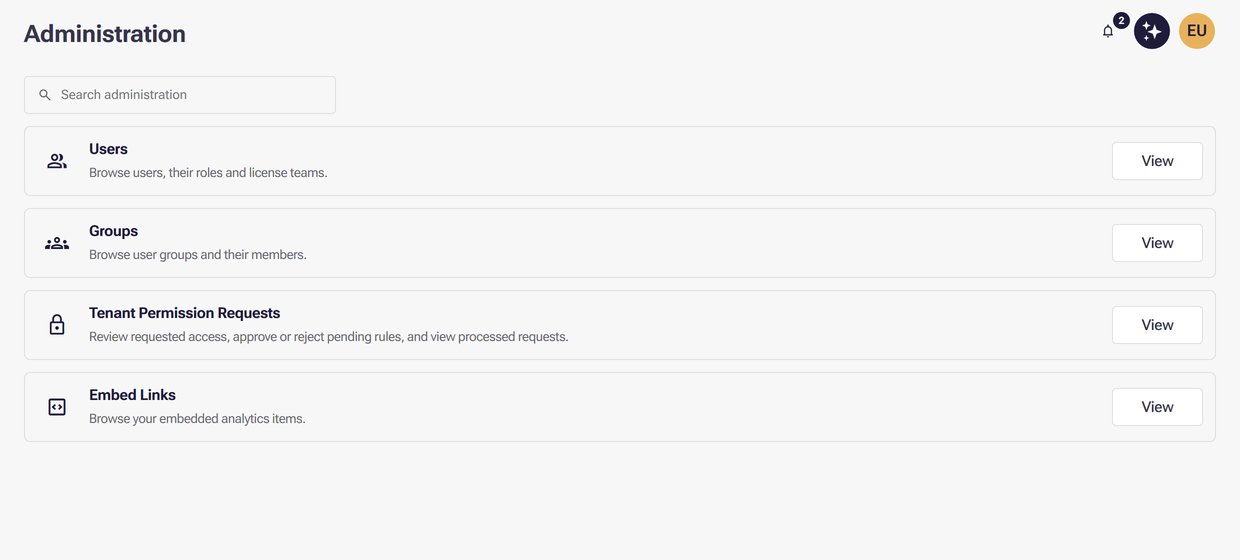
- Users and Groups are read-only. Changing an account, a group or its assignment rules needs an owner or administrator; see Manage users and Manage groups and assignment rules.
- Tenant Permission Requests opens as it does for an administrator. Whether a creator can approve a given request depends on their own access to the resource behind it; see Review permission requests.
- Embed Links opens straight onto the list of embedded items, without the Allow list of domains, which only an owner or administrator can change. A creator can edit or revoke a link to an item they have access to; see Manage embed links.
The fourteen sections
Section titled “The fourteen sections”The cards appear in this order.
| Section | What it is for |
|---|---|
| System Settings | Workspace-wide settings: access policies, SCIM provisioning, the OEM management API and personal access tokens (General), theming (Appearance), each role’s landing page (Default view), the default reporting email and reporting limits (Reporting), Nash (AI) and IP restriction (IP ranges) |
| Users | The workspace directory: each person’s role, status, groups and license team |
| Invitation Links | Links that let people join the workspace |
| Groups | User groups, which permissions can be given to, and the rules that assign people to them |
| License Teams | License teams, and which users are allocated to each |
| Access Overview | Who can view or edit every workbook, collection, semantic layer and data connection, and why |
| Tenant Permission Requests | Requested access to approve or reject, and requests already processed |
| Enterprise Connection | Single sign-on through an identity provider such as Okta, Entra or Google Workspace |
| 3rd Party Integrations | The services reports are delivered through, such as Slack, Teams, SharePoint, S3 and Google Drive, and the email providers that send reports |
| Embed Links | Your embedded analytics items and the domains allowed to host them |
| Content Security Policy | The external content allowed to load inside Astrato frames |
| License & Usage | Your license, seat allocation and usage |
| Media | Images and reporting templates shared across the workspace |
| Export | Workspace metadata, such as workbook and user information, as files or on a schedule |
The AI providers behind Nash have no card of their own: open System Settings → AI and select Manage AI providers, described in AI providers.
Jobs that start elsewhere
Section titled “Jobs that start elsewhere”Two jobs a new administrator does early are not cards here. An owner or administrator adds people with Invite users in the rail; see Invite users. To give one person or group access to one semantic layer or data connection, see Manage resource access.
Before you grant anything, read How access works: it separates roles, groups, license teams and collections, and shows how to plan groups and grant to them rather than to individual people. To do both jobs at once, from invitation to a teammate opening one Data App with its data, follow Invite someone and share one app view-only.
Some of the same work can be done from an AI assistant over MCP, such as changing a user’s role or license team; MCP administration and limits says what it covers and what it does not.
How the lists behave
Section titled “How the lists behave”Where a column can be filtered, a filter button sits beside its name, labelled Filter and the column name. Its menu has one checkbox per value, with Clear filter and Done; once values are selected, the button says how many.
Long lists grow with a button at the foot, named for what it loads: Load more groups, Load more license teams, Load more media, and plain Load more on Users. Two sections page instead: Invitation Links with Previous page and Next page, and Tenant Permission Requests with Previous requests and Next requests.
To change anything workspace-wide from here, start with System settings.