Exporting workbook objects - CSV, XLSX, image and PDF
You can export an object’s data, export an object, group or sheet as an image or PDF to share or print, or copy it to the clipboard as an image. These start from an object’s right-click menu or from the export buttons on the object’s container, and image and PDF exports can also come from an action block:
| Output | Where | What you get |
|---|---|---|
| Data | Right-click an object, then Export to in the editor or Export > Object as in a preview or published workbook | The object’s query results as a CSV or XLSX file |
| Image or PDF | Right-click, then Export > Object as, Group as or Sheet as in a preview or published workbook | The object, group or sheet as it is shown on screen |
| Data or image | The Export to image, Export to Excel and Export to CSV buttons on the object’s container, when they are switched on for the object | A CSV or XLSX file of the object’s data, or an image of the object |
| Image or PDF | The Export … as … action block | The same file, produced when a button or event runs the action |
| Image on the clipboard | Right-click, then Copy to clipboard > Object, Group or Sheet in a preview or published workbook (not in embedded content) | An image ready to paste |
To send these files on a schedule, see Scheduled Dashboard Reporting.
Export an object’s data
Section titled “Export an object’s data”In the editor, right-click a data object and choose Export to, then CSV or XLSX.
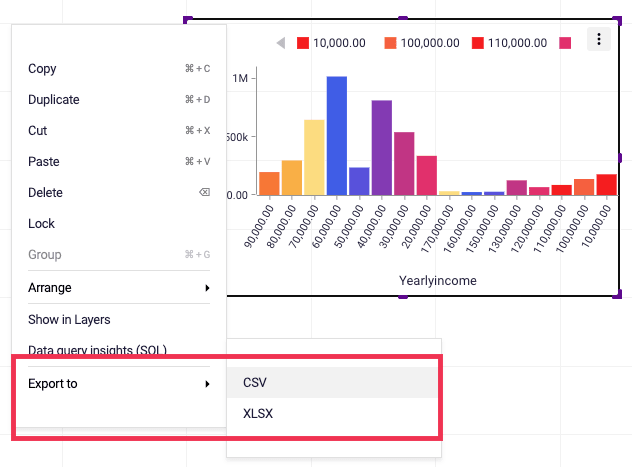
In a preview or published workbook, the same choice is under Export > Object as, next to Image and PDF, once export data is enabled (see the note above). CSV and XLSX are greyed out when the object has no data to export. Any of the four options is also greyed out when the object’s properties limit which export options it offers.
An export holds at most 1,048,575 rows, the most an Excel sheet holds below its header row. A pivot table exports with its pivot layout rather than as flat rows.
Export settings
Section titled “Export settings”An object’s Export settings in the property panel control what the file contains:
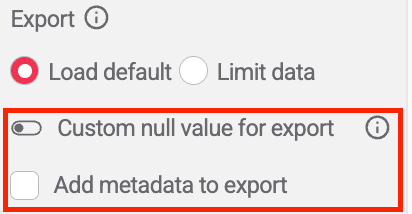
- Load default or Limit data sets how many rows the export holds, up to the limit above.
- Custom null value for export replaces empty (null) values in the file with text you choose.
- Add metadata to export adds a description of where the file came from.
Metadata in the file
Section titled “Metadata in the file”Metadata works for both formats. An XLSX file gets a second sheet named Metadata. A CSV export
downloads as a ZIP file holding data.csv and a separate metadata file.
You choose which entries to include:
- when the export was created
- who created it
- the SQL query behind the object
- the semantic layer the object uses
- the object’s title, subtitle and footer
- one custom row, a name and a value you enter under Custom input
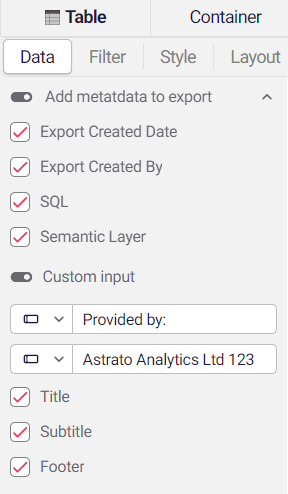
Metadata answers the questions people ask about an exported file later: who exported which object and when, which semantic layer it read, and the exact SQL to rerun in your warehouse. The custom row carries anything else, such as a copyright or disclaimer notice.
Copy to the clipboard
Section titled “Copy to the clipboard”In a preview or published workbook, right-click and choose Copy to clipboard, then Object, Group or Sheet. Group is available when the object sits inside a group; Object is greyed out for a group or a filter bar. Astrato shows “Copy should be ready in a few seconds”, then “Object copied to clipboard.” or “Sheet copied to clipboard.” when the image is ready to paste.
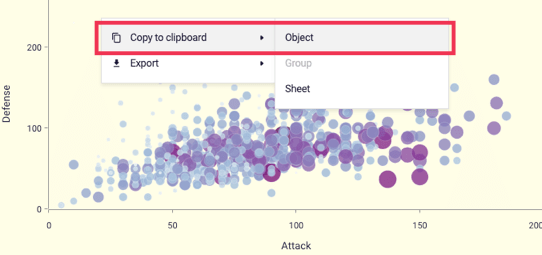
Copy to clipboard needs a browser that allows writing images to the clipboard, and it is not offered in embedded content.
Export an object, group or sheet as an image or PDF
Section titled “Export an object, group or sheet as an image or PDF”In a preview or published workbook, right-click and choose Export, then:
- Object as: CSV, XLSX, Image or PDF. Not shown for a group or a filter bar.
- Group as: Image or PDF, when the object sits inside a group.
- Sheet as: Image or PDF.
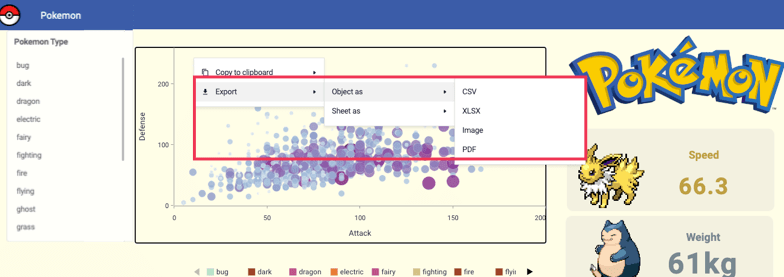
The Export menu appears only when export data is enabled, as described in the note at the top of this page. In embedded content, Sheet as is offered only when a whole sheet or workbook is embedded.
Image options
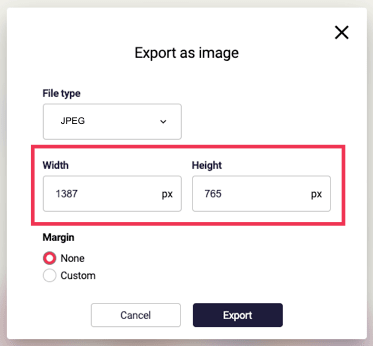
Section titled “Image options”Export as image offers a File type of JPEG or PNG, a Width and Height in pixels, and a Margin of None or Custom. Width and height are separate values, so changing one does not change the other.
PDF options
Section titled “PDF options”Export as PDF offers a Paper size for printing (A0 to A6, Letter, Legal, Tabloid or Ledger, A4 by default), Fit to page, landscape or portrait page orientation, and the same Margin choice.
In either dialog, select Export to download the file.
Export with an action block
Section titled “Export with an action block”The Export … as … action block exports an object, group or sheet as an image or PDF when an action runs, for example from a button. It takes the same width, height, paper size, orientation and margin settings as the dialogs above. See Astrato Action Blocks for how to build actions.